Tuesday, 29 January 2019

Create Art - Shabby Chic Decorative Plate

Hey guys
Today I have a  shabby chic decorative plate for you all. I have never tried image transfer and this will be my first attempt at it.....I have to say I'm pretty happy to see the result I got. Also Shabby chic is my go to style of art and I love to give my projects that feel. For me no project is complete without the touch of Little Birdie flowers.....
Its all about the new Little Birdie Instant Image Transfer Gel this month on Itsy Bitsy's blog and you all can participate on it by clicking HERE. This product can be used for transferring images onto just about any surface including wood, MDF, metal, glass and it takes 5 to 10 mins to dry...so that's a quick image transfer medium!! This is water soluble so it's easy to wipe with soap and water and is also non-toxic.
I have a tutorial for his project on the Itsybitsy blog and you can read it by clicking HERE. I am sharing a few pics of my project here...I hope you all like it.


I  am putting this up at

  1. HLS January Mixed Media Challenge - Anything Goes - Layers

Sunday, 27 January 2019

The Green Grass - My First Mixed Media Art Journal Page

Hey guys
I am super super excited to show you all my very FIRST ART JOURNAL PAGE. I have never made 1 before and it was in my bucket list and I finally thought its time to give this art form a try. I have to say...its really stress busting....I had such an amazing time playing with my mediums and colors....everyone should make an art journal.

  I am putting this up at the following Challenges -
  1. Lindy's Stamp Gang - January 2019 challenge 
  2. More Than Words - January 2019 Challenge - Goals and Journaling
  3. Art and Soul studios - January 2019 Challenge - I have used products available in your store - Lindys, Little Birdie and Prima Marketing.


So this year, I have decided to make atleast 1 art journal page every month with some positive quote and the GOAL is to have a dozen by the end of the year....fingers crossed. I tend to get busy with my work and forget a lot of things....and so I have a post it on my wall....which I call my Goal List with a few things I have to do this year.
Over a period of time...since I have been crafting....I have gone through lot of emotions...some good and some not so good. There have been times when I have been content with my projects...felt proud and happy....but there have also been times when I have thought to my self If I am noticed by anyone? ...or Am I not deserving enough? ...... or Is someone else better than me?......these feeling are not the best and really bring you down.....So I want to remind myself WHY I STARTED CRAFTING? Its because it was fun and made me happy...relaxed me and helped me forget all the other not so good things happening around....So I have made this journal page to remind me to APPRECIATE MYSELF.... LOVE MYSELF....STOP COMPARING WITH OTHERS & KEEP CRAFTING LIKE NO ONE IS WATCHING YOU....


Enough with the heavy...I have a small clip so you can see this page upclose and I hope you all will like it....
I have used a lot of mediums from ItsyBitsy,  Finnabair and Lindys Stamp gang and a few things from my stash. Here is a list of supplies:-


  • Distress Ink, Archival Ink etc
  • Finnabair - Prima Marketing Inc
      • 3d Matt gel medium
      • Clear Gesso
      • Art Ingredients - Art stones - 
      • Stamps - honeycomb, script
  • ItsyBitsy - https://www.itsybitsy.in/ (Little Birdie)
      • 2 - 1 Modelling Paste
      • Black Gesso
      • Chalk Paint - Snow
      • Soft Matt Gel Medium
      • Stencil - Script, Rectangle Jungle, Doily Dou
      • Flowers
      • Cheesecloth
      • Washi tapes
      • Brown thread
  • Lindys Stamp Gang - Magical shakers 

    Friday, 25 January 2019

    Say Yes to New Adventure - Mixed media Tag

    Hello guys
    I am so excited to show off my first mixed media project for 2019. It definitely took me a while to get into the groove after all the parties and vacation.
    I have a mixed media tag to share with you all today which was so fun to make. I have used embellishments from Finnabair ,magical shakers from Lindy's Gang and mixed media mediums from Itsy Bitsy (Little Birdie Crafts).

    All the flowers I have used are handmade by me.....I made a bunch of these a while back and finally used a few today. The pretty feathers tucked in on the left are also handmade by using feather stencil and sparkle paste on clear acetate (ItsyBisty) and fussy cut.


    I am putting my tag up at the following challenges -
    1. More Mixed Media Challenge - January 2019 - Anything Goes optional Blue
    2. Mixed Media & Art - January 2019 Challenge - Coolness

    This year I am trying to improve my product photography skills so that is a little adventure I am taking....finding new software and improving my skill set.

    Monday, 21 January 2019

    Vintage Scrapbook for a Man | Mixed Media | Steampunk

    Hello guys
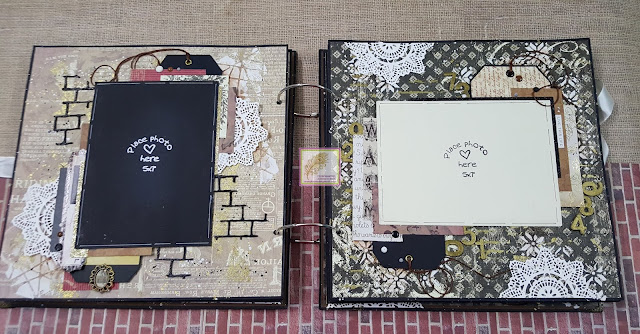
    Today I have a mixed media scrapbook to share with you all. I reason why I call this project as scrapbook as each page is a 12" by 12" layout filled with mixed media techniques and keeping a picture as the focal element......Super happy to share the way it has turned out.
    This project was exclusively made for a client who wanted every page to be treated as a mixed media layout perfect to celebrate a man. A lot of hardwork has gone into making this scrapbook and its all worth it because she loved it.
    This album measures 12" by 12" and is 3" thick. It has 6 mixed media pages which are beautifully embellished with chipboard shapes, paint splatters,stenciling and heat embossing and each page takes 1 or 2  5" by 7"  pictures.
    I have used a lot of magical shakers from Lindy's stamp Gang, Art Alchemy waxes from Finnabair a lot of embellishments from Prima Markerting. The papers used are from Eno Greetings Retro Series which gives this scrapbook a very vintage steampunk masculine feel.I am in love with this album and I hope you guys love it too.
    Without much adieu I am sharing  a video walk through of this mixed media goodness and a few pics of the inside.


    I am putting up this album at the following blog challenges:-

    1. Lindys Stamp Gang - January 2019 Challenge
    2. All Sorts Challenge Blog - Week 503 - Make it Masculine.
    3. Double D Challenge - Looking back in time - This scrapbook is made to hold memories.....so almost like looking back in time.
    4. HLS Mixed Media Challenge January 2019- Layers - This scrabook has a lot of layering on every page....as every page is a layout.
    5. Mini album Makers challenge - January 2019
    No photo description available.

    Supplies used:-
    1. Eno greetings Retro Series Paper pack
    2. Black Cardstock - 220 gsm
    3. Chipboard 900gsm
    4. Binder rings -75mm
    5. Finnabair Art alchemy wax - Vintage gold, Copper 
    6. Pima Marketing Doily die
    7. Itsybitsy - stencils, modelling paste, stamps etc
    8. Tinted metallic paints - ItsyBitsy
    9. Chipboard gears - ItsyBitsy
    10. Lindys Stamp Gang - Magical shakers 
    Thank you so much for stopping by.

    Friday, 18 January 2019

    Be Mine - Shabby chic Handmade card

    Hello everyone
    I am sharing a new card I made for The Valentine's Day with you all today. I love making Shabby chic projects and cards are fun to make. I love playing with flowers and sequins and so I came up with this card.
    This is a shaker card filled with sequins and glitter mix in the tones of red, pin and gold. The heart shaped shaker window is a embellished with pretty flowers and buds and a few flourishes.
     I finished it all with a white ribbon bow onto the side and few gold sequins sprinkled here and there.
    The card has a gold heat embossed sentiment BE MINE which I think makes it a cool Proposal card...what do you think?
    Supplies used - Mostly all the supplies used are from ItsyBitsy store.
    1. Red Cardstock (250gsm)
    2. White Heavyweight cardstock (270 gsm)
    3. Gold Glitter paper 
    4. Pink Cardedstock (250gsm)
    5. Handmade flowers
    6. White Satin Ribbon 
    7. Sisal Fibre 
    8. Heart die
    9. Sequins and gold glitter
    10. Gold heat embossing powder, heat gun and versamark
    11. Be Mine sentiment - local stamp

    I am putting this card up at the following challenges:
    1. Cute Card Thursday Challenge # 565 - Banish the Blues - For me it means using anything apart from Blue colors as well as the mood blue.
    2. Sisterhood of Crafters - Make it Sparkle
    3. Crafty Gals Corner #183 - Make it Sparkle
    4. HLS Anything Goes with dies - January 2019
    5. Through The Purple Haze Challenge # 152 - Favorite Color - My Fav color is Pink and Red. So most of my work will have a bit of these.

    Thursday, 3 January 2019

    Sweet Baby Boy Interactive Mini Album

    Hello everyone
    Wishing you all a very Happy New Year...I hope you all have a fun celebration to bid 2018 goodbye...I had a fabulous time as well....but then its time to get back to work again.Today I have a Baby boy mini album to share with you all today. This cute album was made on commission for a new born baby boy and comes with a box to hold the album secure.
    The album measures 8.5" x  9" with a 4" spine and has 6 interactive and a few pop up pages. Since this album was made for a new born, I have given 12 dedicated monthly pages along with ample journalling spots and milestone tags.


    This album will hold 70 75 pictures and if you paste on both sides of the photomats it will hold 125 pictures in all. Every page has interactive elements and tastefully decorates using stickers and ephemeras. I have used Sweet Baby Boy collection from Echo Park Papers to build my project. I really enjoyed working with this collection because I was finally excited to use non traditional baby boy colors like brown and green and I clubbed them with grey, yellow, blue and pastel turquoise which coordinated so well with the colors in the papers.


    The cover of the album has a fun shaker window in the center and some mixed media work with the name of the boy on the side. The spine and back are kept simple to make it easy to use and store. the box is also relatively simple with decoration for ease in handling and storage....however there is a back pocket on the box lid to store more pictures.
    I really hope you like my album as I surely am very happy with the way it turned out. Here is a video tour of this project...I really recommend you watch it to get a better feel of the interactive elements.  I am putting up this album at the following challenges:
    1. Mini Album Addicts - January 2019