Saturday 28 May 2016

Thanks!

Hello everyone

Today I have made a card for Paper smooches May challenge and A Blog Named Hero challenge for this month.The May challenge for Paper Smooches requires us to do a Rainbow themed card while the May challenge for A Blog Named Hero requires us to a Tone on Tone card. So I have clubbed these challenges and done a Rainbow themed tone on tone card.

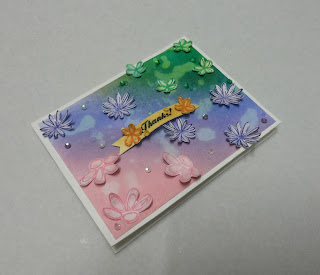
 On a piece of watercolor cardstock, I stamped 4 different flowers from the Fiskars Petals from scratch stamp set with 4 different Distress Inks- Shaded Lilac, Spun Sugar, Peacock Feathers and Squeezed Lemonade. I then went ahead and water colored the flowers using the same distress inks. Now I stamped on the same image using Ranger dye inks in Pink Gumball, Grape soda, Lemon Twist and Peacock feathers distress inks to give them crisp outlines.
I fussy cut all the flowers and curled them a little at ends. I also added colors to the edges so no white is shown. I went ahead and took a 4 . 25" x 5 . 5" white heavyweight cardstock and did a little ink blending on them using Spun sugar, Shaded Lilac and Peacock Feathers. I misted the cardstock with water and let it be for 60 secs. Then I removed the excess with a tissue paper.
I trimmed the card front by 1/4" from all sides and mounted it on the card base which is 4.25" x 5.5" white cardstock (220gsm).On this I added all the cut flowers on their respective colored areas. I then did ink blending on a piece of white cardstock using Squeezed Lemonade Distress Ink. On this I stamped Thanks! sentiment which is from Inkadinkado Expressions And Frames Clear Stamp Set, I cut banner ends and then mounted this sentiment on the card using foam squares such that the sentiment is a bit curved and looks raised. On the sentiment too I added the flowers. I also stamped little circles on the card with the respective colors for a tone on tone stamping effect. If you look closely, it will be seen.
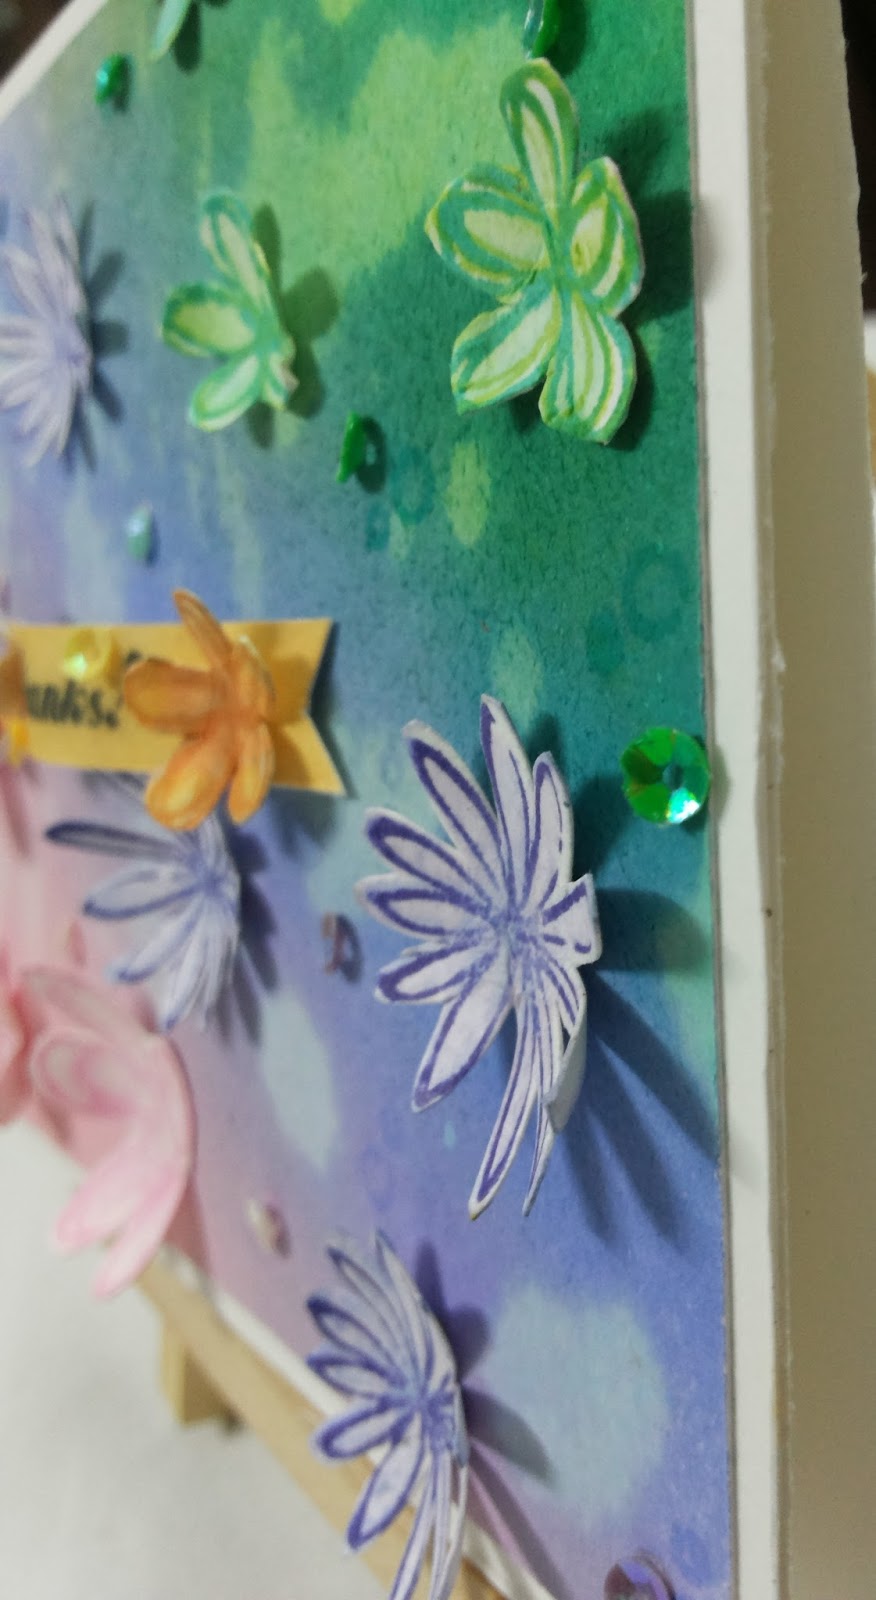
To finish the card I added a few sequins which are of same color tone as the colors on the card. For the inside, I just added a simple stamp that says " for making my day special"
Thank you for reading my blog post and I hope you all liked my card. Have a great day and keep smiling.....

Friday 27 May 2016

Cardboard Photo Frames- 2

Hello again
How are you all? I hope you guys are doing great. Picture frame, no matter how much we like them tend to become passe' after awhile. So why spend a lot of money on buying frames when you can make your own frames. Gather up some cardboard, get your tools and make your own frames.

I have made cardboard photo frames which are incredibly easy and super fun. It uses very few supplies and to be honest I used a few scraps lying in my work space. The ones I made today have an added feature of changing photos, unlike other frames you need not stick the photo to your frame. We will make a slider and you can keep changing the pictures by simply sliding them inside the frames. Also this frame has a back rest, so you can recline it unlike the earlier tutorial which was for sticking your frame on walls or wardrobes.
So let's get to work.....

Materials:
  1. Mountboard/ Cardboard
  2. Pattern Paper
  3. Strong glue
  4. Scissors/ cutters
  5. Score board( optional)
  6. Embellishments :Mulberry flowers, leaves, Rhinestones. sequins, Satin ribbons, twines and satin threads etc
Procedure:
  1. Lets first measure the size of the picture you want to frame. Mine is 4. 5" x  3. 5". So, I took a mountboard which is 6" x 5".( the frame should be at least 1. 5" to 2" bigger than the picture from all sides)
  2. Now, draw a rectangle inside the mountboard 1 " from the edge from all sides. Once, you draw your rectangle, use cutters to cut it out. Your basic frame structure is ready.
  3. Take pattern paper which is slightly bigger than your frame so that you can fold it in the other side and glue it. This allows the edges to be covered as well. Make sure the glue you use is strong.
  4. Ok, so I took a 7 " x 6 " pattern paper and adhered on the front side of the frame. Then, I cut diagonally the pattern paper which is seen where the rectangular piece was cut. Now fold the inner part of the paper onto the frame and cut the excess. Once you do this, fold the excess paper from the edge onto the frame. Your entire frame should now be covered properly.
  5. Once done, make 2 cm strips from the same pattern papers which are 6 cm in length( strips should be smaller than the frame size). We need 2 strips and cut one of the strips lengthwise in half. Fold them in the middle and apply glue to one half of the strip widthwise. Glue this strip on the back of the frame in such a way that it is bordering the inside hollow space, but make sure that the glued half is placed on the outside. Repeat on 2 more sides. The strips will over lap each other at vertices. Glue the overlapping strip onto the other strip. This will give us the required section to slide our photos in the frame and change the photos when you want. Do not stick the overlapping pieces to the frame.
  6. For the back stand, I have used 5" by 8" cardboard piece and folded it in the middle. Then I folded 0.5" at both the ends. Covered the entire piece with paper. Then I adhered it to the frame base at the back at the lowerside at the the two folded parts such that the cardboards folds to form a V.
  7. That's all, embellish your frames and you are done.
  8. I have used various products to embellish my frames like stickers and flowers. I have even added few butterflies, mulberry flowers and leaves, pollens, sentiment stickers , rhinestones and flat back pearls .
I am uploading a video for you all. It might sound difficult but its really simple. Took me 30 mins to make a single frame and 10 mins was spent on embellishing them........lol.

I have made few more frames with different sizes but they all are rectangular in shape. You can also made frames in other shapes likes circular or oval or polygonal shapes.

I hope you all liked it and will make soon to display your memories. Thank you guys and see you all soon with a new project.

Thursday 26 May 2016

Pink gift box

Hello everyone

Today I am posting this very cute gift box. It is small in size and ideal for little treats or goodies. It it very different type of box as it had not additional lid or flip up lid, the id is already attached to the box.


To make this box, I needed very few supplies and making time is 15 mins. I had made this box by accident when I was playing with a piece of paper. After, I was done I made a few tweaks and I got this box.


So I am uploading the pictures and a little video showing you the box. If you guys want a tutorial, please let me know and I will upload it very soon.

I have however used, a gold printed pink cardstock for this box and decorated it with gold chevron pattern washi tape, an eno greeting handmade sticker embellishment and few pearls. I have used red tacky double side tape and fevicol as adhesives for this box.

Real simple, real quick and really easy box.
Thank you and have a great day.

Tuesday 24 May 2016

Happy Birthday(shaker balloon card)

Hey all

Its getting hotter by the day, so please drink enough fluids to keep yourself hydrated. I did a new card today which is all pastel and all sequins.....its another shaker card but this time it carries shaker balloons and Happy Birthday sentiment.

My card is inspired by Halak Shah's card which she made for Peek-a-boo Inspire yourself challenge. Her card inspired me to use pastel colors, sequins, washi and paper tapes and hearts and stars which I have accomodated in the form of sequins.
I am putting this card up for the Peek-a boo May challenge.

To begin, I made 5 small shaker balloons using pale yellow cardstock, acetate sheet and pretty pretty sequins. I have used distress inks to color the balloon edges and the colors I used are Worn lipstick, Spun sugar, Shaded lilac, Peacock feathers and Squeezed Lemonade. I fussy cut all the balloons using a pen knife.
I filled the balloons with matching color sequins. I used few blue flat sequins, purple cone sequins, red heart confetti sequins,yellow flat sequins and pink star confetti sequins. I was inspired by the hearts and starts stamp on Halak's card and so I used star and heart confetti in my card.

I adhered these balloons onto a pale yellow card base which is 5. 25 " square card. I also added bakers twine in matching colors to the balloons. I finished the card with Happy Birthday sentiment from Grand Handwritten Sentiments from Just Rite stamps. I stamped it on the same pale yellow cardstock and mounted it on black cardstock for a better effect.
 Embellished the front with some gold chevron washi tape, pink chevron washi tape and violet polka dotted paper tape. Added few silver sequins to finish the front. I have distressed the card front with the cutter to make it look worn out.
Now, Its a pull out pocket card. To make the pocket, I simple used a 5.5" x 11" black cardstock and score it in the center. I folded and glued the cardstock together on 3 sides while leaving one side open to fill in the card. I adhered my card front on the black cardstock pocket using foam tape. I kept the pocket opening on the right side of the card.
 For the pull out card, I used a pale yellow cardstock which is 4. 75 " x 4. 75 " on which I added thin strips of gold chevron pattern washi tapes at the two ends. I also added balloonc which I cut and distressed with peacock feathers, shaded lilac and spun sugar and drew strings using black waterproof pen. Finished the inside with a happy birthday sentiment near the strings and little sequins to the balloons.
To enable the pulling out of the card, I added a little black cardstock tab and a lilac bakers twine bow to it.
I hope you guys like it. Thank you for reading my blog. Have a great day.

Monday 23 May 2016

Thankful for adding colour to my life...

Hello guys

How are you all today? Its very cloudy today, here in Mumbai with little peeps of sunshine. Can't stop thinking about rains and rainbows and beautiful colors. So to distract myself, I made a handmade card and yes its a rainbow shaker card.

This card is inspired by all the colors of summer and since its about to rain in few days...I made a rainbow colored shaker card. I am entering this card at Peek-a-boo May challenge and Paper Smooches May challenge.

My card takes inspiration from the Rainbow theme for the Paper Smooches challenge for this month as well as Manu Gupta's Card and I have incorporated the rainbow colors, sequins and stamping.
To make this card, I have used 5.5 " square white heavyweight cardstock for base as well as the front window. I have hand-drawn the desired shape on the cs and then cut it using a sharp cutter.
Then, I cut the same size acetate sheet and adhered it to the back of the fussy cut cardstoc. You can also use a die for creating a shaker window, as I do not have such a die, I went ahead and fussy cut it.
After adhering the acetate sheet, I have added thin strips of foam adhesive on the trellis like pattern. Be careful as you do not want the foam tape to be seen from the front.
Now. I brushed the edges of the foam tape with baby talc to remove any unwanted stickiness as we are going to add sequins to it and we do not want them to stick to the sides.
I added sequins in the partitions carefully. I also glued a few of them on the cardstock base so that it wont look empty. You can adhere this window to another 5.5" square cardstock or directly to your card base. I adhered it to the another cardstock.
I have added Paper Smooches thankful sentiment to the white cardstock.This I added to the black cs and did banner cuts at both ends. I mounted this sentiment to the card using foam adhesive.
For the inside, I added few sequins in all the rainbow colors and handwrote the sentiment " for adding colour to my life..." with a waterproof black gel pen.

That completes our card for today.I hope you all liked it and thank you for reading my post. Till next time....keep smiling.

Sunday 22 May 2016

Mountboard/Cardboard Photo frames

Hello again
How are you all? I hope you guys are doing great. Picture frame, no matter how much we like them tend to become passe' after awhile. So why spend a lot of money on buying frames when you can make your own frames. Gather up some cardboard, get your tools and make your own frames.

I have made cardboard photo frames which are incredibly easy and super fun. It uses very few supplies and to be honest I used a few scraps lying in my work space. When done, you can hang them on walls or just stick them to your plain wardrobes to bring in some life. The ones I made today have an added feature of changing photos, unlike other frames you need not stick the photo to your frame. We will make a slider and you can keep changing the pictures by simply sliding them inside the frames.


So let's get to work.....

Materials:
  1. Mountboard/ Cardboard
  2. Pattern Paper
  3. Strong glue
  4. Scissors/ cutters
  5. Score board( optional)
  6. Embellishments :Mulberry flowers, leaves, Rhinestones. sequins, Satin ribbons, twines and satin threads etc
Procedure:
  1. Lets first measure the size of the picture you want to frame. Mine is 4. 5" x  3. 5". So, I took a mountboard which is 6" x 5".( the frame should be at least 1. 5" to 2" bigger than the picture from all sides)
  2. Now, draw a rectangle inside the mountboard 1 " from the edge from all sides. Once, you draw your rectangle, use cutters to cut it out. Your basic frame structure is ready.
  3. Take pattern paper which is slightly bigger than your frame so that you can fold it in the other side and glue it. This allows the edges to be covered as well. Make sure the glue you use is strong.
  4. Ok, so I took a 7 " x 6 " pattern paper and adhered on the front side of the frame. Then, I cut diagonally the pattern paper which is seen where the rectangular piece was cut. Now fold the inner part of the paper onto the frame and cut the excess. Once you do this, fold the excess paper from the edge onto the frame. Your entire frame should now be covered properly.
  5. Once done, make 2 cm strips from the same pattern papers which are 6 cm in length( strips should be smaller than the frame size). We need 2 strips and cut one of the strips hlengthwise in half. Fold them in the middle and apply glue to one half of the strip widthwise. Glue this strip on the back of the frame in such a way that it is bordering the inside hollow space, but make sure that the glued half is placed on the outside. Repeat on 2 more sides. The strips will over lap each other at vertices. Glue the overlapping strip onto the other strip. This will give us the required section to slide our photos in the frame and change the photos when you want. Do not stick the overlapping pieces to the frame.
  6. That's all, embellish your frames and you are done. 
  7. I have used various products to embellish my frames like stickers and flowers. I have even stamped few sentiments and even handwritten a few. 


I am uploading a video for you all. It might sound difficult but its really simple. Took me 30 mins to make a single frame and 10 mins was spent on embellishing them........lol.
I have made few more frames with different sizes but they all are rectangular in shape. You can also made frames in other shapes likes circular or oval or polygonal shapes.

I hope you all liked it and will make soon to display your memories. Thank you guys and see you all soon with a new project.