Showing posts with label a blog named hero. Show all posts

Sunday, 2 October 2016

Happy 1st birthday

Hello all
Its been long since i have blogged about something. Though I have been adding pics and products on facebook....I haven't really posted anything here. Its new month and new challenges are announced and it makes me all excited to make something new...its fun to work within the given guidelines...kinda tests my limits and makes me think a little different.
So here is a new card which I have made to participate at the monthly challenge at Peek-a-boo designs. They have completed one year and the challenge is to make a card using red, gold and number 1 with a additional twist using stenciling or 3d Layered projects or dash of glitter or your own stamped background.
My take on this Recepie challenge is the above card. I have incorporated glitter in the form of glitter pens and chunky glittered number, gold sequins and gold microbeads, red stenciling and red cardstock and I have made my own background on the shaker window using hearts from peek-a-boo stamp set.
I am also linking this card to Paruscardmakingchallenges for this month which says a hint of gold, creative with stamps Sentiment challenge for october and A blog named hero october challege - Geometric.

Also, I am putting my card up at Lulupu october challenge - bling a ding with a stamping twist. which says we need to more than a sentiment and since i have stamped some hearts on the card....I thought to put it up for this challenge.

I started with stenciling using Itsybitsy stencil and Memento Lady bug dye ink. Then I made a shaker window using some acetate sheet and a cardstock frame. I made my own background on the frame using heart stamp from Peek a boo Place Photo stamp. I used the little heart from this stamp set as I wanted to add hearts and I thought to use this stamp set and put it to a different use than what we usually use it for.
I scribbled inside these hearts using gold pen and then added Itsybitsy gold sequins and Itsybitsy microbeads inside the shaker window. For the sentiment on the card, I tore some vellum and then stamped the sentiment using Black Archival ink pad. The sentiment set is from JustRite Grand handwritten sentiments, The number one is made using Black chipboard which I cut and added some chunky glitter again from Itsybitsy. I finished the card front using some gold and black sequins
For the inside, I didnt do much except stamp the sentiment on white cardstock using Itsybitsy Black Pigment ink pad.the sentiment is from Peek a boo Happy birthday to you stamp set. It got a bit smudged and I had to go over it with a microtip black pen.
Well that's my card. I hope you all like it. Thank you for reading my post.

Tuesday, 21 June 2016

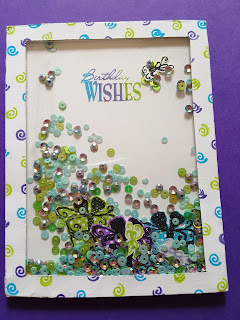
Birthday Wishes - Gift shaker card.

Hello everyone
How are you all? i hope you all are doing fabulous. Today I am posting a shaker card which is filled with sequins and handmade shaker elements. It carries a colorful birthday sentiment with it, which is stamped using 3 colors applied on the same stamp.I am sending this card to the this month challenge at A Blog Named Hero,Creativity with stampsPeek-a-boo designs and Craft Stamper.
  • Peek-a-boo Designs - Anything Goes ( I have used an old stamp sets and vellum and sequins are new stash.
  • A Blog Named Hero - Vellum is used as card base.
  • Creativity with stamps - Manly Card (This card is made using masculine colors like blues and purples)
  • Craft Stamper - Lets Get Inky ( I have used sketchpens and Dye inks
I have used a clear vellum for the base of this card which is in standard A2 size of  4 . 25"x 5 .5 card base. I then went ahead and cut another card base of same size from white heavyweight cardstock. I then cut the white cardbase into 2 parts. Resized one part of the cardstock by 1/8" on all sides and adhered it inside the vellum cardbase,
Now for the card front, I made shaker gift elements using some paper tapes, scraps of cardstock and stamps from GIFTS - HOTP Small Stamp Set. I glued purple, blue and lime green polka dotted paper tapes on scrap cardstock pieces. Then I stamped them using 2 gift stamps using Memento tuxedo Black ink and then fussy cut them. I made 6 gifts of 2 different sizes in 3 colors. Then, I also stamped and fussy cut some bow stamps from the same set.
I cut the white cardstock frame which is 1/4" thick on all sides to make the shaker window. I glued it to acetate sheet which is 41/8"x 5 3/8" in size. Then I added foam adhesive on the edges of the frame carefully not to show any from the sides. I brushed the window with nti static powder before adding shaker elements to avoid them sticking inside.


For the back, I used the other part of the white cardstock I cut earlier and stamped it with Birthday Wishes sentiment from Birthday wishes stamp set from Inkadinkado using Electric Lime dye ink from Ranger, Bahama Blue and Grape Jelly dye ink from Memento. I then filled up the window with green, blue and purple sequins, gifts and bows I made and then attached it to the vellum cardfront. I drew a few swirls using waterproof sketchpens to add some color to the frame of shaker window.

I added 3 gifts to the inside of the card to complete it. That's it and our cute shaker card is ready. I hope you all liked it. Thank you for visiting me.

Saturday, 11 June 2016

Galaxy card - Happy Father's Day

Hello everyone
I am back with another Father's Day card. Its June and Father's Day is just around the corner. Its time to celebrate our father and father figures in our lives....and so I made this one for my Father-in-law from my husband and myself.
I am sending this card to the this month challenge at A Blog Named Hero, Creativity with stamps, Peek-a-boo designs, Craft Stamper and Paru's Card Making challenges.
  • Craft Stamper - Lets Get Inky ( I have used watercolors, Dye inks and Fine-tip Pens) 
  • Peek-a-boo Designs - Anything Goes ( I have used an old woodblock stamp and pale grey cardstock used for card base while the watercolors and vellum is new stash) 
  • A Blog Named Hero - Vellum ( I have stamped the sentiment on star pattern clear vellum) 
  • Paru's Card Making Challenge - Father's Day ( The card is made to celebrate Father's Day) 
  • Creativity with stamps - Manly Card ( The card I made is to celebrates all Father figures)
I made made a watercolor card which is inspired from the sentiment " You mean the World to me".
I used rainbow watercolors and applied it randomly on my watercolor cardstock. Once dried, I applied black watercolor to the cardstock while keep it saturated at few places while a bit watery at other places. I removed excess color using a tissue paper. Once it dried, I used white watercolor to add splatters on the card which would resemble the stars. I have used camel watercolor tubes and watercolor cakes.
I mounted it on a pale grey cards which is 4 .25" by 5 .5". Now I added a star pattern vellum on this card  and stamped Happy Father's Day on it using Memento Tuxedo Black dye ink. The stamp Is woodblock mounted local stamp which I had bought years ago.

However, the stamp didn't quite stamp properly and so I had to redo it using waterproof blank pen. I have handwritten the sentiment "You mean the world to us"on the inside an added a few stars that fussy cut from the vellum.
I am uploading a video to show how I made this card.
I hope you like my card and thank you for visiting me.

Sunday, 5 June 2016

Happy Father's Day

Hey Guys

Happy June to all of you. Here today I will be posting a Father's Day Card I created for the new challenge at Craft Stamper, Paru's Card Making ChallengesCreativity with stampsPeek- A Boodesigns and A Blog Named Hero.
Craft Stamper - Lets Get Inky ( I have used watercolors, Dye inks and Fine-tip Pens)
Peek-a-boo Designs - Anything Goes ( I have used an old woodblock stamp and blue cardstock used                                      for card base while the watercolors and vellum is new stash)
A Blog Named Hero - Vellum ( I have stamped the sentiment on pale yellow vellum)
Paru's Card Making Challenge - Father's Day ( The card is made to celebrate Father's Day)
Creativity with stamps - Manly Card ( The card I made is to celebrates all Father figures)
Its June and its the time to celebrate all the Dad's and Grand dad's  and Uncles. We all will be celebrating Father's Day on June 19th and I just can't wait to give the card I made to my father. I am planning to do one more for my father-in-law which I will upload shortly.
For my card, I have used Sky Blue Cardstock for the base which is 5 . 5" x 4 , 25" in size and I glued off white cardstock on it which is 0 . 25" small on sides then the card base. I went ahead and drew the image of a Dad octopus and a daughter octopus on a watercolor cardstock. Then I water colored the 2 images using Camelin watercolors. I did layers of watercolors on the images and outlined it with waterproof black finetip pen and fussy cut the images. I also drew and colored a small mustache for the Dad octopus and fussy cut it too.
I added the 2 pieces on the card using foam adhesive. I added 2 layers of foam tape to the daughter octopus to make it look as if she was sitting on her Dad's lap. I added mustache to the octopus using foam tape too.
The sentiment I added is Happy Father's Day is a very old woodblock stamp which I had bought from a local store and I dun't know the brand. I stamped in on pale yellow vellum with Memento Tuxedo Black dye ink,which I mounted on layers of cardstock and onto the cardbase. I used a red fine-tip waterproof pen to draw some hearts on the card and a Black waterproof fine-tip pen to add stitched marks around the card. I did not add any sequins or glitter as I wanted the card to be manly and simple.
To finish the card, I stamped you'r the best sentiment of the inside of the card which is from Petals from scratch stamp set from Fiskars.

I hope you all liked the card. Thank you for reading my blog post and dun't forget to wish your Father and Grandpa ad Uncle on June 19th.

Saturday, 28 May 2016

Thanks!

Hello everyone

Today I have made a card for Paper smooches May challenge and A Blog Named Hero challenge for this month.The May challenge for Paper Smooches requires us to do a Rainbow themed card while the May challenge for A Blog Named Hero requires us to a Tone on Tone card. So I have clubbed these challenges and done a Rainbow themed tone on tone card.

 On a piece of watercolor cardstock, I stamped 4 different flowers from the Fiskars Petals from scratch stamp set with 4 different Distress Inks- Shaded Lilac, Spun Sugar, Peacock Feathers and Squeezed Lemonade. I then went ahead and water colored the flowers using the same distress inks. Now I stamped on the same image using Ranger dye inks in Pink Gumball, Grape soda, Lemon Twist and Peacock feathers distress inks to give them crisp outlines.
I fussy cut all the flowers and curled them a little at ends. I also added colors to the edges so no white is shown. I went ahead and took a 4 . 25" x 5 . 5" white heavyweight cardstock and did a little ink blending on them using Spun sugar, Shaded Lilac and Peacock Feathers. I misted the cardstock with water and let it be for 60 secs. Then I removed the excess with a tissue paper.
I trimmed the card front by 1/4" from all sides and mounted it on the card base which is 4.25" x 5.5" white cardstock (220gsm).On this I added all the cut flowers on their respective colored areas. I then did ink blending on a piece of white cardstock using Squeezed Lemonade Distress Ink. On this I stamped Thanks! sentiment which is from Inkadinkado Expressions And Frames Clear Stamp Set, I cut banner ends and then mounted this sentiment on the card using foam squares such that the sentiment is a bit curved and looks raised. On the sentiment too I added the flowers. I also stamped little circles on the card with the respective colors for a tone on tone stamping effect. If you look closely, it will be seen.
To finish the card I added a few sequins which are of same color tone as the colors on the card. For the inside, I just added a simple stamp that says " for making my day special"
Thank you for reading my blog post and I hope you all liked my card. Have a great day and keep smiling.....