Showing posts with label stamp. Show all posts

Sunday, 25 September 2016

Diwali Cards

Hello everyone
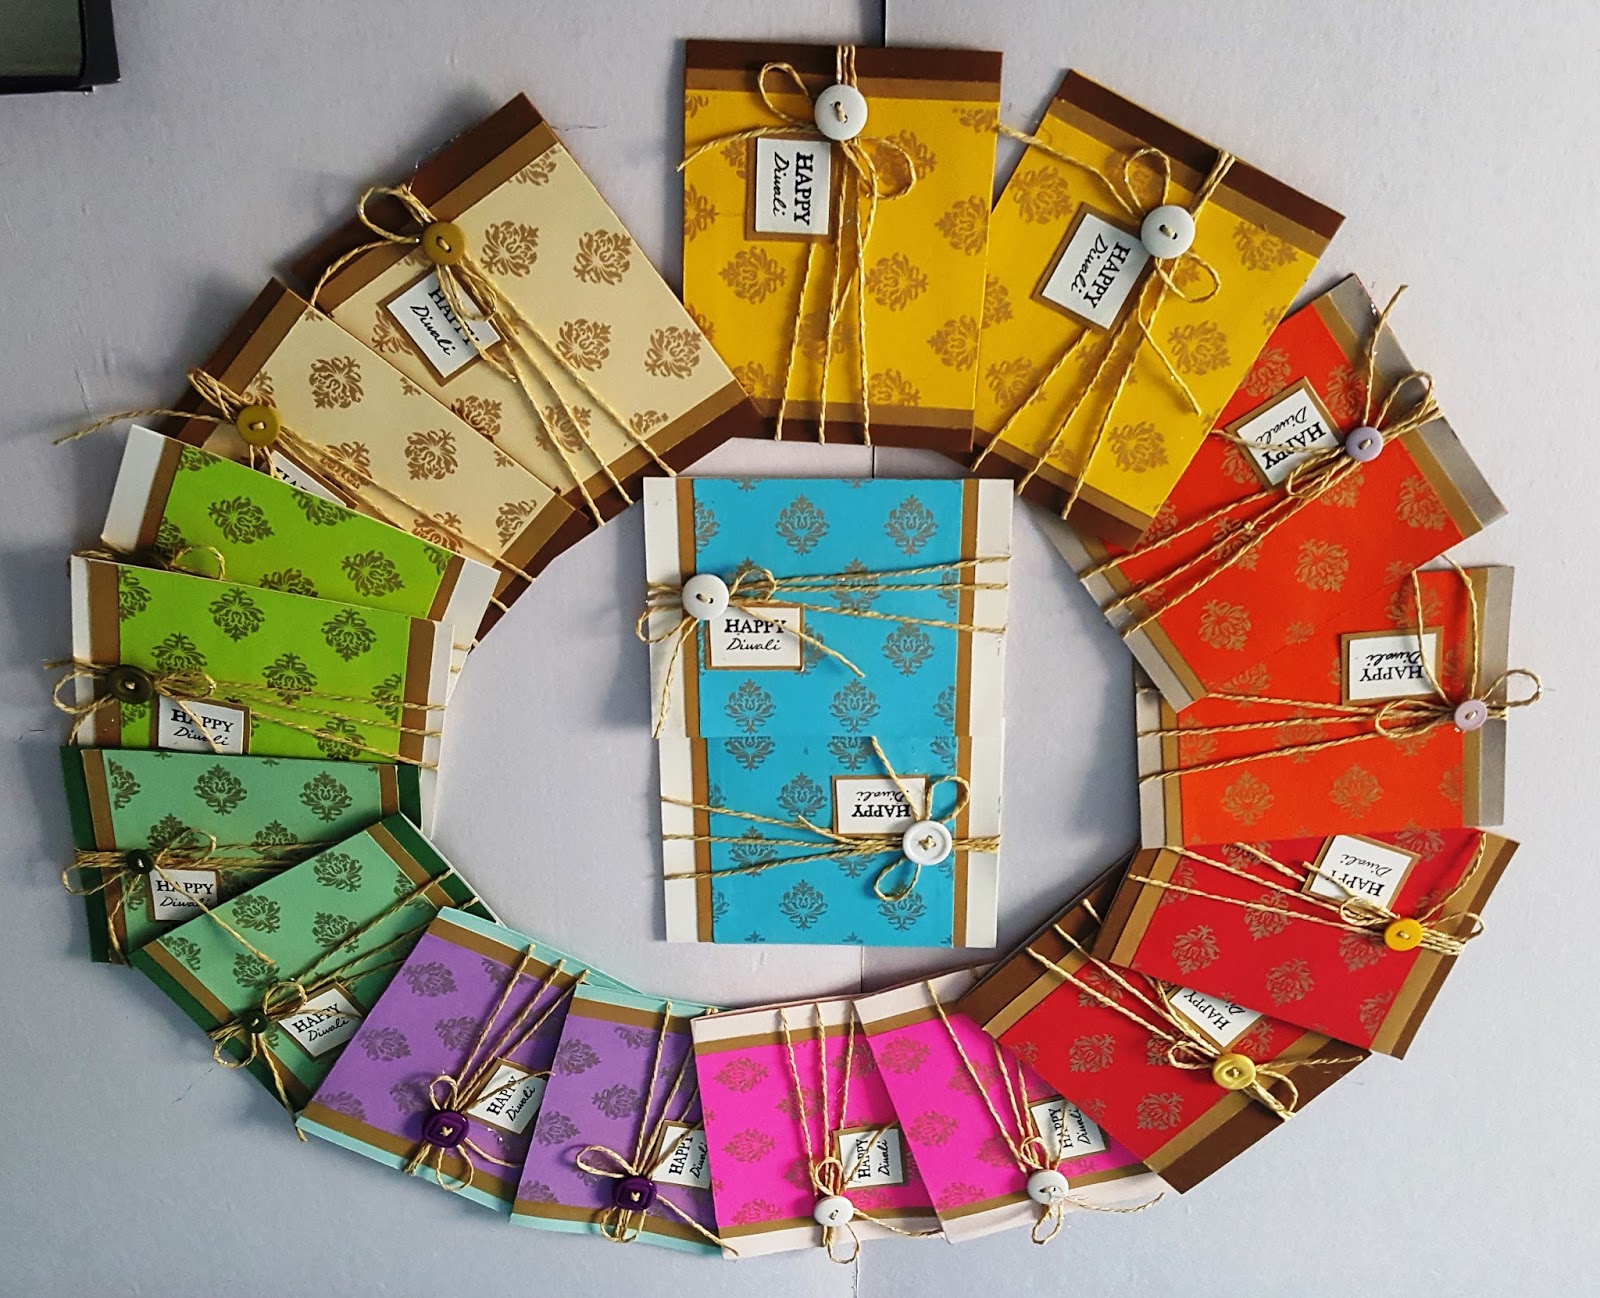
I am posting today some handmade Diwali cards which are very clean and simple with minimum embellishments. I have made this for Cards for a Cause-India where Neha Gala who owns A1 Craft shop in Andheri East, Mumbai is doing a drive for collecting cards for our soldiers on the borders. I really like her store and she had most of the things you need for crafting.
 What she is is doing is collecting cards from willing people and send it to Leh, Hall of Fame and I feel she is doing an amazing job. I feel we should all support this cause and add as many cards as we can to this.Its a wonderful gesture and I wanted to participate in this. So made a few encouragement cards and Diwali cards myself.
Since, using embellishments was required to be minimum and glitter or sequins was not advised, I used buttons in my cards with some paper twine in my cards. I started with standard A2 size card and used pattern paper which has gold motifs on them. Layered this pattern paper on some gold cardstock and mounted them on my card base. To add some decoration, I wound some paper twine and finished with a button and a bow.
On the inside, the cards is pretty simple. I added a strip of pattern paper on the side to bring in some color. For dark cardbases, I have added white cardstocks on the inside to enable the use of any inks available with our jawans.
The envelopes are simple ones made with the same color as the card base and and matching pattern paper. The happy diwali stamp is actually a combined stamp. Diwali is from Peek-a-boo stamp and Happy is from Fiskars petals from Scratch stamp set. The stamping is done using Black Archival ink so its permanent and waterproof.
That's all from me.....and I hope all of you can add some cards from your side. Those of you who do not have a stamp or inks.....don't hold back. Use waterproof pens to write messages and sentiments....use anything you have to make cards. We should appreciate our soldiers who are fighting for us on the border...and these little encouragement notes and cards will mean a lot to them.
Thank you all for reading my post and have a great day.

Supplies:
Cardstock- ItsyBitsy
Buttons- Itsy bitsy and A1 craft
Paper twine - Anupam Super store
Pattern Paper - Anupam super store
Stamps - Peek--boo and Fiskars
Ink- Archival Black ink
Silicon Glue - Itsybitsy

I am adding this card to this month's challenge at Ranganjali.

Thursday, 11 August 2016

Friend Shaker card

Hello everyone
Good to see you all. Its been really busy and crazy in my house this month. I am juggling between my work and my family and more work than family....and I am not able to blog so much. But anytime I find myself with couple of hours, I just run to my workstation and create something quickly and upload it here with some tutorials for you all.
Today I found fews hours free in the morning and I decided to turn a bling eye towards all the ongoing orders and dispatches and satisfy my creative urge. A few days back, I had got a free haul from ItsyBitsy and It has a stencil, silicon glue, glitter glue and a pigment inkpad in it. I wanted to try them for long and made many unsuccessful attempts. Today is the day when i finally got my hands on them and I made a card using the stencil, pigment pad and the silicon glue. I didn't get a chance to use the glitter glue but will make another project and use it.
Now to the card I have made. It is a shaker card with has the shaker elements inside a tag which I have mounted on the card. Making shaker cards is my thing and that combined with stenciling is like my new favorite technique. I love to stencil any opportunity I get.

Supplies:
  1. White texture cardstock (220gsm)
  2. Pink Cardstock (220gsm)
  3. Chevron pattern paper in green and white from Eno Greetings
  4. Sequins
  5. Golden Micro beads ( Itsy Bitsy)
  6. Green Satin ribbon ( Itsy Bitsy)
  7. White Eyelet ( Itsy Bitsy)
  8. Eyelet punch
  9. Flat pearls in pink and white
  10. Clear acetate sheet ( Itsy Bitsy)
  11. Clear Stamp ( Kaisercraft- Best Friends)
  12. Stencil ( Itsy Bitsy)
  13. Black pigment inkpad ( Itsy Bitsy)
  14. Distress inks ( Abandoned coral, spun sugar)
  15. Ink blending tool
  16. Score board
  17. Foam mounting tape
  18. Silicon glue ( Itsy Bitsy)
  19. White adhesive or red tacky tape
Procedure:
  • I started with making the base of my card using the textured white cardstock cut to standard A2 size( 5.5"by 4.25"). 
  • Then, I took the pattern paper and adhered it to the card base in a offset manner using adhesive.
  • Then for the shaker card, the tag is 3"by 3.5". I have cut the pink carstock and then using a stencil and distress inks, I created the background. I also cut some acetate sheet and front shaker window  frame to fit the tag. I have used silicon glue to attach acetate sheet to the shaker frame.
  • I stamped the sentiment on the background using pigment Black inkpad, added sequins and gold microbeads and adhered the shaker frame using foam adhesive.
  • Then I punched a hole and fixed a white eyelet on the tag. Used some green satin ribbon for the tag. I adhered the tag on the card using red tacky tape.
  • Finished off the front, with some sequins and flat pearls using silicon adhesive.
  • For the inside, I have added some pattern paper and stamped another sentiment from the same stamp set using pigment black ink.
That completes our card. I am putting my card up at Lulupu, Peek-a-boo, CWS , Happily Ever Crafter Giveaway, Ranganjali and Craft Stamper magazine.
Thank you all for reading my post and I hope you all liked it. Keep smiling and have a good day.

Monday, 8 August 2016

Friendship Explosion box

Hey guys
I am back with another project today. Since it all about friends this month, I have made a friendship explosion box. This one was for a client and a very quick make, I did steal a few pictures before dispatch. It requires very few supplies and I will give you a tutorial to make this one.


Supplies:
  1. Cardstock
  2. Pattern papers ( Papericious and Itsybitsy)
  3. Embellishments
  4. Scissors and trimmers
  5. Adhesive
  6. Scoring board and bone folder
Procedure:
  1. I have made a 3"by 3"by 3"box. So start with a 9"by 9" heavyweignt cardstock. Score at 3"and 6". Then rotate the paper 90 degrees. Then score again at 3"and 6". 
  2. Once done, bend then at all the score marks. Cut as shown in the image below.
  3. Since this is a single layer box, I did not add more layers to it and out work is done for inside layering.
  4. To make the lid, use a 6.1"by 6.1"paper. Score at 1.5"and 4.6". Rotate the paper by 90 degrees and score again at 1.5"and 4.6".
  5. Once done, bend and cut as shown in the image below.
  6. To add the small inner box, Repeat the procedure above but instead of 9"by 9" paper, start with 6"by 6"paper. Score at 2"and 4"and rotate by 90 degrees and score at 2"and 4".
    Once done, cut as shown in image to obtain the shape of box. 
  7. For the lid, start with 4.1"by 4.1"paper. Score at 1"and 3.1"and rotate by 90 degrees and score at 1"and 3.1"'.
  8. Once everything is ready, decorate it with your favorite pattern papers and embellishments and then assemble the box. I suggest so that you can apply good fore to adhere your paper and burnish your tapes. You cant exert much force after the box is assembled.

  9. I have used pattern papers from Itsybitsy and Papericious. I have also added 3 photomats into the pockets. I have stamped on the photomats using Memento Tuxedo Black and Peek-a-boo stamp for photographs.
  10.  I have also written few quotes from the internet about friendship and printed them on white cardstock. I did so because the stamps which I have were too big for the explosion box I made.

     
  11. Once everything was embellished and ready, I went ahead and joined the boxes and lids. Finished the box with mulberry flowers, rhinestones, pearls, ribbon and Mdf cutout stamped with the sentiment. The stamp is from Fiskars petals from scratch stamp set.

Thats the tutorial for this little explosion box. You can decorate it the way you like with your choice of papers and embellishments. Thank you all for reading my post and have a great day.

I am going to put up my project at the monthly challenge at Papericious which has a moodboard with different items that inspire you. I was inspired by the ribbon, diecut, flowers and little microbeads. I have tried to incorporate those in my own way.


Wednesday, 20 July 2016

Baby Mobile Card

Hey guys
How have you been? I am a bit busy this week with some work commitments, but I am taking pictures of the projects before I dispatch them. I am not able to find time to blog about them as soon as I take pictures, so I am posting about them in between my work when i can find time. So, here is a Congrats card I made for someone who just had a baby. I am linking this card at Craft Stamper for the challenge of this month which is Anything Goes.
I made this card yellow and grey as I wasn't informed if it was boy or a girl and hence the color choice. This card has a gift envelope inside so it can carry your message as well as cash gift.
To make this card, I have used a 5.5"by 5.5"white cardstock for base. Then I went ahead and googled some elephant clipart to make the mobile. I found a one I liked and printed it to the size I wanted. Then after printing it, I tweaked it a little to make it look like the one in the card.
Once, I was happy with my elephant, I fussy cut it out. I took a white cardstock and added yellow polka dotted paper tape on it. I then traced my elephant 4 times on this piece of cardstock and then fussy them out. Then, to add the ears, I cut 4 hearts from Papericious Colour Celebration pattern paper. To make the mobile stand, i used the same pattern paper and used a black waterproof pen to make the threads. I adhered the elephant to the card using foam tape and added a flat pearl to finish the mobile. I have stamped the congrats sentiment from JustRite Clear Grand Handwritten Sentiments Stamp Set on white cardstock and layered it on the pattern paper. To finish the card, I added some yellow bakers twine and a thin strip of the Papericious Colour celebration pattern paper.

For the inside, I made a small envelope and added the swirly pattern and Best wishes Sentiment which re both from Inkadinkado Birthday Wishes Stamp Set. Secured the envelope using White Satin ribbon.For detailed Turorial for making the envelope, please refer my earlier post Congrats on your Engagement.
I want to remind you all about the giveaway running on my blog till 28th July. Please visit the post One Lakh Blogviews and Giveaway to know how to participate in the giveaway.
Thank you for reading my post and hope you all liked it.

Supplies used:
  1. White cardstock
  2. Papericious Colour Celebration pattern paper
  3. Yellow polka Dotted paper tape
  4. Black waterproof finetip pen
  5. Memento Dye inks- Tuxedo Black and Dandelion
  6. Yellow Baker's Twine
  7. Scotch foam adhesive
  8. Red tacky tape
  9. Martha Stewart Scoring borad
  10. Scissors
  11. JustRite Clear Grand Handwritten Sentiments Stamp Set.
  12. Inkadinkado Birthday Wishes Stamp Set.
  13. Satin Ribbon from ItsyBitsy.

Tuesday, 12 July 2016

Celebrate!!!

Hello guys
 Its a very special day for me and I am super excited. I started blogging on 26th March, 2016 with no knowledge about blogging and I didn't know how I would be able to connect to the world to show them my work. But with lot of support from family and friends and majorly by my husband Chintan, I mustered a lot of courage and determination and finally started blogging. Honestly I didn't know I would survive this long on this platform, but I like crafting and I kept doing my work as usual and posted them on my blog. Days turned into weeks and weeks into months and my confidence started to build.
I am very happy to say this today, I have crossed 1,00,000 visits to my blog today it has happened because of all of you who came to my blog to read my posts. Its not been that long since I started blogging, but the love and support I got from all of you makes me feel like I know you all since a very long time. I want to thank each and everyone of you who has made this possible. I have achieved a small milestone today but its very special and important to me and to celebrate this moment I am doing a giveaway on my blog, so go ahead and read the giveaway post to participate in it.
Now for today's card, because I am celebrating our achievement, I have made a celebration card. I am entering this card for the July challenge at Lulupu, Craft Stamper Magazine, Peek-a-boo Designs and Paru's Card making challenge.
The card layout is as per the challenge rules at Lulupu this month, I have lots of layering in my card which is mandatory for Peek-a-boo challenge. While the celebrate theme is also Birthday related which is the Challenge for the month at Paru's. Craft Stamper Magazine has a theme "Anything Goes" but requires stamping in the project. I think, the card I made fits the bill.
I took a 5.5"square white heavyweight cardstock and stamped butterfly stamp which is from Hampton Art Vintologic butterflies stamp set. Stamped the butterfly using shades of blue to give an ombre effect. I have used Memento Danube Blue, Bahama Blue and Tumbled Glass, Peacock Feathers Distress inks.
After stamping, I went ahead and cut a window in it. I then adhered the outer frame back on a pale sea green cardstock base. The I added a piece of clear vellum over it which was cut to 5" by 5". Now using some fun foam, I added the center piece back to the card. I then added a white frame which is 5.5"square and is 1/4" thick to the card. Finished the card front with the celebrate sentiment from Kaisercraft Pop! - Treats Stamp set on the same cardstock which is used on the base. I gave the sentiment banner ends and glued it to the card only on one end so the banner looks liked its sewed to the card. To give it a sewed look, I did some stitch marks using a black finetip pen.
For the inside, I stamped and fussy cut same butterfly in 3 colors on a white cardstock and  adhered it to the inside with some wet adhesive.Hampton Art Vintologic Butterflies Sta
  Thank you all for reading my post and have a great day ahead. Untill next time, keep crafting...