Tuesday 26 September 2017

Baby Giggles - Tri fold folio/ Scrapbook/ Mini album for Baby Girl.

Hey guys
I have a Tri Fold folio for you all today and this project is inspired by Ginger from My Sister Scrapper. Its my first attempt at this style of album and I hope you guys will like it too. This is also my DT inspiration for ItsyBitsy challenge blog where the theme is BABIES all this month.
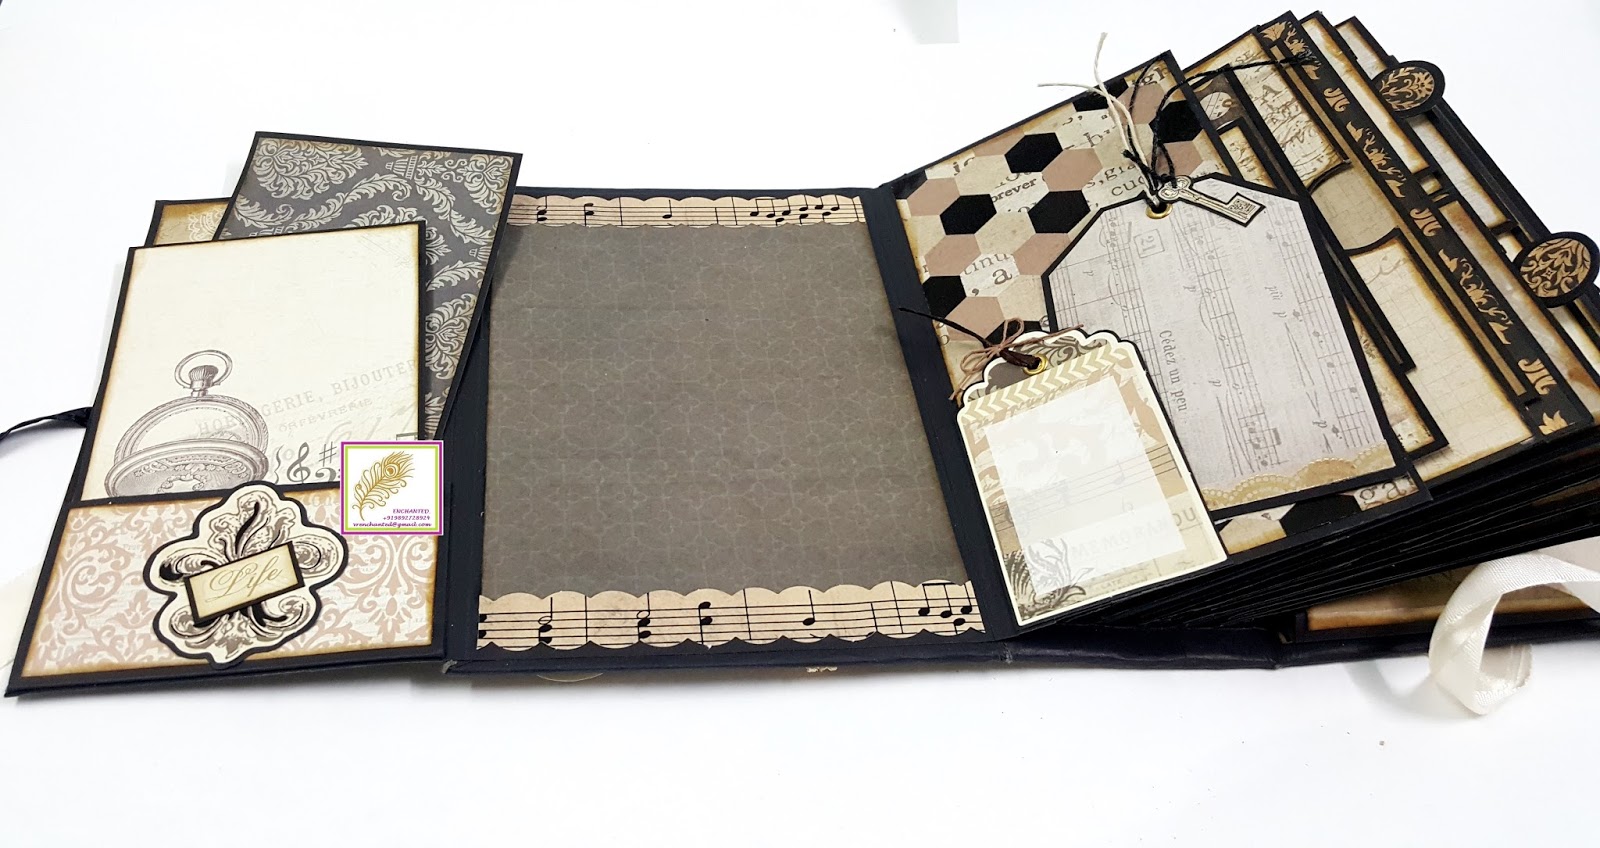
This folio is 9" by 6" by 1" and can take 30 to 40 pictures and is made using the newly launched Baby Giggles paper pack by ItsyBitsy. If you want to know the list of supplies used and how I made this project, please visit the ItsyBisty blog by clicking HERE. I have a pictorial tutorial, , list of supplies and tons of pictures waiting for you all there. Here I have a few pics of my folio along with a small video tour of the finished project...which is super girlie and very cute.
Video 


I am putting my project up at following blog challenges:-
  1. All sorts challenge blog Week 434 - Things with wings - I have butterflies, storks and owls on my project

Thank you for stopping by and have a great day ahead.

Monday 18 September 2017

Welcome! Little one - Handmade Card.

Hello guys
Its all about BABIES this month and I have a handmade card this time to celebrate the arrival of the Little One/s which fill our hearts with love and joy......so here is what I made and this is also my DT inspiration for Lets Craft and Create Challenge blog where the theme is Child's Play all this month. Purple is by far my favorite color and since the baby themed card/ project are usually Blue and Pink, I thought to do something a little out of the box and made a card in my fav color - Purple!
You all can join in the blog challenge which will be running all month by clicking HERE.
Now, back to the card. I started with 270 gsm White cardstock cut to standard A2 size card base. For the front panel, I have used pattern paper from Papericious - Whimsical 6" X 6"paper pack. I have cut the paper to the size 4"by 51/4"and then dry embossed it with Sizzix embossing folder. Later I tied a White satin ribbon on the lower part of the paper and finished it into a cute bow. I mounted this panel on my front of the cardbase using some white fun foam sheet.
I did some die cutting now using Cottage Cutz Baby border die on a Purple cardstock and White cardstock. I mixed the 2 die cuts and adhered it on the front panel above the satin ribbon. To make the center element, I diecut few shapes from white, purple and design papers from the Whimsical collection using Spellbinders Nestabilities Scalloped Labels one, ItsyBisty Nested Stitched Circles and Sizzix basic dies. I added them on the panel using some foam tape to give it a little dimension.
On the center, I added a cute Teddy Bear Sticker from Handmades Sticker collection. I do not have the name as its an old collection and I cannot find it anywhere.
I finished my card with a Welcome sentiment from Mudra craft stamps stamped on a white cardstock with Grape Jelly dye ink from Memento and then matted it with some more design paper in green from the same paper pack. The inside of the card is kept pretty clean. I do not know why its looking so blue in the pictures...in real its Purple and so royal looking...But that's Camera with its own drawbacks.
I am putting this card up at the following blog challenges:
  1. The Ribbon girl Blog - September use any image challenge
  2. HLS September - Anything goes with Dies Challenge
  3. Inky Chicks - Challenge#88 use your favorite colors - I have used my fav color Purple.
  4. Scrapping4fun challenge #98 - Use Techniques - I have used Dry embossing and diecutting.
  5. Word art Wednesday Week #300-301 - Anything Goes
Supplies:
  1. Purple cardstock - ItsyBitsy
  2. White Cardstock - ItsyBitsy
  3. Papericious Whimsical paper pack - 6"X 6"- The craft shop
  4. cottage Cutz- Baby border die
  5. White satin ribbon - ItsyBitsy
  6. Foam tape - ItsyBitsy
  7. White Adhesive
  8.  Spellbinders Nestabilities Scalloped Labels one - ItsyBitsy
  9.  ItsyBisty Nested Stitched Circles - ItsyBitsy
  10.  Sizzix basic dies-ItsyBitsy
  11. Big shot - ItsyBitsy
  12. Welcome sentiment - Mudra carft stamps
  13. Grape Jelly - Memento Dye ink - The craft shop
  14. Teddy Bear Sticker - Handmades
I hope you all liked this card...Thank you so much for stopping by.

Friday 15 September 2017

Vintage Memories Mini Album/Scrapbook

Hello guys
Welcome back to my blog...and today I have a new Mini album/ Scrapbook for you all. This one is custom made using vintage papers from Eno Greetings Retro Series paper pack DSM003. These paper are very very vintage and super fun to work with...They have some cool oldie typewriters, gramophones, pocketwatch and other vintage images included in the pack. I have used some metal charms, diecuts and stickers which are part of this collection...super fun project.
To begin with, This album measures 9" by 6.5" and has a 3 3/4" thick spine. These are 16 pages in all including the front and back and have many pockets, flips, photo mats and journaling tags. This album can hold 5" by 7" size pictures and of course smaller ones too. The pages are 8" by 6" in size.
 The front of this album is decorated with beautiful paper from the 12" x 12" papers from the same collection. These papers come with gold accents and black accents which is beautiful in real. A beige lace runs on the front and back cover which is sourced from local stores. I have a shaker window in the front with my clients name and filled with super fun sequins in all shades of gold, silver, clear and back along with some gold sparkle dots. To add the finishing details, I added a pocket watch charm with a chain in the front and a Gold heat embossed chipboard sentiment Moments on the spine.

The box made to house this album is 10 1/2" by 81/4" by 5" and is made from scratch using 900gsm chipboard. I have used black cardstock to cover this album as well the box. I have kept the box pretty simple and also used pattern paper to decorate it.

I have loads of images of the pages for you with a video walk through of the final project..so sit back and enjoy.
Video link:-
Page Images:-


Supplies used:
  1. Eno Greetings Retro Series DSM003 8" by 8" - Khyati Khotari.
  2. Eno Greetings Retro Series DSM003 12" by 12" - ItsyBitsy
  3. Black cardstock - ItsyBitsy
  4. Eyelets -ItsyBitsy
  5. Ribbons and twine - ItsyBitsy
  6. Distress ink - Vintage photo - ItsyBitsy
  7. Gold sequins -ItsyBitsy
  8. Red tacky tape -ItsyBitsy
  9. Clear Actetate sheet - ItsyBitsy
  10. Aleene's Tacky glue- The craft shop
  11. Chipboard - A1 craft
  12. Circle nested dies - ItsyBitsy

Thank you for visiting me and I hope you all liked my new project. Have a great week ahead.

Monday 11 September 2017

Baby Girl Birthday Decor Ideas.

Hey guys
Welcome back to my blog. I have a new birthday decor idea for you.....it was a custom order with a particular color theme. Below is the inspiration picture which actually is the cute dress for the Birthday girl.
So, I came up with a banner and a badge for the backdrop and a cute little crown for the little princess keeping the color scheme in my mind. Here are few pictures of the projects
The badge is 16"in diameter and decorated with handmade flowers. I made these flowers without any dies....I drew the petals and fussy cut each layer. Every large flower has 4 large and 3 medium layers and the medium flowers has 4 medium and 3 small layers made using handmade paper from ItsyBitsy. I have colored the flowers using memento dye inks - Dandelion and Tangelo. Further, the centers are dusted with sparkle dots also from ItsyBitsy.

Also there is a chipboard embellishment which is also from ItsyBisty which I have heat embossed with gold and white. The number 1 is made using chipboard by me and covered with white handmade paper. I have used Prima Marketing stencil to decorate  the number. I have used Distress inks - Spiced Marmalade and Fossilized Amber to use over the stencil. The badge is made by layering yellow, gold, white and orange cardstock. A white lace is run around the circumference of the banner. To finish the project, I added few butterflies and leaves and twirls.

The banner that I have made is 8 feet in length and has the girl's name TASHVEE in the center. The banner is also uses the same elements like flowers, butterflies, stencil work and laces like the badge, 
The alphabets are ornate alphabets from ItsyBitsy which I have gold heat embossed twice.
The flourishes are MFT diecuts which I have cut from Gold glitter paper also from ItsyBitsy. I have punched holes and reenforced them with eyelets and passed satin ribbon through to form a banner.

The banners are also layers similar to the badge with orange, white and yellow cardstocks. They measure around 4" is breadth and 5" in height.
Here are some closeups of the banner.

The last project is a cutesie crown for the little princess. The crown is handdrawn and is 16"in circumference and 4"in height. The crown is made using yellow foam and orange cardstock. I have used white satin ribbon for closure and I have sandwiched it between the foam and cardstock. This made sure nothing pokes the baby or causes any discomfort.
Further I dry embossed a white cardstock and layered it on the crown. The finishing touches came from a strip of gold glitter paper at the base and circular diecuts at the 4 apex of the crown. I added a number 1 as the finishing detail. I kept it as simple and as light as I could.
This is how my client decorated the backdrop....Isn't it adorable?
 The list of supplies is given below
  1. Distress inks - Fossilized Amber and Spiced Marmalade - ItsyBitsy
  2. Memento dye inks - Dandelion and Tangelo - The craft shop
  3. Butterflies - ItsyBitsy
  4. Yellow foam sheet - Local store
  5. Cardstocks - Yellow, gold, white and orange- ItsyBitsy
  6. Gold Glitter sheet - ItsyBitsy
  7. MFT die- flourish - Crafters Corner
  8. White handmade paper -ItsyBitsy
  9. Sparkle dots -ItsyBitsy
  10. Embossing folder - ItsyBitsy
  11. White lace -ItsyBitsy
  12. Silicon glue - ItsyBitsy
  13. Aleene's Tacky glue - Crafters corner
  14. Red tacky tape - ItsyBitsy
  15. Satin ribbon - White and yellow -ItsyBitsy
  16. Ornate Alphabets -ItsyBitsy
  17. Wow heat gun- ItsyBitsy
  18. Rangel - Tinsel gold heat embossing powder - Crafters corner
  19. Leaves - Local Store
  20. Chipboard flourish - ItsyBitsy
  21. White heat embossing powder - Wow- ItsyBitsy
  22. Stencil - Prima Marketing.
I am adding this project at the following blog challenges
  1. Double D Challenges - Glitter glitter and Glitter
  2. Scrapping4fun challenge #98 - Techniques - Die Cutting, Dry embossing, Heat Embossing, Stencilling, flower making

Friday 8 September 2017

Daddy's Girl - Baby Announcement Explosion box

Hello guys
I have a new project to share with you all today. In continuation to my explosion box series.....I have yet another explosion box and this one is made using the newly launched Baby Giggles paper pack from ItsyBitsy. This project is my DT inspiration for this month challenge at ItsyBitsy.
I have a small tutorial over there to show you how I made this project with a list of supplies and tons of pictures.....So if you are keen to know...please click the link HERE.

Here is a little sneak peek of my new project...I hope you like this one.


I am adding my project at the following blog challenges:-

  1. Allsorts challenge blog - Week #431 - New Beginnings. - It means a new baby for me.
  2. Double D Challenges - Glitter glitter and Glitter
  3. Scrapping4fun challenge #98 - Techniques - Die Cutting, Dry embossing, Heat Embossing, Box making.
  4. Scrapy Land Challenge #73- Anything Goes- I have used Spellbinders Label 1 dies.

Thank you for reading this post ans have a good day ahead.