Tuesday 26 April 2016

Mini Album

Hello everyone
 How are you all? I hope you all are having a great day Today's post is about Mini Albums. Mini Albums are smaller versions of albums which may or may not accommodate as many pictures as a normal album would. These albums can also be made like a card or a scrapbook which can hold small messages and pictures. They are not as bulky and give an opportunity to make our greetings pictorial.


 My version of mini album has space for 4 pictures but lot of space for messages and descriptions about the pictures. You can embellish it as you like and use it either like a card or a small scrapbook.
Lets begin.......

Materials:
  1. Cardstock( CS)
  2. Mountboard/ Cardboard
  3. Adhesive( Fevicol, Red/ White tacky tape)
  4. Score board( Martha Stewart)
  5. Pattern Paper 
  6. Scissor
  7. Embellishments
Procedure:
  1. We need 3 square 8.5" white cardstock sheets. You can take different size and color if you like. Your album will be 0.25" bigger than half the size of your cardstock. So My album was 4.25" + 0.25" = 4.5" in size.
  2. Now take the cardstocks and score them in half both horizontally and vertically. Now score them diagonally on only one side. So the CS is now scored horizontally. vertically and diagonally on one side.
  3. Please watch the video for better understanding. Fold the card where it is scored such that the entire sheet is folded into a quarter . Do the same for all three sheets.

  4. Now place the sheets in such a way that the quarter piece of all sheets overlap each other. the first and last sheet must fold towards you and the middle sheet should fold away from you.This is very important.
  5. Stick the quarters together with good adhesive and fold them all together.
  6. We need 2 pieces of mountboard 4.5" in size. Cover the mountboard with pattern paper on one side making sure at least 1" of paper is excess on all sides and it folds over to other side. Use good adhesive to adhere the paper. Adhere this to the cardstock pile on both the sides.This makes the cover for our mini album.
  7. I added little pattern paper strips to make a frame like structure inside the album. Repeated it on the 4 squares inside to obtain frame outline. You can now mount pictures here.
  8. On the outside, I added a ribbon to facilitate opening/closing of the album. and embellished the cover with mulberry roses and peonies, pollens, Mulberry leaves and a piece of doily. I added a stamped sentiment to complete the look.
You can embellish it inside also. Add diecuts or do some stamping. My client wanted it to be plain and simple on the inside and I didn't do much, but you guys can have fun with embellishments and the options are endless. Thank you for reading my blog and have a great day.

I recommend you all to watch the video for better understanding about making this album.

Monday 18 April 2016

Vintage Newspaper Coasters

Hello guys
I recently had someone elderly woman come to me with a request to make a few coaster for her to gift her elders visiting her after long time but she wanted something toned down. So immediately I thought to make vintage looking coasters. But I had nothing in my stash that was vintage looking......but whats the fun if we have everything handy and have to make effort in creating something........

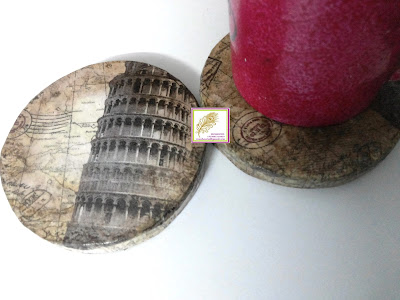
So I used old map printed tissue papers whcih has leaning tower of pisa on them. I had bought these long time ago from A1 craft supply and forgotten about them. If you do not have something like this, use old maps from text books and picture of any wonders of the world for the same effect.


I started coiling my newspaper tubes as tightly as I could to make circular coasters and I made a bit big- 11 cm so they could even use it for soup bowls as well as tea cups and mugs. Then I gave the coasters a good wash with white adhesive on both the sides and allowed thorough drying.
Once I was sure that they were hard dried, I added a mountboard base and a strip around the coaster. For more details please refer my earlier blog post "Newspaper Coasters". I used a 5.5 cm radius base and 1.5 cm stip which was approximately 32-33 cm. Now the measurements will vary depending on the size and thickness of your coasters. To make the coasters very old, I peeled the white paper over the mountboard on one of the coasters. So here onwards, you will see 2 different looking coasters.


Now, I started to decoupage the coasters with the tissue paper using Mod Podge gloss. Once The first layers dried, I used Memento Rich Cocoa dye ink and a blending tool to give the coaster a vintage look. I added ink on the backside where the newspaper was visible, on edges as well as the face of the coaster. That's all we have to do to make it look vintage. Now add few more coats of mod podge while giving time for drying between coats. Make sure you add the glue on both sides....so did the face first and then I did the back.

Our coasters are ready, if you want you can add a few coats of varnish to it or use Mod Podge outdoor to make it waterproof.
Sorry about the quality of the video. I hope you all liked these coasters and try to make them also......thanking for visiting my blog. Have a great day......

Saturday 16 April 2016

How are you?

Hey everyone

Today I will be sharing a card I made for Lulupus's Challenge#60 -Inspired by Moodboard , A Blog Named Hero , Creativity With Stamps and Paru's Card Making Challenge for April.


The colors for this card are inspired by the MER letters from the moodboard, Black text box and the Bokeh effect. The chevron pattern and the little dots motivated me to accommodate them in my card......and I had to do a brain storming session to accommodate all the inspirations from the moodboard. The sentiment I have used is also inspired from the moodboard font and the entire layout of the moodboard. I got very excited and I had hundreds of options running in my head and I wanted to do everything.......but then I had to calm down and finalize one option and this is the card I made......
 I have used a standard 8 .5" by 11" scored at 5 .5" white cardstock as base for the card and for the face of the card, I have used 4 .25" x 5 .5" white cardstock.

 Started off by stamping all the chevron pattern butterflies on a white cs and fussy cutting them out. The butterfly stamp is from Vintologic stamp set from Hampton art and the dye inks used are Bahama Blue and Cantaloupe from Memento and Electric Lime and Pink Gumball from Ranger.
 I have drawn two concentric circles which are partly off the card. I cut these 2 circle outline and the small strip I got from that was smeared with Memento Tuxedo black. The cut circles were then mounted on the card base using foam adhesive for dimension. The black strip was glued using liquid adhesive between the two parts. It should fit properly as it was cut from the same piece.
 Now, I folded all the butterflies and mounted them on the card on the black strip using thin strips of foam adhesive. The sentiment I used is How Are You? from Grand Handwritten Sentiments stamp set from JustRite Clear and it was stamped on white cs and glued to black cs to create border effect. This was then glued to the card using double sided thin tape.

 To create a bokeh effect, I used Fabercastle watercolor pencils and distilled turpentine. I scribbled orange, yellow and pink color pencils on a scrap cs and then using paper stump and turpentine I smoothed it. Using a hole punch. I punched little circles and glued them to the card to create same bokeh effect which was on the moodboard. So complete the effect, I have used some pink, green, yellow and orange sequins.
  For the inside, I added a think black strip and stamped butterflies inside using same colors.
 This card I did is very summer, it has butterflies which see fluttering everywhere and calm pastel colors like pink, yellow, green and blue.
I hope you all like my card and thank you for reading my post. Have an awesome day........

Thursday 14 April 2016

Birthday wishes

Hey guys

Today I am doing two cards which I made for the Peek-a-boo challenge of this month as well as A Blog Named Hero challenge..
I have done two birthday cards and both the cards use the same stamp. I have used Neenah solar white cardstock for the top and iris paper daffodil delight color as the base for both the cards.
  1. For the first card, I stamped balloons from KAISERCRAFT Pop!- Treats stamp set.  I used a fine tip black waterproof pen to draw the strings. I wanted all the strings to show so I masked the balloons on the top while stamping the balloons on the lower row.The die inks used are from MEMENTO - Tuxedo Black, Dandelion, Lady bug, Grape Jelly and Bahama Blue. and Ranger Dye inks -Electric Lime and Pink Gumball. I made a small window cut from the front of card and the base could peep in from behind. Added sequins and satin ribbon bows to finish the card.
  2. For the second card, I have used washi tapes to make the candles. Added the tapes on white card stock and cut them in 1 . 5 cm broad strips. After adding them to the card, I trimmed off the excess. For the flame, I have used the base color cardstock and fussy cut the flame shapes and watercolored them using FaberCastle watercolor pencils. The flames are mounted on the card using foam tapes. I finished the card with a baby blue paper twine and sequins. 
I hope you guys like my cards. Thank you for reading my blog.

Wednesday 13 April 2016

Baby Onesie Monthly Sticker/ Tags

Hey guys

 How are you all? Its a treat for any parent to watch his/her baby grow, however, its difficult to remember his growing days over a period of time. But we can track baby's initial growth with these beautiful monthly labels. All you have to do it s stick them to your baby's clothes and you can photograph him/her every month for your scrapbook or digital albums. These stickers are monthly numbered and help to keep a track of your baby's growth
Today I am posting tutorial for making Baby Onesie Monthly Stickers/ Tags/Labels. They are appropriate baby shower gift and baby announcement gift. I am going to make 12 stickers for a baby boy, so come along and make some with me.......

Materials:
  1. Pattern Paper
  2. Vellum
  3. Ribbons
  4. Adhesive
  5. Scissors
  6. Embellishments
  7. Cardstock
Procedure:
  1. We start by cutting out 12 cardstock circles of 5.5 cm, 12 pattern paper circles of 4.5 cm ad 12 vellum circles of 3.5 cm.

  2. Using transparent double sided tape, adhere the vellum over the pattern paper and then on the cardstock. This will be our base for the stickers, Now using the same adhesive, put few strips behind the cardstock and give it a good rub because you wont be able to do this later. This will give us the sticker back for all the labels. You can also use double sided adhesive sheet if you want. However it can be left as it is and can be attached to your baby with a small cute clothes' pin.


  3. I have added either an animal or a vehicle or something to every sticker which are made using pattern papers and cardstock and colored using copic markers. Adding glitter is optional. You can even use sticker embellishments. 
  4. We need to add numbers to out stickers. All numbers are handmade, few are made using glitter papers and few using cardstock. You can also use number stickers which are available in market.
  5. Add a little ribbon bow on top for added cuteness. "Months" script are handmade using foam tape. Other places, I have handwritten them with waterproof ink or used a 3d outliner(Fevicryl).
     
Well guys, our labels are ready to be attached and  photographed with out baby...... The options are unlimited and the possibilities are infinite. So use your imagination and make the way you desire....I have very recently become an aunt (Chachi) and I made these labels for my little nephew . I truly feel blessed and cant wait to see his photographs with these tags.....

Thank you guys for reading my blog. I will see you guys again with a new post very soon......