Showing posts with label tags. Show all posts

Thursday, 6 April 2017

Handmade Baby Girl Announcement Chocolate Boxes.

Hey all you beautiful people
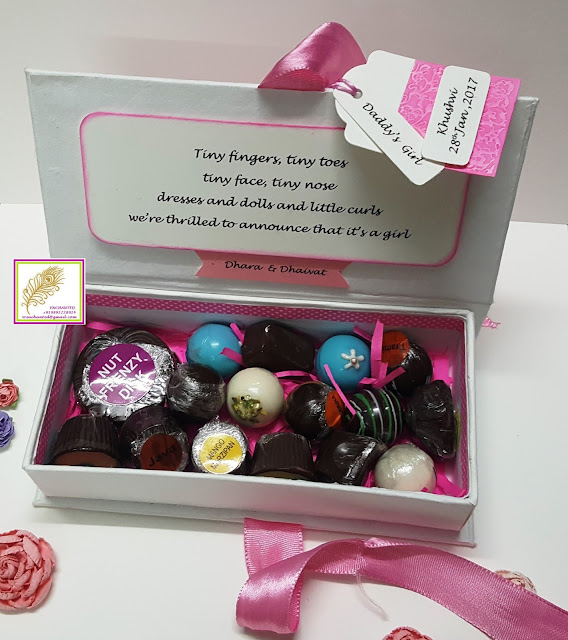
I am back with a new project today which are handmade announcement boxes for a Baby Girl. Now these boxes were custom made to fit 250gms of handmade chocolates. I have made everything for this box from scratch and it was fun......
I am putting this box up at monthly challenges at:
1 Allsorts challenge - Week 406 - Ladies and Girls
2 Cards and more Challenge#180 - Kids/children
3 Let's Craft and Create Challenge#123 - Entwined - Used twine to hand the tags
I have few pics and a video I made before I sent out these boxes.....some might not be so good as I took them in hurry. If you want a tutorial for this plz let me know and I will be happy to do one for you. Now, the supplies used to make these cuties are listed below and you can go throught them.
I would like to thank Itsybitsy for their promptness in delivery of the papers which was incredibly crucial for this project and they got the papers to me in just 24hrs....So thank you Rashmi Harish and team Itsybitsy.
I have used White handmade paper to cover these boxes on the inside as well as outside. The bright pink cardstock is from Fabriano and the other one is from Itsybitsy.  The flourish diecuts are made using MFT(My Favorite Things) Leafy Flourish die. The other diescuts are made using Sizzix dies and embossing folder. 
The tags are diecut using Itsybitsy dies and then given a little color using Picked Raspberry distress ink also from Itsybitsy.  The other little tag is fussy cut by me. I have used twine to tang the 2 tags and the box. the boxes are embellished using baby girl wooden embellishments and I have used different ones on all boxes. I got them in an assorted pack from A1 craft.
For the inside, I have added a little color using polka dotted pink paper tapes. Also I did add a little pink tissue paper shredding to bring in more color. I used baby pink in few and dark pink in the rest. The box is held together using Pink satin ribbon from Itsybitsy as well.
I have printed the messages using my printer on a white cardstock for the tags as well as for the inside.

Supplies
1 White handmade paper- Itsybitsy
2 Fuscia cardstock - Fabriano - A1 craft
3 Baby pink cardstock - Itsybitsy
4 Baby pink satin ribbon - Itsybitsy
5 Iris cardstock for tags and messages - 270gsm - A1 craft
6 Picked Raspberry Distress ink - Itsybitsy
7 Mft Leaft florish die - A1 craft 
8 Sizzix bigshot, dies and embossing folder - Itsybitsy
9 Paper tapes - local store
10 Tissue paper shredding - Local store
11 Wooden embellishments - A1 craft

I have a video here to show you the box. I hope you all will watch it.
Thank you for reading this post. I hope you have a wonderful week ahead.

Sunday, 12 March 2017

Happy 50th Birthday Album featuring Papericious Pretty Basics pattern paper (For a Lady)

Hello guys
I have been a little caught up with work lately and haven't been able to blog as much as I would have liked. I apologize for the same and hope to post more often. So here is a new project I did which is a 6"x 8"Mini Album with a box and 9 specific tags which are placed in the box. The album holds around 40 pics and 12 tags in 5 interactive pages. This album holds few 5"x 7"pics and 4"by 4"pics while most of the pics are 6" by 4"in size. This album was made to celebrate 50th Birthday of a very special lady and was gifted to her by her daughter. Since it has many pictures on the pages, I have chosen to hide them.
I am putting up this project for Monthly challenge at
1  Papericious - Birthday Wishes
2  Allsorts of blog challenge and their theme is Ladies and Girls.
3 The Ribbon Girl - Anything Goes

The spine is 4 3/4"and the covers are 6"by 8". The pages are 5"by 7"in size and have lots of pockets and flipouts. The box is 9"by 6" by 6"in size and has a partition to hold all the extra tags.I have used Papericious Pretty Basics pattern paper for this project along with few solid colored cardstock from Itsybitsy. To build the album I have used white 230gsm Iris Paper and for the box I have used White handmade paper from Itsybitsy. The inside of the box and the album cover is covered with Pink hand made paper again from Itsybitsy.

I have made all the flowers used inside this album using sizzix bigshot and flower dies. I have made around 120 to 150 flowers for the album from the same paper used to make the album and cover. The only exception to this is the flowers on the album cover which are bought from Itsybitsy. The youthful word is chipboard diecut which are covered with the patterm paper and fussy cut. The no 50 is Mdf diecut bought from a local store. All the perals used on ethe cover as well as flower centers are from Itsybitsy. The florishes are  cut using MFT die and my Bigshot machine. All in all I have cut around 120 to 150 florishes for this album.

All the photomats are given color on the edge using Memento dye inks. The spine has laces which are bought from a local fabric store. All the ribbons used are from Itsybitsy and the charms are from A1 craft. There are a few envelopes tucked inside this album to make space for letters. These envelopes are made from handmade tissue paper.

Top View
Spine
Back cover
Please grab a cup of coffee and sit patiently as there are more pics to come and these pics are of the 5 interactive pages and the inside covers. I have you all like it.

Inside cover

Page 1


Page 2
  

Page 3


Page 4


Page 5 and Back cover

I have a video at the end and I hope you will watch it. 

Thank you for reading my post and watching this video. I hope you all liked it. Till next time..Keep crafting.

Thursday, 2 February 2017

Handmade 50th Birthday Gift Box

Hey everyone
How are you all doing this week....I am back with a another new gift box...Ii have been making a lot of gift boxes lately and I really had some fun making them. Now this gift box is made to celebrate 50th birthday and is made keeping gold, black and white as color scheme. I really hope you guys will like this one...
I am putting this project up at Addicted to stamps challenge - Make your mark (I have used white gel pen to write on tags), Petal Lu  and Allsorts challenge - Lets celebrate.
This box is actually 9 1/4"x 5 1/4" on the outside and 8 1/4"x 4 1/4" on the inside and the thickness is 2". I have kept the embellishments to the minimum as the paper used is very decorative on its own. I have used handmade flowers, sparkle dots and few die cut flourishes to decorate this box.
The supplies used for this project are mentioned below.
 The little mustache is stamped with versamark using a foam stamp from itsybitsy and heat embossed with UTEE(Ultra thick embossing enamel) from ranger on a black cardstock. Then I just fussy cut is with little scissors and mounted it on the numbers using some strong adhesive.
The 3 little tags are handcut by me and the messages are handwritten with white gel pen. Holes were punched with a Kangaroo hole punch and then attached to the box using some white satin ribbon. I also used gold and white satin ribbonds as closure for the box.
 The Birthday Wishes sentiment is from Justrite Grande Handwritten Sentiments clear stamp set. I have heat embossed the sentiment using versamark and Gold embossing powder from Ranger on a black cardstock.
So here is the list of supplies used for the box:
1 Chipboard (Kraftily Konnect)
2 Black handmade paper (Itsybitsy)
3 Gold pearl paper ( A1 craft supply)
4 Gold satin ribbon (Itsybitsy)
5 White satin ribbon (Itsybitsy)
6 Silicon glue (Itsybitsy)
7 Pearls (Itsybitsy)
8 Pattern paper - Eno greetings Paper series Blossom.
9 Chipboard alphabets (Itsybitsy)
10 Sparkle dots (Itsybitsy) 
12 Flourish diecuts- MFT 
13 Versamark embossing pad and heat gun (Itsybitsy)
14 Gold embossing powder: Ranger (Crafters corner)
15 White adhesive - Fevicol
16 Handmade flowers- dies from sizzix.
17 White gel pen  local store
18 UTEE: Ranger (Crafters corner)
19 Mustache foam stamp (Itsybitsy) 
20 Birthday wishes - Justrite Grande Handwritten Sentiments clear stamp set
 At the very end I have added the link for the video walkthrough of this project. If you want a tutorial for this box, please let me know and I will come up with one. I hope you all will liked my project...until next time..keep smiling.

Wednesday, 18 January 2017

Handmade Turquoise Gift Box with Tags

Hey everyone
How are you all doing this week....I am back with a new project today and it is a gift box with 4 pretty tags. Now this gift box is inspired by my earlier project which was Baby Girl Mini Album and Tag Box. Now, I had included a similar box in the project which could hold 12 tags but was very shabby chic and in shades of pink. So, I have tried to replicate the same box but in the shades of turquoise, sea greens, violets and blues. I really loved the outcome of this one and I hope you guys will also like this. 
I am putting this project up at Scrapping4fun challenge #83.

This box is actually 8 1/4"x 51/4" in size. The internal box is 73/4"x 43/4" with 2"thickness. I have used a lot of mulberry flowers, sequins, Twinklets diamond dust, Glitter, doilies, twines, distress inks, modelling paste, pearls, stencils and laces.


The supplies used for this project are mainly from Itsybitsy. They sent me a free haul and I have used everything they sent me this time because it arrived just at the time of making this and watever they sent me just matched with the project. 

So here is the list of supplies used for the box:
1 Chipboard (Kraftily Konnect)
2 Turquoise handmade paper (Itsybitsy)
3 White handmade paper (Itsybitsy)
4 Yellow satin ribbon (Itsybitsy)
5 Modelling paste ( Selfmade)
6 Doilies ( A1 craft supply)
7 Silicon glue (Itsybitsy)
8 Pearls (Itsybitsy)
9 Birdcage charm (A1 craft supply)
10 Vellum and other cardstocks (Itsybitsy)
11 Mulberry flowers (Itsybitsy, Nikita more, Kraftily Konnect, A1 craft supply, crafters corner, local stores)
12 Resin flower (The craft shop)
13 Sequins ( local stores)
14 Twinklets diamond dust ( The craft shop)
15 Stencils (Itsybitsy)
16 Distress inks: Peacock feathers, mermaid lagoon, Shaded lilac ( Crafters corner)
17 Glitter (A1 craft supply)
18 Sentiments are from Kaiserkraft (A1 craft supply)
19 Versamark embossing pad and heat gun (Itsybitsy)
20 Black embossing powder: Wow (Itsybitsy)
21 Wink of stella (Itsybitsy)
22 Pattern papers used are from Paperiious and Eno Greetings.
23 White adhesive

So here is the list of supplies used for the tags:
Mulberry flowers (Itsybitsy, Nikita more, Kraftily Konnect, A1 craft supply, crafters corner, local stores)
2 Stencils (Itsybitsy)
3  Silicon glue (Itsybitsy)
4  Doilies ( A1 craft supply)
5 Stamps and sentiments from Kaiserkraft
6 Twinklets diamond dust ( The craft shop)
7 Cardstocks (Itsybitsy)
8 Crochet lace and satin ribbons (Itsybitsy)
9 Eyelets (Itsybitsy)
10 Flourish diecut from MFT
11 Sequins ( local stores)
12 Ephemera from Eno greetings
13 vellum (Itsybitsy)
14 Handmade flowers (Itsybitsy)
15 Chipboard numbers (Itsybitsy)
16 Distress inks Peacock feathers and shaded lilac
17 modelling paste (Self made)
18 Butterfly diecut( Sizzix)
19 White adhesive

Please grab a cup of coffee or teas as now its time for pictures....and lot of them. At the very end I have added the link for the video walkthrough of this project. There are 2 videos showing first the box and the tags in the seconds. I hope you all will like these videos and pictures.


Youtube video: Part 1

Youtube video: Part 2
I hope you guys liked my project. Thank you all so much for visiting me. Till the next time....keep smiling....

Tuesday, 13 September 2016

Treasure Chest

Hello everyone
How are you all doing? I hope you all are enjoying the festivities going on in India....Ganeshotsav is almost over and I cant wait for Navratri to begin...garba, dandya raas and awesome food. This is the my most favorite time of the year when festivals are being celebrated in India with so much energy and excitement.

I have got so engrossed in festivities that I just tend to ignore my work and work commitments and projects tend to near completion slowly and sometimes I just give myself due dates just to tell me to complete it. So today, I am posting a project on which I have been working on for almost 2 months......on and off. Because it was not on order, so I had the luxury to sideline it when I had other things or rush orders on my mind. I decided I had to give myself an ultimatum to take this project seriously......with so much festivities......I am like a child and get so engrossed.....I forget everything.....and I finally completed it on 2nd September....HIGH FIVE......
I got busy with Ganeshotsav and finally got sometime today to write a post about this beautiful project I have made for my friend. It was supposed to be her Belated Birthday gift......Well I am not so delayed after all....Just a delay of 2 months....lol. My BFF is a stationary hoarder and I feel if I rob her, my entire future generation can go without spending anything on stationary items....She has so many pencils, pens, erasers, colors, crayons, diaries and other stuff.....I am sure she doesn't even have a count of it and one day when I asked her to show me her hoarded gold......she had stuffed them in plastic bags and kept them someplace she couldn't locate. That is when I decided, she needed a treasure chest to store her stuff and I started making one for her from scratch.
 So, this treasure chest is not a small sized box.....its a 3 layered box which has lot of space....but I am sure not enough for her collection.....but I am sure it will be of some use to her. I have built this box from scratch.....It took me 2 days to figure out what I wanted to do and how I wanted it to be. I designed it myself....make some mistakes on the way and it helped me to build it better.
This box measures 17" x  12" x 14" ( length x breadth x  height) in dimensions. I have used sunboard and 1500 gms paper board which I have bought from Anupam Stationary stores. to make the box. The entire outer box is made using a sandwich of sunboard ans card board to obtain more durability and strength to the box. To make the inner partitions and flaps as well as small boxes and the other flap to attach the lock is made using the card board. The total weight of this box without anything inside it is 4 kgs.
 FIRST LAYER/SHELF
I have used red tacky tapes, white adhesive and silicon glue for all purposes for this box. Handmade paper is used to cover the box on the inside as well as outside. pattern paper from Eno greetings is used to add some decoration and to cover the boxes. I have done some stamping on this box as well...used Fiskars stamp to add more pattern and borders to this box. Stenciling is done using distress inks in watnut stain, vintage photo, hickory smoke, black soot, old paper and antique linen. I have used same colors on the top and bottom but to obtain a different appearance, I gave the lower part of box a coat of white gesso, and then stenciled over it. That is how the colors look different.
SECOND LAYER/SHELF


To embellish the box, I made some corners from black chipboard and gave it a coat of glossy accents to make it look shiny. Did some decoration with black satin ribbon, polka dotted paper tape and Brown gingham pattern paper tapes. Those little golden flowers were in my stash and i have used them to add more interest to the chest.
THIRD LAYER/SHELF
 
I have used chipboard letters and colored them using black pigment ink pad and then added a layer of glossy accents on it. To add more interest to it, I added some micro beads on them in bronze and golden color and mounted them on layers of black and white handmade paper. These were then mounted on the box using foam tape. More chunky glitter in black and silver is added to the box using some liquid adhesive.


I have filled this box is some gift from my side which include handmade diaries, decoupaged pencils and more things which are only for my BFF's eyes and ears......can't disclose. This chest has 4 hinges and 3 latches added to it as well as some brads to embellish the name board. All the latches and hinges are held by little screws.
The supplies used for this project are:
  • 3 Full emperial sheet of card board (1500gsm) - Anupam stationary store
  • 2 full emperial sheet of sunboard- anupam stationary store
  • 4 Black full emperial handmade paper (Itsy Bitsy)
  • 2 White full emperial handmade paper (Itsy Bitsy) 
  • 2 Beige full emperial handmade paper (Itsy Bitsy)
  • Chipboard sheets to make the boxes inside ( optional)
  • Eno Greetings Pattern Paper ( The craft shop)
  • 3 latches and hinges ( A1 craft store)
  • Glossy accents (A1 craft store)
  • Gingham and polka dotted paper tapes (Anupam stationary store)
  • Micro beads, chunky glitter ( Itsy Bitsy)
  • Brads ( Neha Koradia)
  • Read tacky tape
  • Fevicol
  • Aleene's tacky glue
  • Foam tape
  • Black satin ribbon ( Iitsy Bitsy)
  • Black chipboard for making corners
  • Mdf butterfly buttons (A1 cratft)
  • Fiskars stamps
  • Distress inks and ink blending tool- Watnut stain, Vintage photo, Old paper, Antique linen, Hickory smoke, Black soot.
  • Stencil ( Itsy Bitsy)
  • Decoupage papr and glue for pencils ( optional)
  • Diaries ( optional)
  • Silicon Glue/ Glue gun ( Itsy Bitsy)
  • Golden ribbon
  • Eyelets (ItsyBitsy)
  • Other papers( personal stash)
I even have a video to show the entire chest on youtube and I have added the link below for you all to see.
I am linking my project for this month's challenge at Ranganjali- Sparkly and shiny. I have added gold and bronze micro beads as well as some glitter and some golden shiny embellishments
 It has been a long post and very picture heavy....I hope you all liked it and please do leave comments if you do. Thank you all for reading my post and I hope you all have a good day.