Showing posts with label baby shower. Show all posts

Friday, 7 August 2020

New Baby Gaddi Box/ Handmade Cash Envelope/ Cash Gift

 Hello guys

I am happy to share my new project with you...this is gaddi box or a box to hold bundle of cash meant for gifting purpose. This box easily holds 30 notes of Rs.2000.....and it is meant as a arrival blessing for the new bon. I made it in pink and blue so it is kinda unisex box. The dimensions are 7.5" by 3" by 1.5". I hope you all like it. I have a image and a small clip to help you see it from inside.


Thank you so much for stopping by...Hugs

Tuesday, 23 October 2018

Simple Exploding box for Baby Shower / Baby Announcement

Hello guys
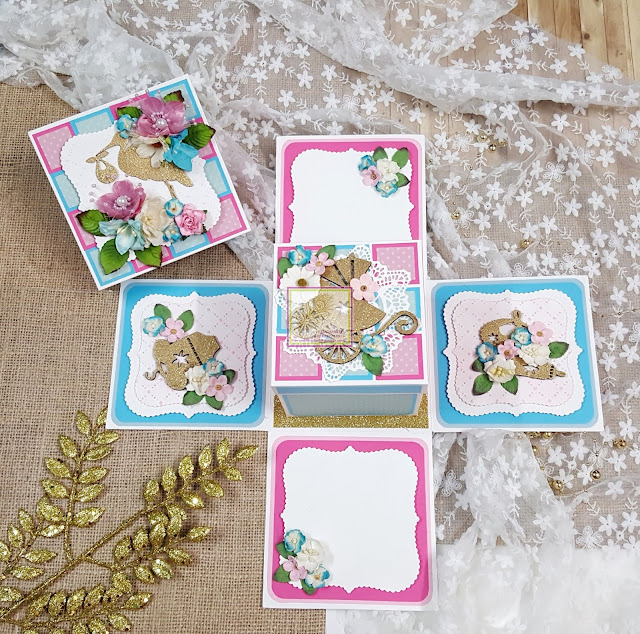
I have a cute little exploding box to share with you all today. This box is perfect for baby showers or baby announcement to write blessings for the baby or the mother to be and fill it up with some sweets.

The exploding box is 5" by 5" by 5" on all sides and when it opens it holds a box in the center which is 4" by 4" by 4" and can hold 250gms of sweets and treats. The exploding box opens to reveal 4 sides on the inside. 2 of these are decorated with flowers and baby embellishments like bib, bottle and onesie which are gold heat embossed to add more shimmer and shine. on the other 2 sides...a message or a blessing can be written for  the mother or the baby.


The lid of the inside box is decorated with gold heat embossed stroller and some pretty flower arrangement on a Prima doily diecut. The outside box is also decorated with a gold heat embossed stork with a baby bundle and beautiful flower arrangement. I have used a lot of diecuts from Spellbinders Nested labels die. I embossed a few of them and then layered them to get a more dimensional effect. I also dry embossed a few of these diecuts and rubbed a little cotton cany distress ink to highlight the raised part to add more interest. I created this fun quilt like effect on the lids of the boxes whihc is by far my most fav part of the project and I hope you all like it too.


I have used Pebbles Basics stack pattern paper to decorate the box and matching cardstock from Fabriano Elle Erre. The box is made using 270gsm Iris cardstock and red tacky tape as adhesive to hold it all together. I have a small video showing you the box better and i hope you will enjoy the video.

Here is a list of supplies used to make this project:-
  1. Iris cardstock - 270gsm
  2. Fabriano Cardstock - Fuscia, Rosa, Ciela, Celesto
  3. Gold glitter cardstock
  4. Mdf baby embellishments - Bottle, bid, onesie and stroller
  5. Wycinanka Chipboard stork and bundle
  6. Ranger Tinsel Gold heat embossing powder
  7. Versamark watermark embossing pad
  8. Pebbles Basics paper stack
  9. Red tacky tape
  10. White adhesive
  11. Mulberry roses, poppies and fillers
  12. Pink Fabric flowers
  13. Prima Doily die
  14. Spellbinders Nested Labels Die
  15. Foam tape
  16. Cotton Candy Distress ink
  17. Dots sizzix Embossing Folder
  18. Sizzix Big Shot

Wednesday, 8 February 2017

Baby Girl Stroller Gift box

Hi guys.

   I have made a Gift box which looks like a baby stroller. You can pack gifts for the new born on baby shower, baby announcement or any occasion you can think of. Now earlier I had made one for a baby boy....this time its for a baby girl. this gift box is almost 18"in height and the dimensions is 14" x  8" approximately in length and breadth.
I am putting up my project at Craft stamper Magazine  and Petal Lu Challenge #31.
  For tutorial, you can visit my earlier post which is very elaborate Click on this link to go to Baby Stroller Gift Box for the tutorial. However if you guys want a video tutorial for the same, do let me know and I will be happy to do one for you.
This gift box took me 2 days approximately to complete as it is a big one and has tone of details to be added to it. I hope you all like it and would try to make a similar one at home.

Supplies used:
  1.  Mount-boards or Cardboard (3)
  2.  Scissors
  3.  Cutters with sharp blades
  4. Fevicol or white strong glue
  5. Fevibond or silicon glue
  6. Kangaroo 1 hole punch
  7. Crafting mat
  8. Ruler
  9.  Compass to draw circles
  10.  Pencils
  11. Small tip glue tube
  12. Binder clips or clothes pin
  13. Level meter
  14. Chart paper or any handmade paper for wheels ( big sheets in 3 colors of your choice I each. 110 gsm)
  15. Heavy Card-stock (220- 250 gsm )
  16. Embellishments
  17. Eyelets
  18. Eyelets punch
  19. Wooden or acrylic beads
  20. Satin ribbon
  21. Glitter foam sheet
  22. Kite paper or tissue paper
  23. Needle and thread
  24. Glitter paper flowers
  25. Pearls
  26. Rhinestone flowers
  27. Wooden beads
  28. Lace/ Trims
  29. Welcome stamp and Archival ink

To make the movable shutter, I have sewed the pieces of the strips to one another in such a fashion that they pieces do not get apart completely. All the pieces of the shutter are held together with a homemade brad.....its simple .....just use button with 2 holes and a thick wire. Pass the wire through the holes of the button and its ready to work like a brad. I covered the exposed end of the wires using a glitter flower with pearl on the center.


  The shutters are decorated with glitter flowers from Itsybitsy and Pink lace trim also from Itsybitsy. I punched a hole in the center of first shutter and added a pink eyelet to it. I then passed the same pink trip and added 3 wooden beads to it....this helps to add some weight on the shutter and keeps it stay put rather than sliding back.
  Finally, I decorate the edges and wheels with thin strips of pink glitter foam. Adds a little interest an color at the same time. The sentiment used is from Mudra stamps and I have heat embossed it using Ranger black embossing powder. Matted it and mounted it using some foam tape.
  This gift box has movable shutter and fixed wheels. You can add an handle to it if you want but I haven't added it purposefully to enable easy access to the gifts.
I am adding the youtube video link below to view the complete gift box. I hope you guys will like it.
Thank you for reading this post and I hope you all will like this.

Tuesday, 30 August 2016

Tiaras

Hello everyone
How are you all doing? Its another rainy day with some strong showers in Mumbai today...very cloudy and very dull. Well everything can be fixed with a little craft and so I decided to do a post on tiaras. this was however pending since many days and had to done soon.
So for all of you who sent me meaasges about tiaras....this one is for you.
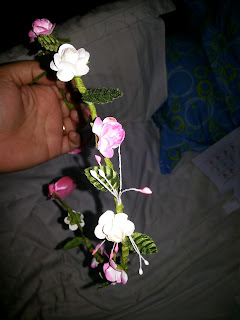
Flower tiaras are incredibly easy to make and look pretty when adored by almost anyone. You can never go wrong with flowers and a little ribbon. To make tiaras, we dunt need much supplies, however I will give you a little gist of what you might need.

Supplies:

Floral wire
Green tape
Mulberry flowers and buds
Pollens
Mulberry leaves
Satin ribbon or organza ribbon and any other ribbon
Wire cutters and wire pliers

I have listed basic supplies but yet again you can add pearls and little charms and anything else you like. You need not worry if you cant find mulberry paper flowers....use anything you can get your hands on.
We start by first making a circle with the wire and make is so big that it will crown your head. Cut the wire an inch shorter and make little loops at ends. You can even double your wire if you think your wire is too thin. I always double mine or just buy thicker wires. That way, they dunt fold under the weight from the flowers.
Once you do that, start coiling your wire with green tape and simultaneously adding flowers and leaves to the tiaras. I add my pollens to the tiaras by adding them to the wire and covering it with green tape. I add this to the tiaras while I am adding flowers.
Once you do that, you can arrange your flowers as they are wired and are more pliable now. You can add ribons at the ends so the one who adorns it can tie a neat bow at the end.

Incredibly easy to make and very cute when worn. If you need a video tutorial for this, please let me know and I will shoot one for you.Thank you for reading my post and have a great day.

Thursday, 2 June 2016

Baby Shower Ideas- 2

Hello guys
I am back with favors for a Baby shower event. I did this event few months ago and though its time to blog about it. This was a Baby shower event for a very special person and it was also a surprise for the Mommy-to-be. Si I had to hurry up to do this event in a very small amount of time and I forgot blogging about it.
I of course started with planning according to the theme......Blue and Pink...So I started with decoration basics.... handcut some pink and blue crepe paper to make the crepe rolls. Then was balloons....baby showers themed and some plain ones. Then I hand did some banners which were baby themed which completed the decoration part.
These banners were hung with balloons from walls and corners with he crepe paper rolls.
 I even did some tassels to decorate the table on which food and drinks were to be kept.
Then it was time for favors....My client wanted 3 favors and so we sat down and worked out what we wanted to give and we decided to do baby booties, Green tea box favor and a small basket filled with girly accessories.
So after a tiring day filled with shopping for accessories and choclates, I sat down to work with the baby booties and tea box

The baby booties are handmade. I used chevron pattern paper with some paper twine. The booties are stuffed with all sorts of chocolates.

The tea box is made using light blue cand light pink  250 gsm cardstock. It was stamped with Thank you sentiment with the flourish.. I contains 4 green tea bags. The tea bags are designed and printed along with pull out tags for the tea bags.
The little baskets were stuffed with shredded paper and thermocol balls. Then, I filled it up with gift wrapped nail enamels, hairbands and hair clips. Then I wrapped the basket with transparent paper and added some satin ribbon bows.


So that finishes the favors. I also added tags to all the favors. These tags are hand drawn and made by hand.
Last but not least, a sache and tiara were made to complete the entire order.

I do have all the pictures for the event and the products I made. Thank for reading my blog and have a great day