Showing posts with label lindys stampgang. Show all posts

Thursday, 13 August 2020

Just Relax - Mixed Media Layout

 Hello guys

I am sharing my new mixed media layout today which is inspired by blog challenge moodboards and I am also putting up my layout at these challenges.The design and choice of words with picture is inspired the Sketch mentioned at More Than Words Challenge for August 2020 and the color scheme and theme is inspired by the moodboard at Lindy's Color Challenge.

I have used a picture of my nephew and myself....this is atleast 10 years old. Though I wanted to add another image of us building sandcastles and chilling on the Juhu Beach(Located in Mumbai, India).....he is a teenager now and wasnt comfortable with me adding his picture playing in underpants...so I zerored in on another picture where only our hands are seen and decided to use only that...but once the post is public..I am going to add the picture I earlier decided to use and give the layout to him. He is my baby...I love him.

The Lindy's moodboard inspired me to do a beachy layout and I wanted to try to use the sketch at MTW challenge because I have never done a sketch challenge before...It was super fun and took considerably less time to build the layout. 


There is a square pattern in the layout that repeats itself 3 times...I decided to replicate it using 3 small stars which symbolise starfish. Also there is circle pattern that repeats itself, also 3 times and I added melange stones at those 3 spots to represent this pattern. I think I have tried my best to replicate the pattern and also combined it with elements and pattern from the Lindy's moodboard like inclusion of stars, chickenwire, sand and 3 colors.

I started with my pattern paper from ItsyBitsy and created my own background with stencil, mediums and pastes. Then I added my colours and splatters in various places. I used a lot of dimension to build arrangement...I feel it adds depth and defination to any project. I did add sand on my image as well as on the background in various places....adds so much to the project. Once My arrangement was done, I added finishing touches and more splatters. I was tempted to add stamping but I refrained from it...just to see if I can try to make a layout with no stamps....I guess I can.

I am participating in 


Tuesday, 12 May 2020

Mixed Media Canvas - Make a Wish

Hello guys
Welcome back to my blog....today I have a mixed media canvas to share with you all. I made this canvas for my sister and brother-in-law for their wedding anniversary..which is today. I wasn't able to find anything to gift her....so I thought to make this canvas for her...she always appreciates and motivates me and I thought hi canvas s would make a perfect gift for her.
I did use a lot of art stones and paper clay pieces I made using moulds from Redesign by Prima...they have some amazing designs and I just use them like everywhere. To build my background, I did use White crackle paste in random areas and sprinkled some art stones using Gel medium....once everything was dry...I added my Lindy's squirts......oh those squirts are filled with magical shine...I am so happy that I have them all. I dried everything and then, layered all my pieces and pattern papers. I am really excited with the way this has turned out to be.....I was a very relaxing process and I am hopeful to make a tutroial for the next one I make....fingers crossed
So...I had this beautiful image of this girl who is blowing dandelions and I was inspired by that to make this canvas. I sorted out the primary colors to use and then everything just fell into place. I made my own pattern paper which was really fun and something I rarely do....a lot of stamping...stenciling and color sprays gave me this beautiful paper which actually completes my canvas. 


List of supplies used:-
  1. White Crackle Paste - Finnabair
  2. Heavy white Gesso - Finnabair
  3. 3D Matt Gel Medium - Finnabair
  4. Italian Accents Redesign Mould
  5. Regal Emblems Redesign Mould
  6. Art Stones, Mega Art Stones and Mini Art Stones - Finnabair 
  7. Dusty Attic Chipboard - ATc Frames #7, Bird Houses
  8. Expressions Craft Chipboard - Rose Leaves, Windows
  9. Lindys Squirts -Maple Syrup Bronze, Beaver Tail Brown, Baniff Blue, Hockey Puck Black
  10. Lindys Sprays - Aloha Avacado, Yellow Rose of Texas.
  11. Art Alchemy Wax- Vintage Gold and Rich Copper.
  12. Little Birdie Crafts Flowers
  13. Glas Glitter and Fine Glitter- Gold
  14. Tim Holtz Sentiment tiles
  15. 8"by 8"Canvas
I am putting this up at the following blog challenges
Thank you so much for stopping by...have a fun day ahead.

Tuesday, 8 October 2019

Choose To Shine - Round Mixed Media Canvas

Hello everyone
I am here to share my new mixed media canvas with you all. I made this canvas taking inspiration from the September Art Recipe Moodboard on the Finnabair blog. I was really excited to work with the given moodboard and make something on a round canvas. So here is what I made....

So, the challenge consists of colour palette and products and I had to use any 2 of the products from the list they gave....so here are the options for colors and products

Colours of September Art Recipe:
carmine red, brown, golden

Products:
Art Alchemy: Liquid Acrylics
Art Extravagance: Fantasy Texture Paste
Art Ingredients: Glass Glitter
Finnabair Stencils

I decided to use the new Finnabair stencil, Vintage Gold Icing Paste and Sterling Glass Glitter. I have still not able to get Liquid Acrylics here so I decided to use New Lindy's Squirts to add color to my canvas. I used Hockey Puck Black, Maple Syrup Bronze, Beaver Tail Brown, Oh Canada Crimson and Canadian Bacon Blush.

I used an old clock as the base for my project.....added gesso, texture paste and some art stones to build my background. Once everything was dry, I added colors to it...so it was easy to build over it. Then, I came back with clay pieces, metal embellishments and  chipboard embellishments to add layers and dimensions to my canvas. Before adhering it all, I stencilled my icing paste in some random areas......its was important to do it now as later I wouldnt be able to do it comfortably. here is a closeup of the focal image.

I then colored all the embellishments on the canvas and added the focal picture. To add highlights, IO have used 3 art alchemy waxes - Vintage Gold, Whilte Gold and Fire Ruby. These waxes give such an amazing finish to my canvas....it all came together after this. To add more interest I added dyed cheesecloth in few places to give a feel of veil. To finish it all, I added glass glitter and some fine glitter. Here are some more closeups


I hope you all liked my project. I am linking it to the following blog challenges:

  1. Finnabair Art Recipe - September 2019 Moodboard
  2. More Than Words - October Moodboard Challenge - Costume and Black Background - I have added a small mask to the image giving it a feel of costume. I was going for the look of a seer without giving it an entire costume.
  3. More Mixed Media Challenge - Anything Goes optional orange

Friday, 6 September 2019

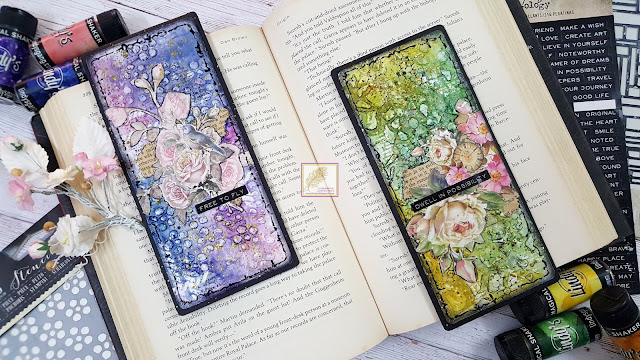
Magnetic MixedMedia BookMark - GDT post Creative Artiste Challenge

Hey guys
Today I have magnetic bookmarks to share with you all. I am the guest Designer at Creative Artiste Challenge Blog today and I have made these as the GDT project. Here is a link to the blog post....do visit me there.
I made 2 of these bookmarks and they were so fun to make....I did use some mixed media techniques to add texture and dimension to this project using mediums and textures from Prima Marketing and Little Birdie Crafts. To add more interest to the background, I have done stamping using Finnabair stamps and some splattering as well. To highlight the texture, I have outlined the stencilled areas and added stitch marks using my Sakura black pen.

To add colors to my project, I have used Lindy's Magical shakers....and used a spray varnish to seal it all in. These bookmarks have magnets ad can clamp on pages...so you never have to loose these bookmarks. I hope you guys like them.
I am putting these up at the following blog challenges:
  1. Addicted to stamps and more Challenge #357 - Make Your Mark - I have outlined the texture and also added stitch marks to my project using Sakura Black pen.