Hello guys
Welcome back to my blog. Its October and time to gear up for Halloween. When you think Halloween....the first thing that comes to my mind is Orange, Purple, Spiders, Pumpkins and Blood....I do not know but these are the first things. So here, I have party decorations that I did for my sister-in-law for the coming up Halloween party.
I made Trick or Treat backdrops on cobwebs, candy treat bags, A Beware plaque for the main door, 3 more plaques for food settings, a few eyes for cupcake toppers and some more banners to hang off the wall.
MAIN DOOR PLAQUE:-


 She asked me to do my best and I did give it all...to be a little honest I just got carried away. in India, we have Diwali during the same time...but in recent times Halloween theme parties are all in rage. So, here is my first attempt at making Halloween decorations.
FOOD SETTING DECORATIONS:-

 To make all the plaques, I started with sturdy black chipboards and some modelling paste. I used my hands and fingers to do all the goop and blood on the plaques using modelling paste. I even traced beware with my fingers and so you see a lot of finger marks on the plaques....It adds to the goriness. I let it dry completely and then I colored it using thick acrylic paints. I added a little white adhesive to the paints to give it a glossy finish...so it looks like its still wet and goopy......I have used 3 shades from each color to give it a variation and add depth to my project...so I used Crimson, Vermillion and Red for the Blood effect on the VAMPIRE's DRINK plaque.

 For the FRANKEINSTEIN's FOOD I have used Light Green, Dark Green and Sap Green. I mixed white adhesive to the paints to give it a more wet and glossy look....Looks like real goop in real.


I just used some woollen yarn to make the cobwebs. It took me 30mins to make each and then I added a thin coat of diluted white adhesive to make it a little stiff. The banners in the center are made using some black chipboard, orange cardstock and chipboard alphabets. I painted the alphabets with black acrylic colors. Then I added some black satin ribbon so it could be easily hung from anywhere.
BANNERS:-


Welcome back to my blog. Its October and time to gear up for Halloween. When you think Halloween....the first thing that comes to my mind is Orange, Purple, Spiders, Pumpkins and Blood....I do not know but these are the first things. So here, I have party decorations that I did for my sister-in-law for the coming up Halloween party.
I made Trick or Treat backdrops on cobwebs, candy treat bags, A Beware plaque for the main door, 3 more plaques for food settings, a few eyes for cupcake toppers and some more banners to hang off the wall.
MAIN DOOR PLAQUE:-


FOOD SETTING DECORATIONS:-


For Eyes for the Witches, I used Lavender, Lilac and Violet and Orange, Chrome Yellow and little Vermillion. Again mised white adhesive to give a more real look. I went with this color to complete the traditional Halloween color scheme. Super fun to make these plaques...
I just used some White gel pen to write all the names on the plaques.
CORNER AND BACKDROP DECORATIONS:-

I just used some woollen yarn to make the cobwebs. It took me 30mins to make each and then I added a thin coat of diluted white adhesive to make it a little stiff. The banners in the center are made using some black chipboard, orange cardstock and chipboard alphabets. I painted the alphabets with black acrylic colors. Then I added some black satin ribbon so it could be easily hung from anywhere.
BANNERS:-


It was so much fun making these banners. I started with black chipboard and layered some orange cardstock on it and then added some Black painted chipboard alphabets....finished with black satin ribbon to make it easy to hang. Super fun to make...
BROOM:-


We all know that....Every Witch needs her broom. So I made this as a prop and everyone in th party could take a pic sitting or holding this. I used newspapers to make the stick and added some tissue paper fringes to make the front part. I then colored the stick with brown and black arylic colors to give a worn out look...I wish I had a better pic.
GOOGLY EYES:-


Aren't these cute....I made these as cupcake toppers. I just matted white circle with colorful cardstock and added a foam center. I added dye ink and then glossy accent on it. It gave it that cracked look as the ink was separating from the foam. I then just distressed the edges to give it a worn out look.
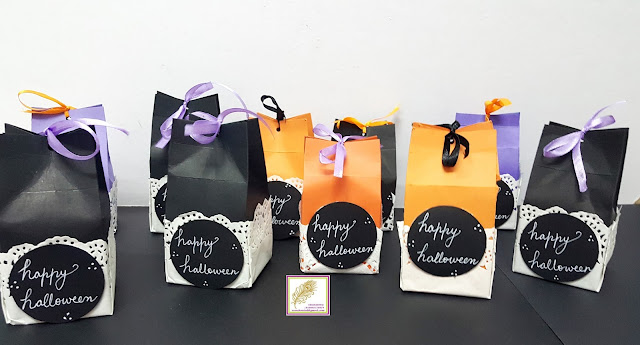
CANDY TREAT BAGS:-


What's Halloween without candy...huh? Made these super cute candy bags using orange, black and violet cardstock. I then covered the lower part with doilies....looks super adorable. Then, I added the Happy Halloween tags in the center. I wrote the sentiment instead of stamping it...just for fun.
I am putting my project up at Simon Says Stamp Monday challenge - A Walk on the Dark Side.
I hope you guys liked it as much as I did.....Thank you for reading this picture heavy post. Have a wonderful week ahead.