Showing posts with label acrylic colors. Show all posts

Sunday, 9 April 2017

Happy Easter Handmade card

Hello everyone
I am back with a handmade card today and after really long. I haven't made any cards in the last few months and so I am really excited to share this one with you all. Since Easter is on the horizon, I have made a shabby chic Easter card.
I am putting my card up at monthly competitions at:-
1 Addicted to stamps challenge#236
2 Allsorts challenge Blog Week 410 - Bring on the bling
14 Scrappy Land Challenge #63- Used die from Elizabeth Craft Design

I have used a lot of products to make this one and am simply in love with the result. The papers used for the card are from Eno Greetings and Papericious. I have done a little stenciling using a very pretty Roses stencil from Prima Marketing. The egg is fussy but by me since I didn't have a die for it. The stamp used for the sentiment is partly from a local store while the EASTER is handwritten using a finetip waterproof Black pen.
I added some delicate leaves using Elizabeth craft designs die and some mulberry flowers which are from different stores. The laces and trims are from local store and Itsybitsy. I did dry brush some Art Basics Heavy white gesso on some flowers and other places.
 I have distressed the edges and added some sparkle using clear sparkle powder from Crafters corner. I have also used Wink of stella at some places. The little gold bird is from Papericious chippies and is heat embossed using Tinsel Gold from Ranger.Finally, I finished the card by added few  sequins and splatters of gold and white acrylic paints.
List of Supplies:-
1 White cardstock - Itsybitsy
2 shades of green cardstock - Itsybitsy
3 Pattern paper for background - Eno Greetings
4 Pattern paper for Egg - Papericious Flora Season
5 Roses Stencil - Prima Marketing
6 Pink color splash - Itsybitsy- To add Pink tinge to the texture paste used for stenciling
7 Embossing/ Texture paste - Art Basics Prima Marketing
8 White Gesso - Art Basics - Prima Marketing
9 White fun foam to add dimensions - Local Store
10 Leaves die - Elizabeth Craft Designs
11 Mulberry flowers - Crafters corner, The Craftshop, Local stores
12 Jute twine - Itsybitsy
13 Laces and trims - Local store and Itsybitsy
14 Clear sequins - Crafters corner
15 Gold sequins- Itsybitsy
16 Silicon glue - Itsybitsy
17 Clear Sparkle dust - Crafters corner
18 Wink of stella - Crafters corner
19 Tim Holtz Distressing tool- Crafters corner
20 Bird Chippies - Papericious
21 Versamark - Crafters corner
22 Tinsel Gold - Crafters corner
23 Wow Heat gun - Itsybitsy
24 White and gold acrylic paints

I hope you liked my card. Thank you so much for visiting me.

Friday, 7 October 2016

Diwali Diyas

Hey everyone
Diyas are getting painted and decorated at a very rapid pace....which is very unusual for me...as I am a very competant person and dunt like anything to be messed up. Everything has to be perfect mostly beacause these diyas are made specially for family and friends to be gifted for Diwali.
Yet again, I bought these diyas from a local potter and then painted them using pearl acrylic colors and decorated with some rhinestones. Don't they look pretty and cute.....I have made around 100-150 of these and I am putting pictures of them. They are just repeated patterns and so I am putting up one from each type I made.

Thank you for reading my post and I hope you all like it.

Thursday, 1 September 2016

Mails - Newspaper Basket

Hello everyone
I have new project for you this week ad it a newspaper basket made specifically to keep your mails. It is made from newspaper tubes using the coiling technique. The best part about making such baskets, you can first figure out what size you want and then start the coiling process. To make this basket, I needed about 60-70 coiled tubes and now this again depends on the size and thickness of your tubes.
This basket it different from the most of the baskets I have done previously because I have used lot of techniques to make. I have colored the basket with acrylic colors and then decoupages on it using flowers cutouts from tissue napkins and mod podge. Another thing, I have incorporated is some glitter or confetti glitter at few places. To add some more dimension, I have outlined the flowers using some white 3d liner and added few 3D stickers of stamps and a beautiful chipboard key. This basket was way out of my comfort zone wrt to colors and bling...but I liked it the way it turned out.
 I started by making 8 circular coiled discs which are about 5" in diameter. I coiled them around a small bottle to get the uniform hole in the center. Then I went ahead and stuck 2 coils together to make a sturdy biscuit like piece. I made two such pieces. These will be used for making the base. The remaining 4 discs will be used for the sides of the baskets. 

Now to make the piece supported by the discs, we need to make 2 small circular coils with diameter 2" and then coil more tubes over it in a square fashion. This will give us the desired shape. Keep coiling until you are happy with the size. Repeat the step for the other side too.
Not to make the rectangular pieces for the other sides, I suggest you make these when you put your coils together. When you do so, you will come to know the size required for the sides and then it will be easy to coil it.


 Once everything is done, put them together and that should give you the basket frame. I added a coat of gesso before I painted it with acrylic colors. I used Fevicryl colors in mauve, purple and magenta and did some shading. Once throughly dried, I decoupaged it with the flowers and while it was wet added some glitter to the project. After, the drying period, I did the outline in white and then gave it a few coats of Asian Paints Aquadur varnish.


Then came the fun part, adding the little stickers and the beautiful key and some glitter alphabets. These were all glued using Epoxy 6000 just to be sure nothing comes apart ever.
I am adding a youtube link for the tour of this basket.
Thats all folks, my basket is ready. I hope you all liked it. Leave me your comments and queries and I will get back to you as soon as I can.

Wednesday, 3 August 2016

Happy Rakshabandhan Card

Hello everyone
I love this time of the year in India...its raining right now but festivals are on the horizon.For me of course, the celebrations start a bit early as I love rains. Super super excited about it...but thats not what I am posting today about.
The first festival to approach is Raksha Bandhan which is on 18th August and I am sure its really special for everyone who either has a brother. I have two elder sisters and never quite celebrated Raksha Bandhan but yet it is a special day because we would be busy with all the preparations at home as my maternal uncles would come home.
Well, this is the first card I made this year to celebrate Raksh Bandhan which is for a very special client.She wanted to send to her brother who stays away from her and so I had to do this card so early.
I have did distress ink blending to get a bright frame for the card using Shaded Lilac, Spun sugar, Peacock Feathers, Squeezed Lemonade, Mermaid Lagoon, Seedless Preserves,Moved lawn and Crushed Olive.I added some white splatters to the card using some white acrylic colors. I then went ahead and make a shaker card which is filled with gold, silver, white and clear sequins. This is a pull out card and the message can be written on the hidden card inside.
 Lots of elements are added to this card like a paper Rakhi I made using punch out flowers and a quilled flower in the center. I finished the Rakhi with an embellishment in the center and attached a golden twine to it. You can also replace this with a real Rakhi for your brother and attach it to the card with a mild adhesive.
The sentiment I have used is from Peek-a-boo designs and I have stamped it using Memento Dye inks Grape jelly and Lilac roses.To give it a pop I did a gold edge to it using a gold fine tip pen. You can do embossing as well using gold embossing powder.
For the main frame of the card. I have used glitter paper cut outs from ItsyBitsy to give it a finished edge. I have filed the card with gold, iridescent, white, silver sequins and metallic micro-beads, I have made a shaker window in such a way that the center part of the card is adhered to the shaker portion and it creates a frame like look to the shaker window.
For the inside of the pullout card, I have added a red and gold tassel to the tag. At the bottom of the card I added a strip of the ink blended front card and a glitter strip.
I did some ink blending on the white cardstock using Shaded Lilac and Spun Sugar distress inks and stamped some leaves from Fiskars Petals from Scratch stamp set. I fussy cut them and then adhered them on the card. The other side is blank and you can write your messages there.
That finished our card. Its full of vibrant colors and glitter and sparkle and turned out exactly how my client asked me to do it. She was very happy when she saw it and I felt the time I spent making this card was worth it.

Supplies used:

  • White cardstock
  • Distress inks - Shaded Lilac, Spun sugar, Peacock Feathers, Squeezed Lemonade, Mermaid Lagoon, Seedless Preserves,Moved lawn and Crushed Olive.
  • White glitter strips
  • Stamps for Raksha'bandhan
  • Yellow Glitter punch out flowers from Itsybitsy
  • Ink blending tool
  • Gold Thread
  • Sequins and micro-beads
  • Fiskars Petals from scratch stamp set
  • Red and gold tassel
  • White acrylic paint
  • foam adhesive
  • Acetate sheet
  • Paper cutters,scissors and trimmers
  • Strong adhesive 
  • Gold fine tip pen
  • Memento Dye inks Grape jelly and Lilac roses
I am entering this card at Peek-a -boo challenge of the month and Paru's card making challenge, Thank you all for reading my blog post and Happy Raksha bandhan to you all.

Monday, 18 July 2016

Hexagonal newspaper basket with a lid

Hello guys
I am uploading pictures of yet another basket that I have made. This basket is also made with newspaper tubes and colored with acrylic colors. I have embellished this one with flat pearls and some critters from ItsyBitsy.
 For tutorials you can visit my previous posts. I am not posting a specific tutorial here as the procedure is similar to the earlier baskets. The only change is that I have added few embellishments.

Thank you all for reading my post and have a Happy Monday. 

Friday, 15 July 2016

Newspaper Basket for Tissue Napkins

Hello guys
I am back today with yet another newspaper basket. This one is incredibly easy one to make and it was custom made for one of my clients. I did it in a record time of 2 days and that includes varnishing the basket.
I do not have much pictures of this basket as the client was in a big hurry and I had no time to take appropriate pictures. I randomly clicked some from my mobile phone and got only two pics which were ok and I uploaded them here on my blog.
 I have detailed tutorials on my other posts. I am just going to give a summary about how I made this one. I started off by making some newspaper tubes and started coiling them around a pen. Did 16 small circular discs for the sides, joined 4 discs together to get the sides of the basket.Then I went ahead and did the base by coiling the tubes in a square style. After I achieved the desired size, I attached the sides to the base and then added an additional coil around the base to hold off the sides.
Once the basket was done, I gave it a glue wash and dried it, and repeated the process. Once thoroughly dried, I went ahead and painted my basket with Fevicryl acrylic colors. Then to finish it gave it 2 coats of Asian Paint Aquadur PU varnish.
Thats all and my basket was ready. this one is very easy to make. I would maybe leave this basket near the door entrance to leave my keys there,...just a thought. I would like to remind you all about the Giveaway on my blog which will be running till 27th July and you all can participate in it. Just read the post about giveaway and follow the steps.
Thank you all for reading my post and have a good day.

Wednesday, 13 July 2016

Newspaper Coiled Basket 2 (Olive Green)

Hello everyone
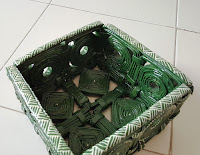
This month is upcycling month for me at my blog and I am trying to upcycle and make as many products as I can. So here I am today with a different basket made with newspaper coiling. Now this basket is made with neswpaper tubes which are coiled tighly and then joined together to get a basket.
For more information about how to make newspaper baskets you can refer my earlier blog posts about making Newspaper coiled baskets. This basket is bigger than the earlier basket and can accomodate more things. I could fit in 6 small bottles or 4 big bottles and if I mixed the sizes I could fir in 5-7 bottles.
That is the best part about making such baskets, you can first figure out what size you want and then start the coiling process. To make this basket, I needed about 100 coiled tubes and now this again depends on the size and thickness of your tubes. I started by making 8 circular coiled discs which are about 3"in diameter. I coiled them around a small bottle to get the uniform hole in the center. Then I went ahead and coiled tubes around the discs in square format. If you can do it directly, you can make a square template and coil it around it and then transfer the coil on the disc. The size of the square is 4"by 4".
 Once all eights squares were complete, I joined them together with a broad newspaper tube which were not very thick. So I joined a 2 square per side and I got 4 rectangles. I then coiled coiled tubes on them to make them look like a single piece. I repeated this process for all the 4 rectangular pieces. The size of the rectangles after coiling came up to be 9"by 5". This completed our sides.
For the base, I  have made 4 squares which are 2"by 2" in size and then turned them 90 degrees and coiled tubes around them untill they were 4.5"by 4.5"in size. Repeated this with all 4 squares and I got 4 big squares. I joined all of them together to get a big square which was 9"by 9"in size.
I joined the sides we made earlier with the base using flat paper tubes. Then joined all the adjacent sides with each other. This completed the basic basket.

Now, give the basket a good glue wash which is glue and water mixed to the ration if 1:2. Once it dries up, give another wash thoroughly on the inside as well as outside and let it dry. I painted it with Fevicryl acrylic color in Olive green. Once it dried, I did some handwork using Fevicryl 3D white matt lines. It took about 30 mins to dry completely. I let the basket be overnight and the next day I varnished it twice using Asian Paints Aquadur PU. Varnishing the project is an optional step as the acrylic colors make the project waterproof, but I varnish to make it scratchproof and stainproof.
This completes our tutorial about making this basket. Thank you all for reading and have a wonderful day. I have a giveaway running on my blog to celebrate 1,00,000 hits on my blog. You can participate in it by reading my post Once Lakh Blog views and a Giveaway. See you next time and untill then keep crafting.....