Hello everyone
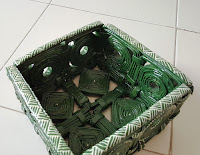
This month is upcycling month for me at my blog and I am trying to upcycle and make as many products as I can. So here I am today with a different basket made with newspaper coiling. Now this basket is made with neswpaper tubes which are coiled tighly and then joined together to get a basket.
For more information about how to make newspaper baskets you can refer my earlier blog posts about making Newspaper coiled baskets. This basket is bigger than the earlier basket and can accomodate more things. I could fit in 6 small bottles or 4 big bottles and if I mixed the sizes I could fir in 5-7 bottles.
That is the best part about making such baskets, you can first figure out what size you want and then start the coiling process. To make this basket, I needed about 100 coiled tubes and now this again depends on the size and thickness of your tubes. I started by making 8 circular coiled discs which are about 3"in diameter. I coiled them around a small bottle to get the uniform hole in the center. Then I went ahead and coiled tubes around the discs in square format. If you can do it directly, you can make a square template and coil it around it and then transfer the coil on the disc. The size of the square is 4"by 4".Once all eights squares were complete, I joined them together with a broad newspaper tube which were not very thick. So I joined a 2 square per side and I got 4 rectangles. I then coiled coiled tubes on them to make them look like a single piece. I repeated this process for all the 4 rectangular pieces. The size of the rectangles after coiling came up to be 9"by 5". This completed our sides.
For the base, I have made 4 squares which are 2"by 2" in size and then turned them 90 degrees and coiled tubes around them untill they were 4.5"by 4.5"in size. Repeated this with all 4 squares and I got 4 big squares. I joined all of them together to get a big square which was 9"by 9"in size.
I joined the sides we made earlier with the base using flat paper tubes. Then joined all the adjacent sides with each other. This completed the basic basket.
Now, give the basket a good glue wash which is glue and water mixed to the ration if 1:2. Once it dries up, give another wash thoroughly on the inside as well as outside and let it dry. I painted it with Fevicryl acrylic color in Olive green. Once it dried, I did some handwork using Fevicryl 3D white matt lines. It took about 30 mins to dry completely. I let the basket be overnight and the next day I varnished it twice using Asian Paints Aquadur PU. Varnishing the project is an optional step as the acrylic colors make the project waterproof, but I varnish to make it scratchproof and stainproof.
This completes our tutorial about making this basket. Thank you all for reading and have a wonderful day. I have a giveaway running on my blog to celebrate 1,00,000 hits on my blog. You can participate in it by reading my post Once Lakh Blog views and a Giveaway. See you next time and untill then keep crafting.....


Absolutely stunning!! Wow!! I love the design!! You've colored it so beautifully!! It looks amazing!! What a spectacular basket!! Have a great day!! Big hugs :)
ReplyDeleteLisa
A Mermaid's Crafts
Hey Lisa...Ty for ll your lovely comments. You have a great day ahead...cheers!!
DeleteThis is so fabulous Mukta. I loved the color and the final touches using 3d. It looks like you have stiched them.
ReplyDeleteCongrats for getting a lakh hits too.
Http://vsomayaji.Blogspot.com
Hi Vasudha....Ty for the wishes. I love this basket too....its amazing what a 3D tube can do..Have a good day and ty for visitng me.
Delete