Wednesday 20 July 2016

Baby Mobile Card

Hey guys
How have you been? I am a bit busy this week with some work commitments, but I am taking pictures of the projects before I dispatch them. I am not able to find time to blog about them as soon as I take pictures, so I am posting about them in between my work when i can find time. So, here is a Congrats card I made for someone who just had a baby. I am linking this card at Craft Stamper for the challenge of this month which is Anything Goes.
I made this card yellow and grey as I wasn't informed if it was boy or a girl and hence the color choice. This card has a gift envelope inside so it can carry your message as well as cash gift.
To make this card, I have used a 5.5"by 5.5"white cardstock for base. Then I went ahead and googled some elephant clipart to make the mobile. I found a one I liked and printed it to the size I wanted. Then after printing it, I tweaked it a little to make it look like the one in the card.
Once, I was happy with my elephant, I fussy cut it out. I took a white cardstock and added yellow polka dotted paper tape on it. I then traced my elephant 4 times on this piece of cardstock and then fussy them out. Then, to add the ears, I cut 4 hearts from Papericious Colour Celebration pattern paper. To make the mobile stand, i used the same pattern paper and used a black waterproof pen to make the threads. I adhered the elephant to the card using foam tape and added a flat pearl to finish the mobile. I have stamped the congrats sentiment from JustRite Clear Grand Handwritten Sentiments Stamp Set on white cardstock and layered it on the pattern paper. To finish the card, I added some yellow bakers twine and a thin strip of the Papericious Colour celebration pattern paper.

For the inside, I made a small envelope and added the swirly pattern and Best wishes Sentiment which re both from Inkadinkado Birthday Wishes Stamp Set. Secured the envelope using White Satin ribbon.For detailed Turorial for making the envelope, please refer my earlier post Congrats on your Engagement.
I want to remind you all about the giveaway running on my blog till 28th July. Please visit the post One Lakh Blogviews and Giveaway to know how to participate in the giveaway.
Thank you for reading my post and hope you all liked it.

Supplies used:
  1. White cardstock
  2. Papericious Colour Celebration pattern paper
  3. Yellow polka Dotted paper tape
  4. Black waterproof finetip pen
  5. Memento Dye inks- Tuxedo Black and Dandelion
  6. Yellow Baker's Twine
  7. Scotch foam adhesive
  8. Red tacky tape
  9. Martha Stewart Scoring borad
  10. Scissors
  11. JustRite Clear Grand Handwritten Sentiments Stamp Set.
  12. Inkadinkado Birthday Wishes Stamp Set.
  13. Satin Ribbon from ItsyBitsy.

Monday 18 July 2016

Hexagonal newspaper basket with a lid

Hello guys
I am uploading pictures of yet another basket that I have made. This basket is also made with newspaper tubes and colored with acrylic colors. I have embellished this one with flat pearls and some critters from ItsyBitsy.
 For tutorials you can visit my previous posts. I am not posting a specific tutorial here as the procedure is similar to the earlier baskets. The only change is that I have added few embellishments.

Thank you all for reading my post and have a Happy Monday. 

Friday 15 July 2016

Newspaper Basket for Tissue Napkins

Hello guys
I am back today with yet another newspaper basket. This one is incredibly easy one to make and it was custom made for one of my clients. I did it in a record time of 2 days and that includes varnishing the basket.
I do not have much pictures of this basket as the client was in a big hurry and I had no time to take appropriate pictures. I randomly clicked some from my mobile phone and got only two pics which were ok and I uploaded them here on my blog.
 I have detailed tutorials on my other posts. I am just going to give a summary about how I made this one. I started off by making some newspaper tubes and started coiling them around a pen. Did 16 small circular discs for the sides, joined 4 discs together to get the sides of the basket.Then I went ahead and did the base by coiling the tubes in a square style. After I achieved the desired size, I attached the sides to the base and then added an additional coil around the base to hold off the sides.
Once the basket was done, I gave it a glue wash and dried it, and repeated the process. Once thoroughly dried, I went ahead and painted my basket with Fevicryl acrylic colors. Then to finish it gave it 2 coats of Asian Paint Aquadur PU varnish.
Thats all and my basket was ready. this one is very easy to make. I would maybe leave this basket near the door entrance to leave my keys there,...just a thought. I would like to remind you all about the Giveaway on my blog which will be running till 27th July and you all can participate in it. Just read the post about giveaway and follow the steps.
Thank you all for reading my post and have a good day.

Wednesday 13 July 2016

Newspaper Coiled Basket 2 (Olive Green)

Hello everyone
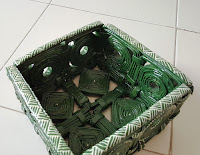
This month is upcycling month for me at my blog and I am trying to upcycle and make as many products as I can. So here I am today with a different basket made with newspaper coiling. Now this basket is made with neswpaper tubes which are coiled tighly and then joined together to get a basket.
For more information about how to make newspaper baskets you can refer my earlier blog posts about making Newspaper coiled baskets. This basket is bigger than the earlier basket and can accomodate more things. I could fit in 6 small bottles or 4 big bottles and if I mixed the sizes I could fir in 5-7 bottles.
That is the best part about making such baskets, you can first figure out what size you want and then start the coiling process. To make this basket, I needed about 100 coiled tubes and now this again depends on the size and thickness of your tubes. I started by making 8 circular coiled discs which are about 3"in diameter. I coiled them around a small bottle to get the uniform hole in the center. Then I went ahead and coiled tubes around the discs in square format. If you can do it directly, you can make a square template and coil it around it and then transfer the coil on the disc. The size of the square is 4"by 4".
 Once all eights squares were complete, I joined them together with a broad newspaper tube which were not very thick. So I joined a 2 square per side and I got 4 rectangles. I then coiled coiled tubes on them to make them look like a single piece. I repeated this process for all the 4 rectangular pieces. The size of the rectangles after coiling came up to be 9"by 5". This completed our sides.
For the base, I  have made 4 squares which are 2"by 2" in size and then turned them 90 degrees and coiled tubes around them untill they were 4.5"by 4.5"in size. Repeated this with all 4 squares and I got 4 big squares. I joined all of them together to get a big square which was 9"by 9"in size.
I joined the sides we made earlier with the base using flat paper tubes. Then joined all the adjacent sides with each other. This completed the basic basket.

Now, give the basket a good glue wash which is glue and water mixed to the ration if 1:2. Once it dries up, give another wash thoroughly on the inside as well as outside and let it dry. I painted it with Fevicryl acrylic color in Olive green. Once it dried, I did some handwork using Fevicryl 3D white matt lines. It took about 30 mins to dry completely. I let the basket be overnight and the next day I varnished it twice using Asian Paints Aquadur PU. Varnishing the project is an optional step as the acrylic colors make the project waterproof, but I varnish to make it scratchproof and stainproof.
This completes our tutorial about making this basket. Thank you all for reading and have a wonderful day. I have a giveaway running on my blog to celebrate 1,00,000 hits on my blog. You can participate in it by reading my post Once Lakh Blog views and a Giveaway. See you next time and untill then keep crafting.....

Tuesday 12 July 2016

Celebrate!!!

Hello guys
 Its a very special day for me and I am super excited. I started blogging on 26th March, 2016 with no knowledge about blogging and I didn't know how I would be able to connect to the world to show them my work. But with lot of support from family and friends and majorly by my husband Chintan, I mustered a lot of courage and determination and finally started blogging. Honestly I didn't know I would survive this long on this platform, but I like crafting and I kept doing my work as usual and posted them on my blog. Days turned into weeks and weeks into months and my confidence started to build.
I am very happy to say this today, I have crossed 1,00,000 visits to my blog today it has happened because of all of you who came to my blog to read my posts. Its not been that long since I started blogging, but the love and support I got from all of you makes me feel like I know you all since a very long time. I want to thank each and everyone of you who has made this possible. I have achieved a small milestone today but its very special and important to me and to celebrate this moment I am doing a giveaway on my blog, so go ahead and read the giveaway post to participate in it.
Now for today's card, because I am celebrating our achievement, I have made a celebration card. I am entering this card for the July challenge at Lulupu, Craft Stamper Magazine, Peek-a-boo Designs and Paru's Card making challenge.
The card layout is as per the challenge rules at Lulupu this month, I have lots of layering in my card which is mandatory for Peek-a-boo challenge. While the celebrate theme is also Birthday related which is the Challenge for the month at Paru's. Craft Stamper Magazine has a theme "Anything Goes" but requires stamping in the project. I think, the card I made fits the bill.
I took a 5.5"square white heavyweight cardstock and stamped butterfly stamp which is from Hampton Art Vintologic butterflies stamp set. Stamped the butterfly using shades of blue to give an ombre effect. I have used Memento Danube Blue, Bahama Blue and Tumbled Glass, Peacock Feathers Distress inks.
After stamping, I went ahead and cut a window in it. I then adhered the outer frame back on a pale sea green cardstock base. The I added a piece of clear vellum over it which was cut to 5" by 5". Now using some fun foam, I added the center piece back to the card. I then added a white frame which is 5.5"square and is 1/4" thick to the card. Finished the card front with the celebrate sentiment from Kaisercraft Pop! - Treats Stamp set on the same cardstock which is used on the base. I gave the sentiment banner ends and glued it to the card only on one end so the banner looks liked its sewed to the card. To give it a sewed look, I did some stitch marks using a black finetip pen.
For the inside, I stamped and fussy cut same butterfly in 3 colors on a white cardstock and  adhered it to the inside with some wet adhesive.Hampton Art Vintologic Butterflies Sta
  Thank you all for reading my post and have a great day ahead. Untill next time, keep crafting...

Saturday 9 July 2016

Kitchen Tissue Paper Holder made using Newspaper.

Hello all you beautiful people

Its heavily raining in Mumbai now and I am snugly sitting home with a cup of hot tea with my laptop at window. I have not been well this week (viral flue...I hate you. What did I ever do to you?) which means I have a few pending projects which are very close to deadline and should have been ready to ship them this week end, but will be shipped next week. I hate it when I cant reach my deadlines because of reasons I cant command over. So I am a bit upset about this and walked into my room and saw all my crafty things( glue, scissors, colorful paper, embellishments, flowers) and immediately got cheered up.

So to cheer myself up more and since we are doing up cycled projects this month on our blog, I decided to my revive my old project which was to make a Kitchen Tissue Paper holder using newspaper. When I conceptualize anything, I just scribble it down in my diary and make notes about supplies and procedure. Then I compare its design with a actual product and work out the design and then make my own version of the same. I did the same with this and I finally decided it was time to make it for real.

So lets begin

Supplies:
  1. Pva glue( Fevicol)
  2. Newspaper 
  3. Dovel or crochet needle
  4. Acrylic Paints
  5. Varnish 
  6. Scissors/ cutter
  7. Binder clips
  8. Gesso ( if you intend to varnish your project)
  9. Mod Podge or any other decoupage glue
  10. Tissue napkins or any other paper for decoupage
Procedure:
  • We need to start by first making newspaper tubes to make the base of the Kitchen Tissue Paper holder. I have used almost 50 tubes of newspaper for this purpose. Plz refer earlier posts to learn how to make newspaper tubes. I make my tubes by dividing a single sheer of newspaper into 3 parts and rolling then using crochet needle. MY tubes re a foot long and 1/4"in diameter.

  • To make the central pillar, you need to take the entire newspaper double sheet and roll it in a straight manner to get a uniform straight coil. I rolled the entire newspaper up....so I must have used 6 double sheets and my central pillar is 1"in diameter. Dun't forget to apply glue at the edges of the paper while rolling. This will keep your paper intact.
  • Once you finish making your central stick, you can trim it for any unevenness. Check length of your tissue rolls and if your stick is too long, trim it again, You will have to trim it using cutters.
  • Once you are ready with your tubes and central stick, we have to coil the tubes to to make a small disc of 3"diameter around the central pillar.
  • Once you do that, keep it aside while giving it as good wash of glue and water(1:1 ratio).Make another coiled disc which is 6"in diameter and give it a good glue wash to. Let everything dry properly. Now glue the stick with small disc onto this bigger disc with strong adhesive. that should give us our body.
  • Once all the coiling is done at the base, I went ahead and made it a cap so that our tissue wont jump out when we use it. 
  • To make a cap, I coiled the tissue paper with keep 1"gap in the center to make a circle. You can also make any other shaped cap. Then, I pushed the coils outwards to obtain a something like a bowl. So now it looked like a little cap.
  • I didn't paint my tubes at first as I am going to decoupage it. By coiling around the central tube to get small disc and then attaching it to a bigger disc, added to the sturdiness and weight of the holder and it wudn't move around when we use it. Too light and the holder will keep falling down.
  • Try to fit your cap on the stick such that it should fit tight and not fall through. If loose, roll some paper around the stick and try adjusting.
  • Once all this is done. give all the parts a good coat of glue mixture( 1:2 glue:water).  Let it dry thoroughly overnight or 12 hours.
  • We have now assembled our kitchen tissue holder and we cant start painting after this or if you want decoupaging. I gave it a coat of Gesso so newspaper print is not seen. Then using Mod Podge Gloss I decoupaged the project using napkins, Applied thin coat of glue , then place the napkin carefully. Let it dry and then applied a thin coat of Mod  Podge over it. Then I used acrylic colors in the remaining places where I didn't decoupage. Once done. I gave it another coat of Mod podge. 
  • I went ahead and added 2 coats of varnish/ sealer to it when I was dried. You can skip this process because Mod Podge itself if a sealer. I however did this because I place my Kitchen holder near the wash basin and I know it will be wet for more time then I want. 
  • At the end, I tied some bakers twine around the base to add some color to it.
That's all guys. We have our very own Kitchen Tissue Paper Holder. You can even attach it to your wall with strong double side tape. I dun't know, if it will stay....but you can try and see for yourself.
Thank you guys for reading my post and I hope you all liked it. I am all ears to your comments and questions.
Have a great day ahead. Till next time...Keep upcycling.