Showing posts with label Handmade cards. Show all posts

Friday, 7 August 2020

New Baby Gaddi Box/ Handmade Cash Envelope/ Cash Gift

 Hello guys

I am happy to share my new project with you...this is gaddi box or a box to hold bundle of cash meant for gifting purpose. This box easily holds 30 notes of Rs.2000.....and it is meant as a arrival blessing for the new bon. I made it in pink and blue so it is kinda unisex box. The dimensions are 7.5" by 3" by 1.5". I hope you all like it. I have a image and a small clip to help you see it from inside.


Thank you so much for stopping by...Hugs

Saturday, 9 November 2019

How to make Handmade Christmas Cards - Tutorial | DIY

Hey guys
Today I have a tutorial to make Christmas cards.....which are in non traditional colors. I wanted to give this feel of snow and so I have used really pastel shades of Blue, lilac and grey but I gave into the feel of Christmas and used Gold, green and little silver sparke on my snowflake.
 These are standard A7 cards and I have used stamps from Mudra craft for this project. I started with watercolor panels and clear heat embossed snowflakes in 3 sizes. Then, I ink blended using Distress inks to get this soft snow look...I didnt want to use traditional Christmas colors but yet I used green for the last card.
 Once I was happy with my panels, I assembeled it on my card base along with some gold glitter paper to give it a touch of whimsy. The sentiment used is also from Mudra craft which I gold heat embossed on vellum.....this allows me to see the background through it ....those snowflakes look so fun through he vellum. I also added a white wax cord in the front with a small bow to add a little extra to the front.
 Once, my card front was ready, I dressed the inside as well with a similar panel design and stamped the back of the card with a sentiment that says "Handmade just for you"....
 I made my own grey envelops and dressed them up as well using the scrap strips and white heat embossing snowflakes....make it look so special. I never forget to dress my envelopes up whenever I make cards. I finished it all with some silver sequins in the center of snowflakes.
I have a full tutorial and I encourage you to watch this if you want to know how I made these cards.
I am putting these cards up at the following blog challenges:
  1. Addicted to stamps and more Challenge #366 - Anything Goes
  2. Cute Card Thursday #607 - Anything Goes
  3. HLS November Christmas Challenge -Anything Goes

Here is a list of supplies used:-

  1. Mudra Stamps - Christmas Decor
  2. Mudra Stamps - Wishing You
  3. Mudra Stamps - Mail Delight
  4. Distress Inks - Hickory Smoke, Shaded Lilac, Tumbled Glass, Mermaid Lagoon, Crushed Olive and Moved Lawn
  5. Grey Cardstock for evnvelope
  6. Watercolor Panels - Brusto 300 gsm
  7. A7 Card Base - Iris 270 gsm
  8. Gold Glitter paper - ItsyBitsy

Thank you for visiting me......have a fab day ahead.

Saturday, 18 November 2017

Thanks (Fall inspired thank you card)

Hello guys
I have a card to share with you all today....this is a Thank you card keeping the upcoming Thanksgiving in mind. I have made this card as a DT inspiration for Lets Craft and Create Blog where the theme this month is ANYTHING GOES + option FALL COLOURS/THANKFUL. Below is my take on this fun theme...... To participate in the on going challenge, please click HERE
I am putting my card up at following challenges:
  1. HLS November anything goes with dies challenge  - Used Curvy Leaf dies from Elizabeth Craft designs 
  2. Scrapy Land Challenge #78 - Anything goes - Used Elizabeth craft design Curvy leaves die
  3. The Ribbon girl November Card challenge- Anything Goes
  4. The Sisterhood of crafters -Let the Sparkles Fly- I have used the frosting powder with loads of sparkle in it from Papericious - Rajni Chawla's Frosting Powder
  5. Word Art Wednesday - Week 308 - 309 - Anything Goes
  6. Allsorts Challenge Blog Week 442- Glitter - I have used the frosting powder with loads of sparkle in it from Papericious - Rajni Chawla's Frosting Powder

I started with a watercolor cardstock cut to A2 size panel and did some distress ink blending to achieve a seamless background. I have used Spiced Marmalade, Crushed Olive, Fossilized Amber, Vintage Photo and Abandoned Coral distress inks. I spritzed it with some water and then lifted some color off the panel.
The leaves were randomly placed an diecut using the Curvy leaves dies from Elizabeth Craft designs on my bigshot. Then...was the fun part......using versamark, I added some Rajni Chawla's Frosting Powder on the diecut leaves as well as the front panel....randomly and heat set it. It is so much fun to achieve the frosting and all the shimmer and shine in just one step......love it. I also applied glossy accents to few of the leaf diecuts.
I then added my front panel to a white textured cardstock from ItsyBitsy and trimmed the panel 1/8"from all the sides. I mounted this panel on my A2 size white cardbase using some white craft foam to give the card some dimension.
The leaves were shaped and added back to the panel from where they were diecut. Finished my card with the Thanks sentiment from Die namics and some Mudra Craft sequins. I diecut the sentiment 4 times from the same white cardstock and piled them on each other to obtain a dimensional sentiment. 
On the inside, I added the 1/8' sliver I cut initially from the panel...to add a little interest to the inside.
That finishes my card for today...I hope you liked it. Here is a small video clip to see the magic of the frosting powder on this card....


List of Supplies:-
  • Distress inks - Abandoned Coral, Vintage Photo, Spiced Marmalade, Fossilized Amber and Crushed Olive
  • Round foam blending tool
  • Glossy Accents
  • White Adhesive
  • Textured White cardstock
  • water spritzer
  • Mudra craft sequins
  • Die namics Thanks die
  • Elizabethe craft designs - Curvy Leaves
  • watercolor cardstock
  • Big Shot
  • Heat gun
  • Rajni Chawla's Frosting Powder
  • White craft foam sheet

Sunday, 9 April 2017

Happy Easter Handmade card

Hello everyone
I am back with a handmade card today and after really long. I haven't made any cards in the last few months and so I am really excited to share this one with you all. Since Easter is on the horizon, I have made a shabby chic Easter card.
I am putting my card up at monthly competitions at:-
1 Addicted to stamps challenge#236
2 Allsorts challenge Blog Week 410 - Bring on the bling
14 Scrappy Land Challenge #63- Used die from Elizabeth Craft Design

I have used a lot of products to make this one and am simply in love with the result. The papers used for the card are from Eno Greetings and Papericious. I have done a little stenciling using a very pretty Roses stencil from Prima Marketing. The egg is fussy but by me since I didn't have a die for it. The stamp used for the sentiment is partly from a local store while the EASTER is handwritten using a finetip waterproof Black pen.
I added some delicate leaves using Elizabeth craft designs die and some mulberry flowers which are from different stores. The laces and trims are from local store and Itsybitsy. I did dry brush some Art Basics Heavy white gesso on some flowers and other places.
 I have distressed the edges and added some sparkle using clear sparkle powder from Crafters corner. I have also used Wink of stella at some places. The little gold bird is from Papericious chippies and is heat embossed using Tinsel Gold from Ranger.Finally, I finished the card by added few  sequins and splatters of gold and white acrylic paints.
List of Supplies:-
1 White cardstock - Itsybitsy
2 shades of green cardstock - Itsybitsy
3 Pattern paper for background - Eno Greetings
4 Pattern paper for Egg - Papericious Flora Season
5 Roses Stencil - Prima Marketing
6 Pink color splash - Itsybitsy- To add Pink tinge to the texture paste used for stenciling
7 Embossing/ Texture paste - Art Basics Prima Marketing
8 White Gesso - Art Basics - Prima Marketing
9 White fun foam to add dimensions - Local Store
10 Leaves die - Elizabeth Craft Designs
11 Mulberry flowers - Crafters corner, The Craftshop, Local stores
12 Jute twine - Itsybitsy
13 Laces and trims - Local store and Itsybitsy
14 Clear sequins - Crafters corner
15 Gold sequins- Itsybitsy
16 Silicon glue - Itsybitsy
17 Clear Sparkle dust - Crafters corner
18 Wink of stella - Crafters corner
19 Tim Holtz Distressing tool- Crafters corner
20 Bird Chippies - Papericious
21 Versamark - Crafters corner
22 Tinsel Gold - Crafters corner
23 Wow Heat gun - Itsybitsy
24 White and gold acrylic paints

I hope you liked my card. Thank you so much for visiting me.

Wednesday, 15 February 2017

Be Mine - Handmade card using ItsyBitsy dies.

Hello guys
I am back today with a new shaker card. Shaker cards have always been my favorite and are super fun to make. I have made this one keep Valentine's Day in mind and this one I have made for my husband. I truly hope he likes this one..
I am putting this card up at :-
1 Itsybitsy Challenge#2 2017 - Being creative with thin cut dies.
Addicted to stamps challenge #229 - Clean and simple
Allsorts challeneg #402  - Hearts and/or Flowers
4 Cards and more challenge # 178 -Valentine's Day

5 Craft stamper February challenge - Take it and make it.
6 CWS Challenge #11 - Valentine
7 Let's Craft & Create Challenge #122- Love is in the air
8 Petal Lu Challenge #32 - Anything goes
9 Paru's Card making Challenge - Love
10 Scrapping 4 fun challenge #83 - Friends, Wedding, love, Valentine
11 The Ribbon Girl February Challenge - Anything goes

So to begin, I started with a 4 1/4" by 51/2" standard A2 size card for the base. I have used white cardstock from Itsybitsy. They had sent me this in a free haul some time back.I had used it earlier to make some tags and this time I used it to make a card. i must say that the quality is really good.
I cut the 3 hearts  on a 41/4" by 51/2" white cardstock piece using ItsyBitsy nesting hearts dies through my Sizzix Bigshot. The die set has 4 hearts and I have used the smaller 3 dies.
I added a little red hearts confetti sequins, clear white sequins and some gold sequins as my shaker elements.
I have used some foam adhesive and clear acetate sheet to create my shaker window. Once my shaker card was ready, I added some splatters using Memento Ladybug dye ink o the card front. to add more details, I made some dots with my red gel pen.
Embellished my card using some clear sequins and 3 red die cut hearts right in the center of the shaker panels. The sentiment "Be Mine" is stamped on vellum using Tinsel Gold embossing powder by Ranger.
For the inside, I just matted the card using Red cardstock and layered some red and whte die cut hearts.
That finished my card....all I need to do is write a message and make a cute envelope for this card. Can't wait to hand it over to my husband when he comes home....
Thank you guys for reading this post and until next time....Keep Crafting.

Supplies used:
1 White cardstock (Itsybitsy)
2 Red Cardstock (Itsybitsy)
3 Range multi medium matte
4 Clear sequins(Local store)
5 Red confetti sequins (Local store)
6 Gold sequins (Itsybitsy)
7 Itsybitsy thin cut dies Heart 4 pcs (Itsybitsy)
8 Foam tape (Itsybitsy)
9 Acetate sheet (Itsybitsy)
10 Sizzix Bigshot (Itsybitsy)
11 Vellum (Itsybitsy)
12 Wow Heat Embossing gun (Itsybitsy)
13 Ranger Tinsel gold Embossing powder (A1 craft supply)
14 Be Mine Sentiment (Local store)

Sunday, 2 October 2016

Happy 1st birthday

Hello all
Its been long since i have blogged about something. Though I have been adding pics and products on facebook....I haven't really posted anything here. Its new month and new challenges are announced and it makes me all excited to make something new...its fun to work within the given guidelines...kinda tests my limits and makes me think a little different.
So here is a new card which I have made to participate at the monthly challenge at Peek-a-boo designs. They have completed one year and the challenge is to make a card using red, gold and number 1 with a additional twist using stenciling or 3d Layered projects or dash of glitter or your own stamped background.
My take on this Recepie challenge is the above card. I have incorporated glitter in the form of glitter pens and chunky glittered number, gold sequins and gold microbeads, red stenciling and red cardstock and I have made my own background on the shaker window using hearts from peek-a-boo stamp set.
I am also linking this card to Paruscardmakingchallenges for this month which says a hint of gold, creative with stamps Sentiment challenge for october and A blog named hero october challege - Geometric.

Also, I am putting my card up at Lulupu october challenge - bling a ding with a stamping twist. which says we need to more than a sentiment and since i have stamped some hearts on the card....I thought to put it up for this challenge.

I started with stenciling using Itsybitsy stencil and Memento Lady bug dye ink. Then I made a shaker window using some acetate sheet and a cardstock frame. I made my own background on the frame using heart stamp from Peek a boo Place Photo stamp. I used the little heart from this stamp set as I wanted to add hearts and I thought to use this stamp set and put it to a different use than what we usually use it for.
I scribbled inside these hearts using gold pen and then added Itsybitsy gold sequins and Itsybitsy microbeads inside the shaker window. For the sentiment on the card, I tore some vellum and then stamped the sentiment using Black Archival ink pad. The sentiment set is from JustRite Grand handwritten sentiments, The number one is made using Black chipboard which I cut and added some chunky glitter again from Itsybitsy. I finished the card front using some gold and black sequins
For the inside, I didnt do much except stamp the sentiment on white cardstock using Itsybitsy Black Pigment ink pad.the sentiment is from Peek a boo Happy birthday to you stamp set. It got a bit smudged and I had to go over it with a microtip black pen.
Well that's my card. I hope you all like it. Thank you for reading my post.

Sunday, 25 September 2016

Diwali Cards

Hello everyone
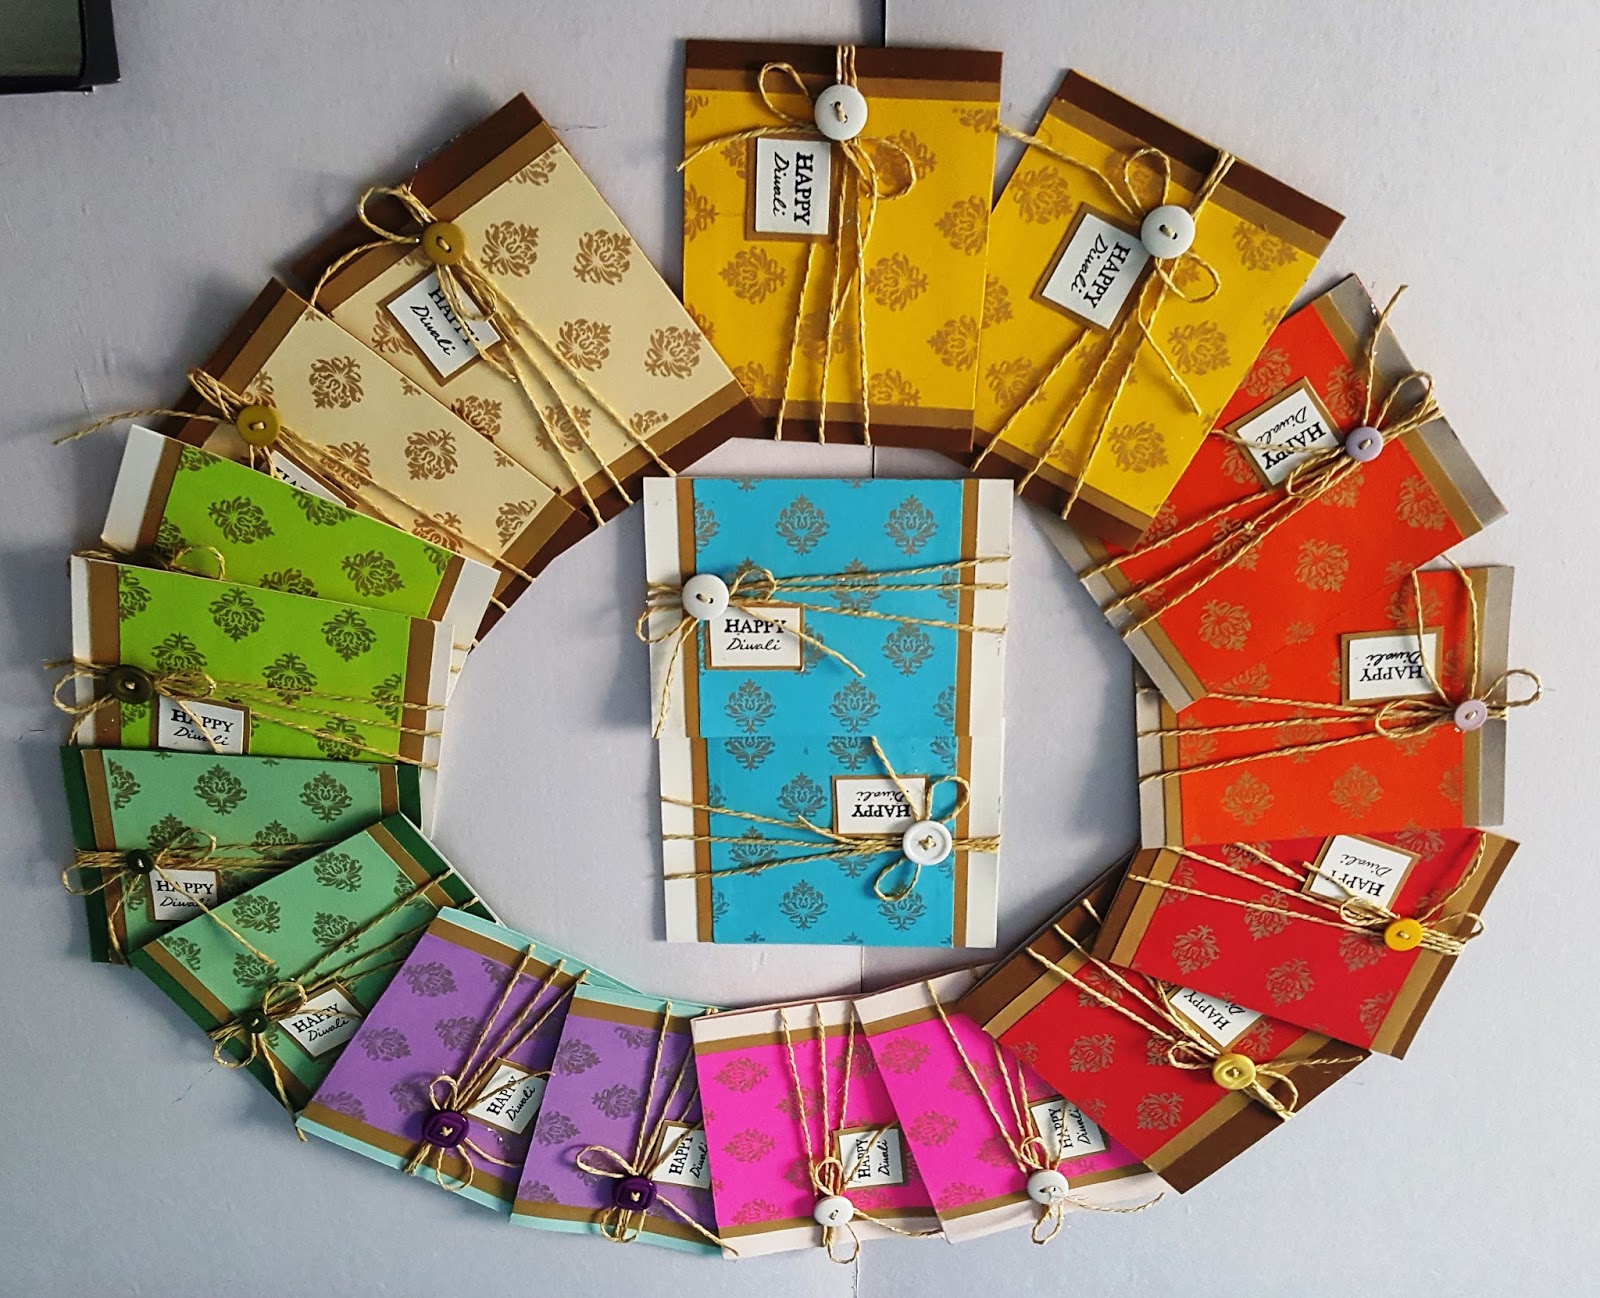
I am posting today some handmade Diwali cards which are very clean and simple with minimum embellishments. I have made this for Cards for a Cause-India where Neha Gala who owns A1 Craft shop in Andheri East, Mumbai is doing a drive for collecting cards for our soldiers on the borders. I really like her store and she had most of the things you need for crafting.
 What she is is doing is collecting cards from willing people and send it to Leh, Hall of Fame and I feel she is doing an amazing job. I feel we should all support this cause and add as many cards as we can to this.Its a wonderful gesture and I wanted to participate in this. So made a few encouragement cards and Diwali cards myself.
Since, using embellishments was required to be minimum and glitter or sequins was not advised, I used buttons in my cards with some paper twine in my cards. I started with standard A2 size card and used pattern paper which has gold motifs on them. Layered this pattern paper on some gold cardstock and mounted them on my card base. To add some decoration, I wound some paper twine and finished with a button and a bow.
On the inside, the cards is pretty simple. I added a strip of pattern paper on the side to bring in some color. For dark cardbases, I have added white cardstocks on the inside to enable the use of any inks available with our jawans.
The envelopes are simple ones made with the same color as the card base and and matching pattern paper. The happy diwali stamp is actually a combined stamp. Diwali is from Peek-a-boo stamp and Happy is from Fiskars petals from Scratch stamp set. The stamping is done using Black Archival ink so its permanent and waterproof.
That's all from me.....and I hope all of you can add some cards from your side. Those of you who do not have a stamp or inks.....don't hold back. Use waterproof pens to write messages and sentiments....use anything you have to make cards. We should appreciate our soldiers who are fighting for us on the border...and these little encouragement notes and cards will mean a lot to them.
Thank you all for reading my post and have a great day.

Supplies:
Cardstock- ItsyBitsy
Buttons- Itsy bitsy and A1 craft
Paper twine - Anupam Super store
Pattern Paper - Anupam super store
Stamps - Peek--boo and Fiskars
Ink- Archival Black ink
Silicon Glue - Itsybitsy

I am adding this card to this month's challenge at Ranganjali.

Thursday, 11 August 2016

Friend Shaker card

Hello everyone
Good to see you all. Its been really busy and crazy in my house this month. I am juggling between my work and my family and more work than family....and I am not able to blog so much. But anytime I find myself with couple of hours, I just run to my workstation and create something quickly and upload it here with some tutorials for you all.
Today I found fews hours free in the morning and I decided to turn a bling eye towards all the ongoing orders and dispatches and satisfy my creative urge. A few days back, I had got a free haul from ItsyBitsy and It has a stencil, silicon glue, glitter glue and a pigment inkpad in it. I wanted to try them for long and made many unsuccessful attempts. Today is the day when i finally got my hands on them and I made a card using the stencil, pigment pad and the silicon glue. I didn't get a chance to use the glitter glue but will make another project and use it.
Now to the card I have made. It is a shaker card with has the shaker elements inside a tag which I have mounted on the card. Making shaker cards is my thing and that combined with stenciling is like my new favorite technique. I love to stencil any opportunity I get.

Supplies:
  1. White texture cardstock (220gsm)
  2. Pink Cardstock (220gsm)
  3. Chevron pattern paper in green and white from Eno Greetings
  4. Sequins
  5. Golden Micro beads ( Itsy Bitsy)
  6. Green Satin ribbon ( Itsy Bitsy)
  7. White Eyelet ( Itsy Bitsy)
  8. Eyelet punch
  9. Flat pearls in pink and white
  10. Clear acetate sheet ( Itsy Bitsy)
  11. Clear Stamp ( Kaisercraft- Best Friends)
  12. Stencil ( Itsy Bitsy)
  13. Black pigment inkpad ( Itsy Bitsy)
  14. Distress inks ( Abandoned coral, spun sugar)
  15. Ink blending tool
  16. Score board
  17. Foam mounting tape
  18. Silicon glue ( Itsy Bitsy)
  19. White adhesive or red tacky tape
Procedure:
  • I started with making the base of my card using the textured white cardstock cut to standard A2 size( 5.5"by 4.25"). 
  • Then, I took the pattern paper and adhered it to the card base in a offset manner using adhesive.
  • Then for the shaker card, the tag is 3"by 3.5". I have cut the pink carstock and then using a stencil and distress inks, I created the background. I also cut some acetate sheet and front shaker window  frame to fit the tag. I have used silicon glue to attach acetate sheet to the shaker frame.
  • I stamped the sentiment on the background using pigment Black inkpad, added sequins and gold microbeads and adhered the shaker frame using foam adhesive.
  • Then I punched a hole and fixed a white eyelet on the tag. Used some green satin ribbon for the tag. I adhered the tag on the card using red tacky tape.
  • Finished off the front, with some sequins and flat pearls using silicon adhesive.
  • For the inside, I have added some pattern paper and stamped another sentiment from the same stamp set using pigment black ink.
That completes our card. I am putting my card up at Lulupu, Peek-a-boo, CWS , Happily Ever Crafter Giveaway, Ranganjali and Craft Stamper magazine.
Thank you all for reading my post and I hope you all liked it. Keep smiling and have a good day.