VREnchanted is an art and craft blog. Here, we share tutorials as well as craft project ideas and I hope you will like them. Some of the projects include scrapbooks, mini albums, handmade cards, gifts boxes, 3D projects, Mixed media layouts, Photo frames and more.....
Sharing some handmade cards today....these are very dimensional in my fav style...shabby chic. I also made some very dimensional envelopes to hold these cards.....super fun to look at.
These cards are 6" by 6" in size and the envelopes are same size with 1" thickness. I used beautiful flowers from Little birdie crafts along with the laces and glitter papers.
The shaker window is filled with sequins, glitter dots, pearls and glitter all from ItsyBitsy along with the die used to diecut the glittery golden wreath.
Hey guys
Today I have a tutorial to make Christmas cards.....which are in non traditional colors. I wanted to give this feel of snow and so I have used really pastel shades of Blue, lilac and grey but I gave into the feel of Christmas and used Gold, green and little silver sparke on my snowflake.
These are standard A7 cards and I have used stamps from Mudra craft for this project. I started with watercolor panels and clear heat embossed snowflakes in 3 sizes. Then, I ink blended using Distress inks to get this soft snow look...I didnt want to use traditional Christmas colors but yet I used green for the last card.
Once I was happy with my panels, I assembeled it on my card base along with some gold glitter paper to give it a touch of whimsy. The sentiment used is also from Mudra craft which I gold heat embossed on vellum.....this allows me to see the background through it ....those snowflakes look so fun through he vellum. I also added a white wax cord in the front with a small bow to add a little extra to the front.
Once, my card front was ready, I dressed the inside as well with a similar panel design and stamped the back of the card with a sentiment that says "Handmade just for you"....
I made my own grey envelops and dressed them up as well using the scrap strips and white heat embossing snowflakes....make it look so special. I never forget to dress my envelopes up whenever I make cards. I finished it all with some silver sequins in the center of snowflakes.
I have a full tutorial and I encourage you to watch this if you want to know how I made these cards.
I am putting these cards up at the following blog challenges:
Hey guys
I ave a quick cared to share with you all today...I have made a CAS rainbow card along with some fusy cut clouds. I used Lawn Fawn rainbow die to make my rainbow....and I had no dies for clouds so I made my own from textured cardstock...this was a quick card and I spent most of my time in diecutting the rainbow.
I die cut the rainbow from 7 colors of cardstock 3 times and then I layered stacked them together to get a more dimentional rainbow. Then I fussy cut my clouds and outlined it using Silver Stickles and arranged them above and behind my rainbow to give the feel of "rainbow emerging between the clouds". I heat embossed my sentiment on a white cardstock and added it to my card panel along with some gold sequins. To add more dimension, I mounted this panel on my 6" by 6" card using dimentional tape.
I also made my won envelopes using same cardstock and washi tape....used WRMK envelope punch board. I hope you like my card. I am putting this up at the following blog challenges:
Crafty Gals Corner Challenge# 197 - 3+ layers - My card has 6 layers - The panel is mounted on card. The rainbow is created by adhering diecuts 3 times and the clouds add another layer.
Hey guys
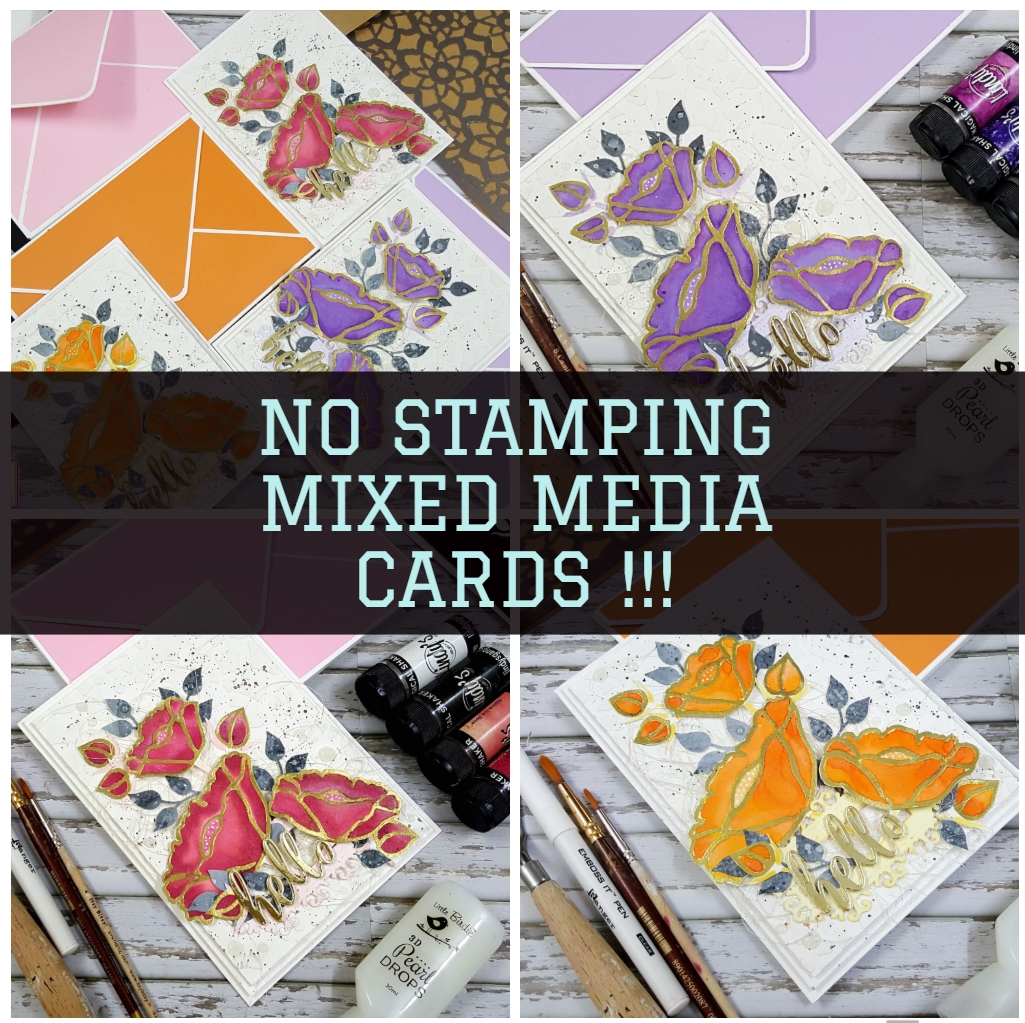
Today I have 3 mixed media cards to share with you all along with tutorial to make them. I have been wanting to make cards with stencils instead of stamps and this is what I came up with....there is no stamping on these cards...which is quite a challenge on its own.
Here is a tutorial for these cards
I started with watercolor panels from ItsyBitsy and cut 3 panels to 5.5"by 7.5". I added texture to this using Mixed Media Paste and Finnabair stencil.
I left this to dry on the side and started to work on my flowers. I decided not to use any stamps and choose to use this flower stencil from ItsyBitsy to create my own flowers. So I taped it to the watercolor panels and then stencilled using Distress inks using Shaded Lilac, Spun sugar and Squeezed Lemonade.
I then heat embossed the flowers with gold embossing powder and an embossing pen so that I could not color the flowers with ease. I am not watercolor expert and so I wanted to water to be contained in each petal so I could do some quick coloring. Just for fun, I used Lindys Magical shakers to color my flowers...these are super fun and leave an amazing shine. Once it was dry, I fussy cut all my images out.
This is so fun to look at.....I did the leaves in the same manner too. I added some magicals ( Black Forest Black Magical Shaker and Frozen Jack Frost Magical Shaker) on a watercolor panel and spritzed it with water and then I diecut my leaves from it. My sentiment is also a diecut from MFT and I layered it 4 times to get a thick sentiment and the top layer is from gold foil paper....looks really fun.
I arranged all my elements on the panel using some sisal fiber and then layered the panel on the card to add more dimension and texture. I finished my card with black splatters and some pearl drops here and there.
Supplies Used:
Little Birdie Watercolour Heavyweight Paper - A4, 440 GSM (ItsyBitsy)
Little Birdie Mixed Media Paste 2 In 1 -White 400gm (ItsyBitsy)
I want to share some envelopes and a card I made with the Little Birdie watercolor embellishments. Along with that, I am also here to share my experience of using these products with you.
The entire Watercolor range is really useful and the embellishments are specially amazing. They make life really easy when you are looking for a convenient solution without having to draw pretty sketches. I am not a watercolor or a coloring person in general…I am always scared about coloring and shading. Its a nightmare for me to stay within the lines while coloring. So watercolors are never my go to choice and I do not have a lot of accessories and colors. But the quality of paper used are awesome…so even when I made mistakes…I can correct them. The ink doesn’t bleed or seep….even after layers of colors and water. After I finished colouring, the paper was still intact which is a sign of real good quality! These embellishments are unique in design, self adhesive are ideal for customizing with colours of your choice. You can paint them with watercolour paints, watercolour pencils, ink washes, distress inks, markers, color splashes and more to match your projects. These are ready to use and add dimension and interest on cards, scrapbooks. journals, mixed media and more. The high quality paper has great absorbency and avoids wrapping. For a tutorial to know how I made these please visit the ItsyBitsy blog where the challenge this month is to make anything using the new Watercolor Range. I hope you all liked my projects. I am putting this up at the following blog challenges:
Hello everyone
I am sharing a new card I made for The Valentine's Day with you all today. I love making Shabby chic projects and cards are fun to make. I love playing with flowers and sequins and so I came up with this card.
This is a shaker card filled with sequins and glitter mix in the tones of red, pin and gold. The heart shaped shaker window is a embellished with pretty flowers and buds and a few flourishes.
I finished it all with a white ribbon bow onto the side and few gold sequins sprinkled here and there.
The card has a gold heat embossed sentiment BE MINE which I think makes it a cool Proposal card...what do you think?
Supplies used - Mostly all the supplies used are from ItsyBitsy store.
Red Cardstock (250gsm)
White Heavyweight cardstock (270 gsm)
Gold Glitter paper
Pink Cardedstock (250gsm)
Handmade flowers
White Satin Ribbon
Sisal Fibre
Heart die
Sequins and gold glitter
Gold heat embossing powder, heat gun and versamark
Be Mine sentiment - local stamp
I am putting this card up at the following challenges: