VREnchanted is an art and craft blog. Here, we share tutorials as well as craft project ideas and I hope you will like them. Some of the projects include scrapbooks, mini albums, handmade cards, gifts boxes, 3D projects, Mixed media layouts, Photo frames and more.....
Sharing some handmade cards today....these are very dimensional in my fav style...shabby chic. I also made some very dimensional envelopes to hold these cards.....super fun to look at.
These cards are 6" by 6" in size and the envelopes are same size with 1" thickness. I used beautiful flowers from Little birdie crafts along with the laces and glitter papers.
The shaker window is filled with sequins, glitter dots, pearls and glitter all from ItsyBitsy along with the die used to diecut the glittery golden wreath.
I am sharing a baby stroller gift box I recently made. This is made for an expecting mother and so its unisex themed. This gift box is made to resemble a baby stroller.....it has movable shutters like an actual stroller....and gosh its fun to keep playing with it.
You can pack gifts for the new born on baby shower, baby announcement or any occasion you can think of. Now earlier I had made one for a baby boy....this time its for a baby girl. this gift box is almost 18"in height and the dimensions is 14" x 8" approximately in length and breadth.Here is a small video clip
For tutorial, you can visit my earlier post by clicking HERE. thank you so much for stopping by...Hugs
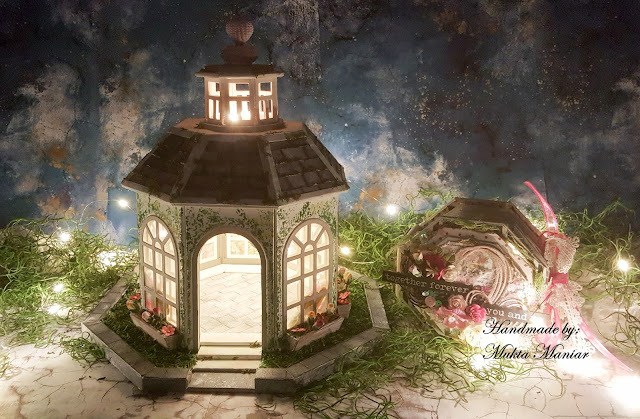
I am sharing my project with you all. This project is my entry for #dmccrownstage3, a challenge held by Crafters Corner. I made a Gazebo to hold a tiny mini album of size 4" x 4" x 3" which has 6 interactive pop up page and a capacity to hold 30ish pics. . I have used Whispering Love paper pad sent to me by Crafters Corner.
Every page in my octogonal album is handcut (also bcoz I do not have an octogonal die.) The front is beautifully embellished with chipboards and flowers....dmc glitter, sequins and gold foiled paper. I have added many layers to add interest to my album front...but thats not it...there is something hidden on the front....you will be able to see that in the video.
This album has a fun shaker spine filled with cutesy stuff...that was the first thing I made when I was working on the album and the closure is using laces and ribbons.
The Gazebo is built from the scratch and it have numerous details with I have added over couple of days. It is adorned with 7 shaker windows filled with glitter and sequins. All the shingles on the roof are handpainted and hand laid 1 by 1....the moss just adds so much drama to the roof. Apart from this the grey wall...grass..planters...flowers...there are so many pretty details. I still thought something was missing and I added lights to my gazebo as the final touch....
I have used black glitter cardstock and 3 plain cardstocks in blush pink, bright pink and olive green to compliment the colors of the paperline.I am happy to have participate in this which really got me out of my slumber and made me think creatively. I would like to thank Crafters Corner for this amazing Challenge.
Hey guys
I am here to share my new art journal spread....Life is Beautiful. It has been really long since I did an art journal page...I want to do this art form atleast once a month but I get caught up in work and custom orders and land up postponing this. I think art journal gives me complete freedom to express myself....sometimes its difficult to put in words but art is a language that need no syllables.
I made this page keeping the Lindy's Monthly Challenge in mind....they have a really challenging color combo this month...using all pastel shades of pinks, beige, coral and lilac/lavender. I have never gone all pastel in the similar shades and it was like a challenge for me personally to see if I can work with them....and I came up with this art journal page.
I started with prepping my surface with gesso and adding texture with Finnabair Manuscript stencil. Then I added some squirts and sprays in multiple layers to add depth and dimension to the background. I wanted a subtle background as the elements I was planning to add were in contrast. Once everything was dry, I distressed the edges with Black and Grey archival ink and stamped the background in random places with grey archival ink and Finnabair stamp.
Then, I started to arrange my elements and then stamped and gold heat embossed at a random places. This helped me to frame my elements and bring the focus on them. I used some chipboard elements from Little Birdie crafts, cheesecloth and old book page to create interest around my picture. Once everything was arranged, I added more stamping with a script stamp and sepia archival ink. I made a few filler flowers to dress my page...was so happy to make my own flowers...its so fulfilling. Glued everything down and added a fussy cut butterfly that I stamped and white heat embossed on vellum. The finishing touches came from Tim Holtz small chat sentiment stickers,white and black splatters and sprinkle of glitter and sparkle.
I hope you all like it as much as I do. Here is a list of supplies used:-
Finnabair stencil - Manuscript
Finnabair White Gesso, Paper Texture Paste and 3D Matt Gel
Finnabair stamps - Chequered and Script
Archival Ink - Shadow Grey and Jet Black
Little Birdie Crafts Cheesecloth
Little Birdie Crafts chipboard shapes - Life is Beautiful, Ornate flourish, Brick wall and Grass
Hey guys
Today I have a tutorial to make Christmas cards.....which are in non traditional colors. I wanted to give this feel of snow and so I have used really pastel shades of Blue, lilac and grey but I gave into the feel of Christmas and used Gold, green and little silver sparke on my snowflake.
These are standard A7 cards and I have used stamps from Mudra craft for this project. I started with watercolor panels and clear heat embossed snowflakes in 3 sizes. Then, I ink blended using Distress inks to get this soft snow look...I didnt want to use traditional Christmas colors but yet I used green for the last card.
Once I was happy with my panels, I assembeled it on my card base along with some gold glitter paper to give it a touch of whimsy. The sentiment used is also from Mudra craft which I gold heat embossed on vellum.....this allows me to see the background through it ....those snowflakes look so fun through he vellum. I also added a white wax cord in the front with a small bow to add a little extra to the front.
Once, my card front was ready, I dressed the inside as well with a similar panel design and stamped the back of the card with a sentiment that says "Handmade just for you"....
I made my own grey envelops and dressed them up as well using the scrap strips and white heat embossing snowflakes....make it look so special. I never forget to dress my envelopes up whenever I make cards. I finished it all with some silver sequins in the center of snowflakes.
I have a full tutorial and I encourage you to watch this if you want to know how I made these cards.
I am putting these cards up at the following blog challenges:
Hey guys
I ave a quick cared to share with you all today...I have made a CAS rainbow card along with some fusy cut clouds. I used Lawn Fawn rainbow die to make my rainbow....and I had no dies for clouds so I made my own from textured cardstock...this was a quick card and I spent most of my time in diecutting the rainbow.
I die cut the rainbow from 7 colors of cardstock 3 times and then I layered stacked them together to get a more dimentional rainbow. Then I fussy cut my clouds and outlined it using Silver Stickles and arranged them above and behind my rainbow to give the feel of "rainbow emerging between the clouds". I heat embossed my sentiment on a white cardstock and added it to my card panel along with some gold sequins. To add more dimension, I mounted this panel on my 6" by 6" card using dimentional tape.
I also made my won envelopes using same cardstock and washi tape....used WRMK envelope punch board. I hope you like my card. I am putting this up at the following blog challenges:
Crafty Gals Corner Challenge# 197 - 3+ layers - My card has 6 layers - The panel is mounted on card. The rainbow is created by adhering diecuts 3 times and the clouds add another layer.
Hey guys
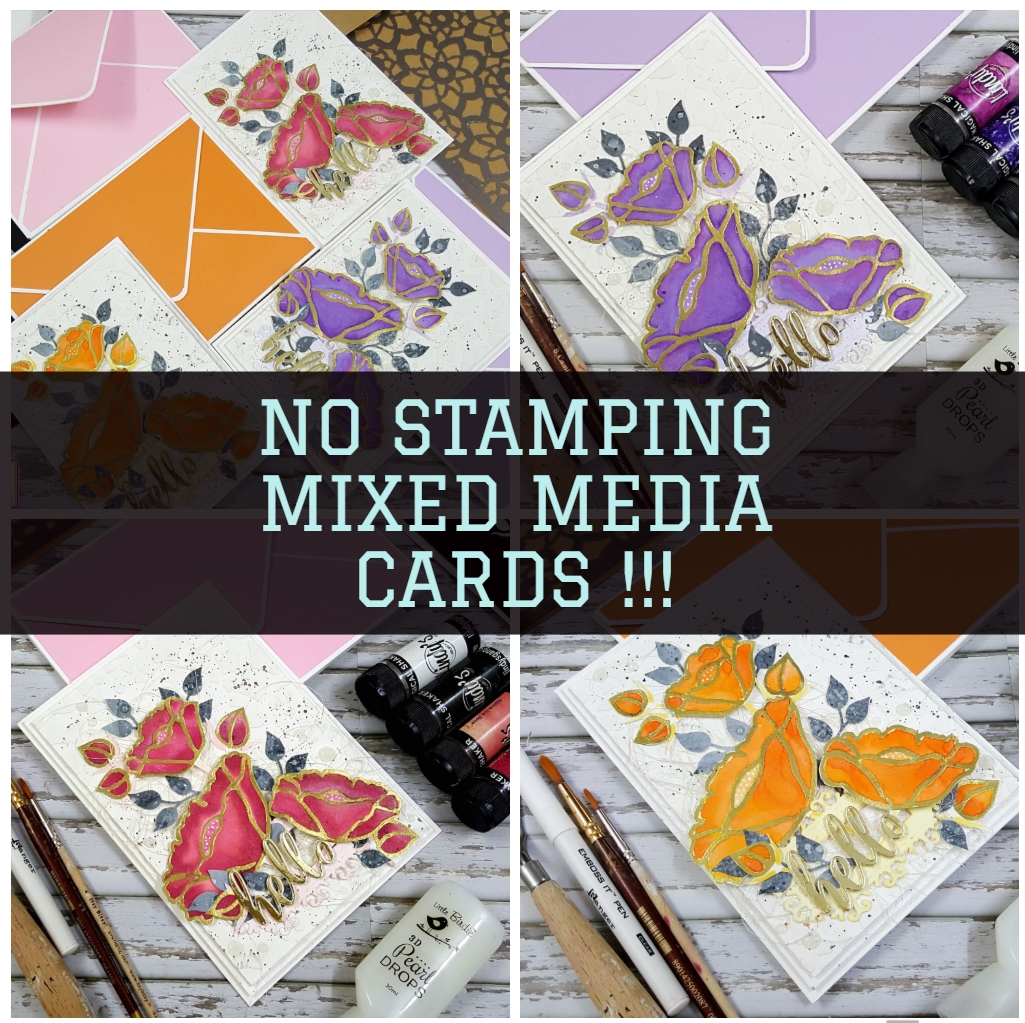
Today I have 3 mixed media cards to share with you all along with tutorial to make them. I have been wanting to make cards with stencils instead of stamps and this is what I came up with....there is no stamping on these cards...which is quite a challenge on its own.
Here is a tutorial for these cards
I started with watercolor panels from ItsyBitsy and cut 3 panels to 5.5"by 7.5". I added texture to this using Mixed Media Paste and Finnabair stencil.
I left this to dry on the side and started to work on my flowers. I decided not to use any stamps and choose to use this flower stencil from ItsyBitsy to create my own flowers. So I taped it to the watercolor panels and then stencilled using Distress inks using Shaded Lilac, Spun sugar and Squeezed Lemonade.
I then heat embossed the flowers with gold embossing powder and an embossing pen so that I could not color the flowers with ease. I am not watercolor expert and so I wanted to water to be contained in each petal so I could do some quick coloring. Just for fun, I used Lindys Magical shakers to color my flowers...these are super fun and leave an amazing shine. Once it was dry, I fussy cut all my images out.
This is so fun to look at.....I did the leaves in the same manner too. I added some magicals ( Black Forest Black Magical Shaker and Frozen Jack Frost Magical Shaker) on a watercolor panel and spritzed it with water and then I diecut my leaves from it. My sentiment is also a diecut from MFT and I layered it 4 times to get a thick sentiment and the top layer is from gold foil paper....looks really fun.
I arranged all my elements on the panel using some sisal fiber and then layered the panel on the card to add more dimension and texture. I finished my card with black splatters and some pearl drops here and there.
Supplies Used:
Little Birdie Watercolour Heavyweight Paper - A4, 440 GSM (ItsyBitsy)
Little Birdie Mixed Media Paste 2 In 1 -White 400gm (ItsyBitsy)