VREnchanted is an art and craft blog. Here, we share tutorials as well as craft project ideas and I hope you will like them. Some of the projects include scrapbooks, mini albums, handmade cards, gifts boxes, 3D projects, Mixed media layouts, Photo frames and more.....
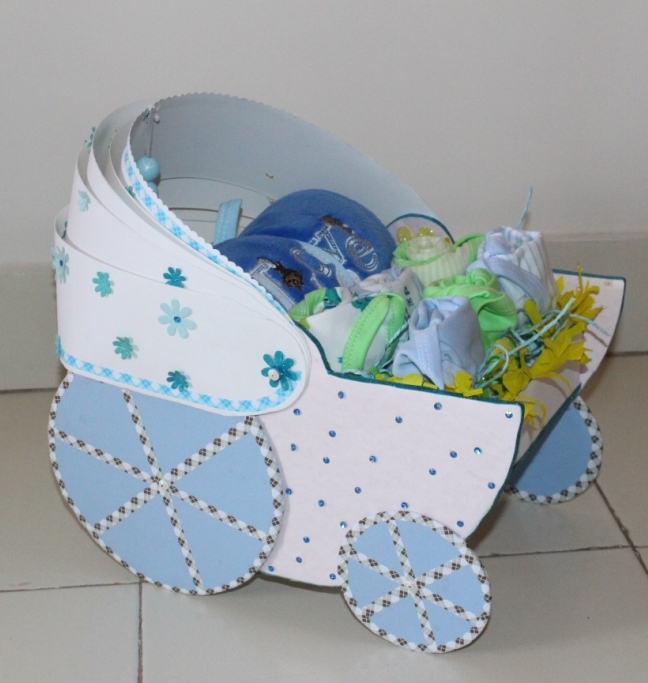
I am sharing a baby stroller gift box I recently made. This is made for an expecting mother and so its unisex themed. This gift box is made to resemble a baby stroller.....it has movable shutters like an actual stroller....and gosh its fun to keep playing with it.
You can pack gifts for the new born on baby shower, baby announcement or any occasion you can think of. Now earlier I had made one for a baby boy....this time its for a baby girl. this gift box is almost 18"in height and the dimensions is 14" x 8" approximately in length and breadth.Here is a small video clip
For tutorial, you can visit my earlier post by clicking HERE. thank you so much for stopping by...Hugs
I have made a Gift box which looks like a baby stroller. You can pack gifts for the new born on baby shower, baby announcement or any occasion you can think of. Now earlier I had made one for a baby boy....this time its for a baby girl. this gift box is almost 18"in height and the dimensions is 14" x 8" approximately in length and breadth.
For tutorial, you can visit my earlier post which is very elaborate Click on this link to go to Baby Stroller Gift Box for the tutorial. However if you guys want a video tutorial for the same, do let me know and I will be happy to do one for you.
This gift box took me 2 days approximately to complete as it is a big one and has tone of details to be added to it. I hope you all like it and would try to make a similar one at home.
Supplies used:
Mount-boards or Cardboard (3)
Scissors
Cutters with sharp blades
Fevicol or white strong glue
Fevibond or silicon glue
Kangaroo 1 hole punch
Crafting mat
Ruler
Compass to draw circles
Pencils
Small tip glue tube
Binder clips or clothes pin
Level meter
Chart paper or any handmade paper for wheels ( big sheets in 3 colors of your choice I each. 110 gsm)
Heavy Card-stock (220- 250 gsm )
Embellishments
Eyelets
Eyelets punch
Wooden or acrylic beads
Satin ribbon
Glitter foam sheet
Kite paper or tissue paper
Needle and thread
Glitter paper flowers
Pearls
Rhinestone flowers
Wooden beads
Lace/ Trims
Welcome stamp and Archival ink
To make the movable shutter, I have sewed the pieces of the strips to one another in such a fashion that they pieces do not get apart completely. All the pieces of the shutter are held together with a homemade brad.....its simple .....just use button with 2 holes and a thick wire. Pass the wire through the holes of the button and its ready to work like a brad. I covered the exposed end of the wires using a glitter flower with pearl on the center.
The shutters are decorated with glitter flowers from Itsybitsy and Pink lace trim also from Itsybitsy. I punched a hole in the center of first shutter and added a pink eyelet to it. I then passed the same pink trip and added 3 wooden beads to it....this helps to add some weight on the shutter and keeps it stay put rather than sliding back.
Finally, I decorate the edges and wheels with thin strips of pink glitter foam. Adds a little interest an color at the same time. The sentiment used is from Mudra stamps and I have heat embossed it using Ranger black embossing powder. Matted it and mounted it using some foam tape.
This gift box has movable shutter and fixed wheels. You can add an handle to it if you want but I haven't added it purposefully to enable easy access to the gifts.
I am adding the youtube video link below to view the complete gift box. I hope you guys will like it.
Thank you for reading this post and I hope you all will like this.
I have made a Gift box which looks like a baby stroller. You can
pack gifts for the new born on baby shower, baby announcement or any occasion
you can think of.
The inspiration behind this box came from Dr. Sonia who has this very beautiful blog called Cards, Craft, Kids Projects. Some time back maybe in 2014, I was looking for craft projects for kids when
I accidentally visited her blog and since then I keep visiting her blog for inspiration.
This gift box took me 4 days approximately to
complete because I work for mere 3- 4 hrs daily. You might complete it faster if you
have help. Also I made from scratch so
it took me longer to analyze the measurements and make changes to fit parts
better. I hope you all appreciate it and would try to make a similar one at home.
So enough talking….lets work.
MATERIALS:
Mount-boards or Cardboard (3)
Scissors
Cutters with sharp blades
Fevicol or white strong glue
Fevibond or any transparent rubber based
adhesive
Kangaroo 1 hole punch
Crafting mat
Ruler
Compass to draw circles
Pencils
Small tip glue tube
Binder clips or clothes pin
Level meter
Chart paper or any handmade paper for wheels (
big sheets in 3 colors of your choice I each. 100-120 gsm)
Heavy Card-stock (220 gsm )
Embellishments
Eyelets
Eyelets punch
Wooden or acrylic beads
Satin ribbon
Glitter paper
Kite paper or tissue paper
Sequins
Needle and thread
Paper tapes
Paper flowers
PROCEDURE:
Make a
cardboard or mount-board box with the following dimensions:-24 cm
x 20 cm x 6 cm- l x b x h
Cover the
box completely using handmade paper or chart paper. I used white colored 120 gsm
paper to completely cover the box. To cover the box, cut the paper using below
dimensions:- 24 cm x 20 cm x 10 cm – l x b x h
Score the dotted lines properly before folding the paper.
Once scored and folded, glue the paper to the box. Stick the excess paper at the
top sides of the box to the inside of the box.
For the
sides of stroller, draw 2 semicircles with 15 cm radius i.e 30 cm diameter.
From the
same center, draw circles with 3 cm radius i.e 6 cm diameter.
Cut the two pieces as shown in the image.
Now cover the two pieces with a different colored paper. I used 120 gsm baby pink paper. To cover the semicircle, cut the paper 2 cm bigger from all sides than the semicircle piece. Stick the paper on one side and the make cutsat the ends having the excess paper, fold on the other side and stick it.
Now cut exact same shape of the semicircle piece on the paper and stick it to the other side with folded paper. Before sticking the paper, punch a hole at the center of the semicircle. Repeat the procedure for the other side also. Your stroller sides are ready.
Now for the wheels, cut 4 circles with 9 cm radius i.e 18 cm diameter. Cut another 4 wheels with 2 .5" radius i.e 5" diameter.
Stick pairs of 9 cm wheels together with strong adhesive to get 2 numbers of 9 cm wheels. I used fevicol to stick them together. Repeat the same with 2 . 5" wheels to get 2 thicker wheels.
Now cover your wheels with different coloured paper. I used baby blue 120 gsm paper. Follow step 6) to cover the wheels neatly with paper. Now your wheels are ready.
To attach the sides of the stroller with the length of the main box, used strong rubber adhesive. I used fevibond. Place the side as shown in the image and place a ruler on the piece lengthwise.
Arrange box below the ruler such that the center of the semicircle is above the box well over 1 cm. Adjust the position of the box so that the corners of the box are not peeping outside the semicircular sides. For help, I marked the center of the box and center of the semicircle and coincided them for proper placement. Once you get the placement simple pick up the box and apply glue and place it back.
Apply pressure for good 15 mins or place something heavy on it. Once dried completely, repeat the step on the other side. Voila, your stroller body is ready.
Attaching the wheels was a tricky part. I placed the wheels on the crafting mat to make sure they are aligned with the lines on the mat.
Then I placed the stroller sideways on the mat. Aligned it with lines on mat and then slowly adjusted the wheels. Once done I glued them to the sides.
This was the trickiest part of the entire project. Once dried repeat on the other side. Make marking on the crafting mat for help.
Once your wheels are glued, place the stroller on the ground and place a level meter on it to check if they are balanced. You can also do this step before gluing the wheels to make sure the stroller is well balanced and aligned.
Now for the movable shutters, cut 5 strips from the heavy card-stock or any heavy weight paper. Each strip with 8 cm breadth rounded at the corners.
Also slant cut them at the ends to taper them at the ends. The length of the 5 strips should be 43 cm, 47 cm, 51 cm, 55 cm and 59 cm.You can add more more if you want with change in lengths as 43 cm, 46 cm, 49 cm, 52 cm, 55 cm ans 58 cm.Hold the strips from end to end on one side and mark the center at 4 cm x 2 cm from the bottom. Punch a hole in the center. Repeat the same for the other ends.
Now using an eyelet join holes in the strips with the hole in the side of the stroller. Use and eyelet punch. You will need a big eyelet.
If you cant find an eyelet I suggest u use a small wooden stick 1 cm in length but cylindrical in shape. Ends of Indian broomsticks do just fine. Cut in 1 cm long pieces and join the strips.
To lock the ends so that the strips do not come out use buttons with hot glue guns at the two ends make sure you do not stick glue anywhere else but only the button and the stick end.I used an eyelet for this project. But I had used a button and glue gun previously on another project and it works just fine.
Let it dry completely. Hold it tight until it doesn’t dry if you are using a stick, glue gun and a button.Repeat on the other sides.
Your shutter is in place now. U can permanently stick the shutter in the position you desire, but to make it movable u need needle and thread.
This is simple process but tricky. First you stick the last strip on the back of wheels near the corner part. You need to do so on both sides. And u need to do this process of stitching on both sides simultaneously one after other.
Once last strip is secured, which is the longest one take the next longest strip and hold it closest to the last strip like the shutter would be when held back. Make 2 dots on either sides near the ends of strips. Pass your needle through both strips at the dot marked. Work on both sides. Now pull the strip away from the last strip till no gap shows between the 2 strips. Now mark another point close to the earlier one from inside and pass the needle only from one strip. i.e from the strip which is not glued. Tie a knot and cut the thread. Now the last 2 strips are joined and have a recoiling motion.
Repeat the process for the 3rd and 4th strips, then 2nd and 3rd strip and then st and 2nd strip.Once all are stitched together, the shutter is ready to move back and front.
Punch a hole in the center of the 1st strip near the end. Hang 2 wooden beads with satin ribbon from that hole. This will help you to pull the shutter front.
Your stroller is ready. Glue your kite paper inside the box to cover the exposed area. Cut tassels or frills at the ends.
Now you can add as many embellishments as you desire. I added sequins on the sides and glitter flowers on the shutters.
I covered the eyelets with blue flowers on the out and yellow flowers inside.
For the wheels I used paper tapes for spokes and tracks. I added paper tapes on the shutters for decorations. I also design cut the shutter to get a nice finishing.
I covered the edges of the stroller using glitter strips.
Embellish the way you want. Have fun. After all the hard work, u can have a little fun.
I purposely didn’t add handle. You can add if you want.