Tuesday 24 October 2017

Shaker Window Wind chime/ Baby Mobile/ Balcony decor

Hey guys
Welcome back to my blog...today I have a wind chime/ baby mobile/ balcony decor piece for you which I made a a DT inspiration post for ItsyBitsy blog. I incorporated the fun shaker windows into my project to make it more fun and interesting. I hope you all will like this...I also have a detailed tutorial for this and you can visit me HERE to know more.
here are a few sneak peeks of this project.


Thank you for stopping by...have a fab day ahead.

Monday 16 October 2017

Snuggle bug - unisex Mini Album with a Box and 12 onesie tags featuring K & Kompany papers.

Hello guys
Happy Diwali to all...I hope you guys are enjoying this Divine Festival of Lights.....May Goddess Laxmi bless you all with wealth and prosperity. 
Today, I have a very special project for you all...This is is my very first Unisex Mini Album. I have made this very bright and colorful album as a custom order using the K & Company Snuggle Bug paper pack. Like all my baby albums, this album is also accompanies with 12 onesie tags and a custom made box to hold everything snugly inside.
The album measures 9" x 9" x 43/4" in size and has 6 very interactive pages. so including the front and back covers, there are 14 sides in this album. Each page is decorated and has many pockets and flipouts...I feel all in all it should hold atleast 120 to 150 pictures in here. I also have give 12 big collage photo mats so you can even add collages....12 collages if added on one side. I have decorated my cover with flowers, butterflies and a shaker window in the center filled with cute sequins, i also have diecuts from Imaginisce to embellish my cover.
The box made to house this chunky album and 12 tags is made from scratch using heavyweight chipboard. This box measures 12" by 15" by 6" and has a partition to hold the tags. Also I added a pocket on the inside of the lid to hold more ephemera and pictures. I have used handmade papers to cover the inside as well as outside of the box and the lid is decorated with colorful polka dots from the scraps of the cardstock. To give it a more finished look, I added satin ribbon tot he box and tied it intoa neat bow....looks like a cool gift box.
The 12 onesie tags are very colorful and made to co ordinate with the paper pack. The numers used are foam numbers and are all glittered. A cute charm and ribbons completes the look. There is journalling space at the back...for every month.
I have a video walkthrough of this album...I encourage you to watch it to see the interactive elements in action. However, I am adding a few pics here also.


That's my album...I hope you guys will like it. Thank you for reading this very long picture heavy post...have a great day ahead.

Saturday 14 October 2017

Happy Diwali - Handmade cards

Hey guys
Firstly I would like to wish you all a very HAPPY AND PROSPEROUS DEEPAVALI or DIWALI. I know its just around the corner and so I couldn't hold myself back and want to show you some of the cards I made this year for my crafty friends. I have been busy since August with work and could only make so little of them......next year i am planning to start a month in advance so I can make a lot of such card..maybe send out a few to orphanages and elder homes.
I m putting my cards at the following blog challenges:-

  1. Scrapy Land Challenge #75- Anything Goes with dies Scrapy Land sells -I have used Spellbinders die for diecutting.
  2. Addicted to stamp and more Challenge#263 - Holiday - Diwali is an Indian festival and its a big holiday for us. Children get a month vacation from schools and colleges and the festival is on for 4 to 5 days. I have made a money envelope for gifting in Diwali.
  3. HLS October Challenge- anything goes with dies- I have used Spellbinders die for diecutting the ornate design.
  4. Inky chicks Challenge #89 - Anything but square
  5. Word Art Wednesday Week #304-305 - Anything Goes
  6. The Ribbon girl- october card challenge 

For me Diwali is all about colors and sparkle and that is what I have tried to represent through my cards.....couldn't hold back and made an entire array of colors this time. I hope you guys like it...because everytime I see these babies...I feel happy.

 
So all the cards are made in the same fashion...I started with an A2 size cardbase of all the colors I could find in my stash. Then I went ahead and added a sparkly gold glitter paper over it which was 1/4"smaller than the base. I took white cardstock cut to 3 3/4"by 5" and diecut an ornate frame using Spellbinders DIE D-LITES GRATE WORKS ETCHED DIE. Then I adhered satin ribbon on the bottom of this diecut piece and then adhered this on my card front. I used 1 gold sequin to embellish my card that too on the center of the satin ribbon bow.


The sentiment I used is a local brand and I do not know the name. I stamped it with versamark and gold heat embossed it on a matching cardstock. I matted it on vellum and then added it to the corner of my card.


I also made matching envelopes for these pretty card. I have used white gold pearl cardstock and decorated it strips of matching cardstocks and gold sequins. I added a sentiment on the envelope from Mudra Craft stamps using Black Archival Ink. Simple and very easy....I hope you all like these beauties....Thank you for reading this post and have a great day ahead.

Supplies:-
  1. Satin ribbons - ItsyBitsy
  2. Cardstock - Different colors from different brands and stores - ItsyBitsy, Fabriano, A1 craft
  3. White cardstock - A1 Craft 
  4. Gold sequins - Mudra craft stamps
  5. Spellbinders Grate Works die -The Crafters corner
  6. Gold glitter paper - ItsyBitsy
  7. Vellum - ItsyBitsy.

Wednesday 11 October 2017

Happy Diwali- Tri Fold Money Envelope

Hey guys
Welcome back to my blog. Today's post is  a DT inspiration for ItsyBitsy challenge blog which will be running all this month. In India, its time for the most awaited festival....Diwali and we all are gearing up here. Its a very colorful, sparkly and happy festival filled with love and joy.
Since I am already into a festive mood since I have started with the mandatory cleaning of the house to welcome Goddess Laxmi, I have come up with a Tri Fold Money Envelope so I can gift them to my loved ones this festive season.
Here are few sneak peeks...for more information and a tutorial please visit the ITSYBITSY blog by clicking HERE.


I am putting this project up at the following blog challenges:-

  1. Addicted to tamp and more Challenge#263 - Holiday - Diwali is an Indian festival and its a big holiday for us. Children get a month vacation from schools and colleges and the festival is on for 4 to 5 days. I have made a money envelope for gifting in Diwali.
  2. I love Math challenge #7  - Use no.7 or 7 things - I have used 7 flowers to build my project.
  3. HLS October Cahllenge- anything goes with dies- I have used Cottage Cutz - Spring Greenery die for the leaves on my project.
  4. Inky chicks Challenge #89 - Anything but square
  5. Word Art Wednesday Week #304-305 - Anything Goes
  6. The Sisterhood of crafters - Pink october
Thank you for stopping by...Hav a fab day ahead.

Monday 2 October 2017

Halloween Party decorations (Spooky and gory)

Hello guys
Welcome back to my blog. Its October and time to gear up for Halloween. When you think Halloween....the first thing that comes to my mind is Orange, Purple, Spiders, Pumpkins and Blood....I do not know but these are the first things. So here, I have party decorations that I did for my sister-in-law for the coming up Halloween party.
I made Trick or Treat backdrops on cobwebs, candy treat bags, A Beware plaque for the main door, 3 more plaques for food settings, a few eyes for cupcake toppers and some more banners to hang off the wall.
MAIN DOOR PLAQUE:-


She asked me to do my best and I did give it all...to be a little honest I just got carried away. in India, we have Diwali during the same time...but in recent times Halloween theme parties are all in rage. So, here is my first attempt at making Halloween decorations.
FOOD SETTING DECORATIONS:-

 To make all the plaques, I started with sturdy black chipboards and some modelling paste. I used my hands and fingers to do all the goop and blood on the plaques using modelling paste. I even traced beware with my fingers and so you see a lot of finger marks on the plaques....It adds to the goriness. I let it dry completely and then I colored it using thick acrylic paints. I added a little white adhesive to the paints to give it a glossy finish...so it looks like its still wet and goopy......I have used 3 shades from each color to give it a variation and add depth to my project...so I used Crimson, Vermillion and Red for the Blood effect on the VAMPIRE's DRINK plaque.

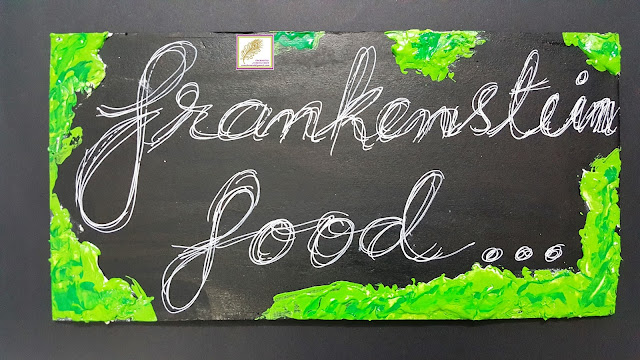
 For the FRANKEINSTEIN's FOOD I have used Light Green, Dark Green and Sap Green. I mixed white adhesive to the paints to give it a more wet and glossy look....Looks like real goop in real.

For Eyes for the Witches, I used Lavender, Lilac and Violet and Orange, Chrome Yellow and little Vermillion. Again mised white adhesive to give a more real look. I went with this color to complete the traditional Halloween color scheme. Super fun to make these plaques...
I just used some White gel pen to write all the names on the plaques.
CORNER AND BACKDROP DECORATIONS:-


I just used some woollen yarn to make the cobwebs. It took me 30mins to make each and then I added a thin coat of diluted white adhesive to make it a little stiff. The banners in the center are made using some black chipboard, orange cardstock and chipboard alphabets. I painted the alphabets with black acrylic colors. Then I added some black satin ribbon so it could be easily hung from anywhere.
BANNERS:-

It was so much fun making these banners. I started with black chipboard and layered some orange cardstock on it and then added some Black painted chipboard alphabets....finished with black satin ribbon to make it easy to hang. Super fun to make...
BROOM:-
We all know that....Every Witch needs her broom. So I made this as a prop and everyone in th party could take a pic sitting or holding this. I used newspapers to make the stick and added some tissue paper fringes to make the front part. I then colored the stick with brown and black arylic colors to give a worn out look...I wish I had a better pic.
GOOGLY EYES:-


Aren't these cute....I made these as cupcake toppers. I just matted white circle with colorful cardstock and added a foam center. I added dye ink and then glossy accent on it. It gave it that cracked look as the ink was separating from the foam. I then just distressed the edges to give it a worn out look.
CANDY TREAT BAGS:-


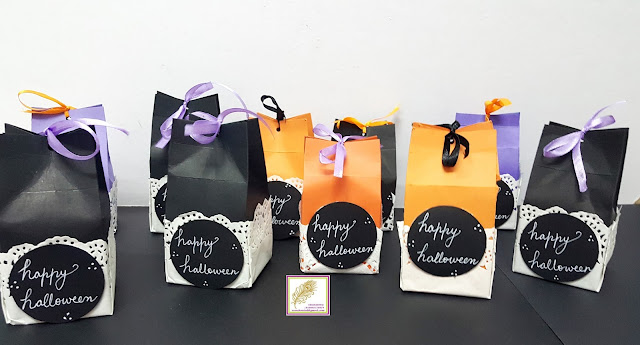
What's Halloween without candy...huh? Made these super cute candy bags using orange, black and violet cardstock. I then covered the lower part with doilies....looks super adorable. Then, I added the Happy Halloween tags in the center. I wrote the sentiment instead of stamping it...just for fun.


I hope you guys liked it as much as I did.....Thank you for reading this picture heavy post. Have a wonderful week ahead.