Showing posts with label bundleofjoy. Show all posts

Thursday, 6 April 2017

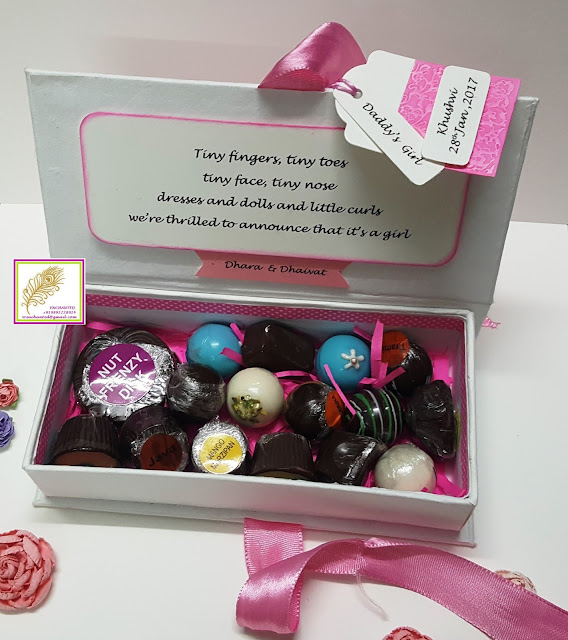
Handmade Baby Girl Announcement Chocolate Boxes.

Hey all you beautiful people
I am back with a new project today which are handmade announcement boxes for a Baby Girl. Now these boxes were custom made to fit 250gms of handmade chocolates. I have made everything for this box from scratch and it was fun......
I am putting this box up at monthly challenges at:
1 Allsorts challenge - Week 406 - Ladies and Girls
2 Cards and more Challenge#180 - Kids/children
3 Let's Craft and Create Challenge#123 - Entwined - Used twine to hand the tags
I have few pics and a video I made before I sent out these boxes.....some might not be so good as I took them in hurry. If you want a tutorial for this plz let me know and I will be happy to do one for you. Now, the supplies used to make these cuties are listed below and you can go throught them.
I would like to thank Itsybitsy for their promptness in delivery of the papers which was incredibly crucial for this project and they got the papers to me in just 24hrs....So thank you Rashmi Harish and team Itsybitsy.
I have used White handmade paper to cover these boxes on the inside as well as outside. The bright pink cardstock is from Fabriano and the other one is from Itsybitsy.  The flourish diecuts are made using MFT(My Favorite Things) Leafy Flourish die. The other diescuts are made using Sizzix dies and embossing folder. 
The tags are diecut using Itsybitsy dies and then given a little color using Picked Raspberry distress ink also from Itsybitsy.  The other little tag is fussy cut by me. I have used twine to tang the 2 tags and the box. the boxes are embellished using baby girl wooden embellishments and I have used different ones on all boxes. I got them in an assorted pack from A1 craft.
For the inside, I have added a little color using polka dotted pink paper tapes. Also I did add a little pink tissue paper shredding to bring in more color. I used baby pink in few and dark pink in the rest. The box is held together using Pink satin ribbon from Itsybitsy as well.
I have printed the messages using my printer on a white cardstock for the tags as well as for the inside.

Supplies
1 White handmade paper- Itsybitsy
2 Fuscia cardstock - Fabriano - A1 craft
3 Baby pink cardstock - Itsybitsy
4 Baby pink satin ribbon - Itsybitsy
5 Iris cardstock for tags and messages - 270gsm - A1 craft
6 Picked Raspberry Distress ink - Itsybitsy
7 Mft Leaft florish die - A1 craft 
8 Sizzix bigshot, dies and embossing folder - Itsybitsy
9 Paper tapes - local store
10 Tissue paper shredding - Local store
11 Wooden embellishments - A1 craft

I have a video here to show you the box. I hope you all will watch it.
Thank you for reading this post. I hope you have a wonderful week ahead.

Wednesday, 8 February 2017

Baby Girl Stroller Gift box

Hi guys.

   I have made a Gift box which looks like a baby stroller. You can pack gifts for the new born on baby shower, baby announcement or any occasion you can think of. Now earlier I had made one for a baby boy....this time its for a baby girl. this gift box is almost 18"in height and the dimensions is 14" x  8" approximately in length and breadth.
I am putting up my project at Craft stamper Magazine  and Petal Lu Challenge #31.
  For tutorial, you can visit my earlier post which is very elaborate Click on this link to go to Baby Stroller Gift Box for the tutorial. However if you guys want a video tutorial for the same, do let me know and I will be happy to do one for you.
This gift box took me 2 days approximately to complete as it is a big one and has tone of details to be added to it. I hope you all like it and would try to make a similar one at home.

Supplies used:
  1.  Mount-boards or Cardboard (3)
  2.  Scissors
  3.  Cutters with sharp blades
  4. Fevicol or white strong glue
  5. Fevibond or silicon glue
  6. Kangaroo 1 hole punch
  7. Crafting mat
  8. Ruler
  9.  Compass to draw circles
  10.  Pencils
  11. Small tip glue tube
  12. Binder clips or clothes pin
  13. Level meter
  14. Chart paper or any handmade paper for wheels ( big sheets in 3 colors of your choice I each. 110 gsm)
  15. Heavy Card-stock (220- 250 gsm )
  16. Embellishments
  17. Eyelets
  18. Eyelets punch
  19. Wooden or acrylic beads
  20. Satin ribbon
  21. Glitter foam sheet
  22. Kite paper or tissue paper
  23. Needle and thread
  24. Glitter paper flowers
  25. Pearls
  26. Rhinestone flowers
  27. Wooden beads
  28. Lace/ Trims
  29. Welcome stamp and Archival ink

To make the movable shutter, I have sewed the pieces of the strips to one another in such a fashion that they pieces do not get apart completely. All the pieces of the shutter are held together with a homemade brad.....its simple .....just use button with 2 holes and a thick wire. Pass the wire through the holes of the button and its ready to work like a brad. I covered the exposed end of the wires using a glitter flower with pearl on the center.


  The shutters are decorated with glitter flowers from Itsybitsy and Pink lace trim also from Itsybitsy. I punched a hole in the center of first shutter and added a pink eyelet to it. I then passed the same pink trip and added 3 wooden beads to it....this helps to add some weight on the shutter and keeps it stay put rather than sliding back.
  Finally, I decorate the edges and wheels with thin strips of pink glitter foam. Adds a little interest an color at the same time. The sentiment used is from Mudra stamps and I have heat embossed it using Ranger black embossing powder. Matted it and mounted it using some foam tape.
  This gift box has movable shutter and fixed wheels. You can add an handle to it if you want but I haven't added it purposefully to enable easy access to the gifts.
I am adding the youtube video link below to view the complete gift box. I hope you guys will like it.
Thank you for reading this post and I hope you all will like this.

Monday, 9 January 2017

Baby Girl Mini Album and Tag Box.

Hello everyone.
Firstly I would want to wish all of you a very happy new year and I hope you guys find love happiness and peace this year. It has been a while for me since I have done a blog post as there was a lot happening on my personal front. I had been doing projects...just didn't find time to write a post and share them with you all.

So lets begin the new year with a beautiful  project for a heaven sent bundle of joy....I have made a mini album for a baby girl....its my first and I am really excited to share with you. Now this one is a big album with 8" by 8" as covers and the spine is 4 3/4"....so its a big one for sure.
This album has a fair few tags and lots of journalling spots and can hold over 100 pictures on the mats and you can still tuck a few more in the nooks and crannies of this album. This album is divided into 12 sections and I have made specific monthly tags to fit those 12 special months of a baby's first year. You can also use these tags as baby onesie tags as once done you can continue to treat them as regular jounalling tags. I have added a little space on the back of these tags to write about baby;'s monthly routines.
I have used suppies from Itsybitsy, Papericious, Kaisercraft and the mdf diecuts are from Jasmine Siddhiqui from Kraftily konnect. The collection of ribbons and embellishments at Itsybitsy is just outstanding and I really like working with them. The paper pack used is called Its a Girl which is from Papericious and I must say that the collection is really perfect for making such albums.
All in all...I have loads of pictures I want to share with you all...so sit back and enjoy this interactive mini album.
I am putting this album up at Papericious monthly challenge for December.
This moodboard really inspired me to make a Baby Girl album with loads os shades of pinks and purples with hints of greys and white. I have incorporated roses as well as sequins in my project.


For a more detailed walk through of this album, you can visit my youtube channel to see the video. I am putting the link for the same below.


I hope you liked my project and if you do...please leave me some love. Thank you guys and have a nice day.