Showing posts with label handmade paper. Show all posts

Monday, 3 April 2017

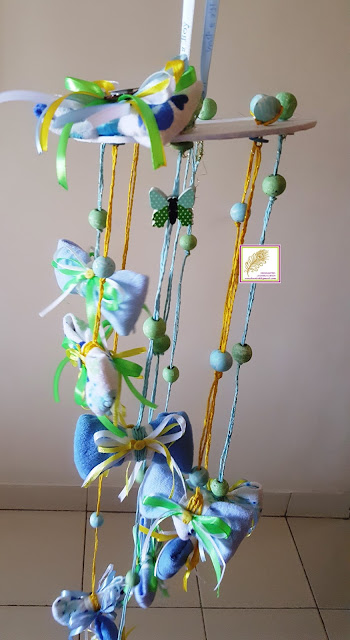
Handmade Baby Boy Mobile using Washcloths

Hey guys
How are you all doing today? Off late most of my projects are for infants and newborns...so to keep the trend going on I made yet another baby mobile using washcloths and well this one is for a baby boy. I had done A mobile a few days back for my niece and you can read it here on my blog Handmade baby girl mobile 


I took a lot of pictures this time and also made a small video which I would like to share with you all. I am putting this project up at monthly challenges at:
1 Addicted to stamps and more -Challenge #235 - I have used butterflies in my project and have taken blues colors as inspiration for this project.

2 Craft Addiction Challenge Blog # Challeneg 04 - butterflies-- I have used Butterflies in my project.


 Supplies:
1 Chipboard 1600gsm
2 White Handmade paper- Itsybitsy
3 Wooded beads - Itsybitsy - Old stash
4 Paper twine (You can also use ribbons, laces, jute ropes....anything you like)
5 Washcloth
6 Satin ribbons
7 Silicon glue
8 Fabric glue
9 Hole Punch
10 Circle cutter
11 2 wooden butterfly buttons - A1 craft
12 small mdf circle cutout - A1 craft
13 silver glitter- Itsybitsy
14 footprint sticker- Itsybitsy

I have made this in such a way that the washcloths can be remove easily from the mobile and it wudn't damage the mobile at all. Here is the video for this project. I hope you all with watch it.

Saturday, 25 March 2017

Handmade Baby Girl Mobile using washcloth.

Hey guys
Lately, I have been doing a lot of baby themed project. I made baby mobile for my sister-in-law using washcloths when I was gifting her baby products...... So I wanted to give her in a different style. First I thought to do a bouquet of washcloths arranged like roses....well  I did that too a while ago and didn't want to repeat it. Well, My pictures are too good this time as I was in a hurry...but I still would want you all to see them.
Then it came to me....Washcloth mobile.....and it did come out as I imagined. So I would like to share few pics and a small video showing you the mobile. Initially I did for a baby girl and then I thought why not do for a boy as well.....so I will be posting very soon a baby mobile for a boy.

I am putting this project up for monthly challenges at
1  Cards and more Challenge #180 - Kids/Children - Its a baby mobile
2 Double D challenge - Things that fly - I have incorporated stars whihc are up in the sky and its a                                                                        hanging mobile.
3 Let's Craft and Create Challenge #123 - Entwined - I have used Paper twine.
4 Scrapping4fun Challenge#86- Anything goes with recycling/old stash - the wooden beads and                                                              paper twine were in my stash forever....glad I could use them.
5 Polkadoodles Crafting challenge Week 12 - Anything goes

So here there are pics as much as I could click before these beauties left my door to find a new home. Aren't those washcloth bows adorable....so cute!!!!

Supplies:
1 Chipboard 1600gsm
2 White Handmade paper- Itsybitsy
3 Wooded beads - Itsybitsy - Old stash
4 Paper twine (You can also use ribbons, laces, jute ropes....anything you like)
5 Washcloth
6 satin ribbons
7 Silicon glue
8 Fabric glue
9 Hole Punch
10 Circle cutter

I have made this in such a way that the washcloths can be remove easily from the mobile and it wudn't damage the mobile at all. Here is the video for this project. I hope you all with watch it.

Thank you for visiting me and have a great weekend.....Hugs.

Wednesday, 8 February 2017

Baby Girl Stroller Gift box

Hi guys.

   I have made a Gift box which looks like a baby stroller. You can pack gifts for the new born on baby shower, baby announcement or any occasion you can think of. Now earlier I had made one for a baby boy....this time its for a baby girl. this gift box is almost 18"in height and the dimensions is 14" x  8" approximately in length and breadth.
I am putting up my project at Craft stamper Magazine  and Petal Lu Challenge #31.
  For tutorial, you can visit my earlier post which is very elaborate Click on this link to go to Baby Stroller Gift Box for the tutorial. However if you guys want a video tutorial for the same, do let me know and I will be happy to do one for you.
This gift box took me 2 days approximately to complete as it is a big one and has tone of details to be added to it. I hope you all like it and would try to make a similar one at home.

Supplies used:
  1.  Mount-boards or Cardboard (3)
  2.  Scissors
  3.  Cutters with sharp blades
  4. Fevicol or white strong glue
  5. Fevibond or silicon glue
  6. Kangaroo 1 hole punch
  7. Crafting mat
  8. Ruler
  9.  Compass to draw circles
  10.  Pencils
  11. Small tip glue tube
  12. Binder clips or clothes pin
  13. Level meter
  14. Chart paper or any handmade paper for wheels ( big sheets in 3 colors of your choice I each. 110 gsm)
  15. Heavy Card-stock (220- 250 gsm )
  16. Embellishments
  17. Eyelets
  18. Eyelets punch
  19. Wooden or acrylic beads
  20. Satin ribbon
  21. Glitter foam sheet
  22. Kite paper or tissue paper
  23. Needle and thread
  24. Glitter paper flowers
  25. Pearls
  26. Rhinestone flowers
  27. Wooden beads
  28. Lace/ Trims
  29. Welcome stamp and Archival ink

To make the movable shutter, I have sewed the pieces of the strips to one another in such a fashion that they pieces do not get apart completely. All the pieces of the shutter are held together with a homemade brad.....its simple .....just use button with 2 holes and a thick wire. Pass the wire through the holes of the button and its ready to work like a brad. I covered the exposed end of the wires using a glitter flower with pearl on the center.


  The shutters are decorated with glitter flowers from Itsybitsy and Pink lace trim also from Itsybitsy. I punched a hole in the center of first shutter and added a pink eyelet to it. I then passed the same pink trip and added 3 wooden beads to it....this helps to add some weight on the shutter and keeps it stay put rather than sliding back.
  Finally, I decorate the edges and wheels with thin strips of pink glitter foam. Adds a little interest an color at the same time. The sentiment used is from Mudra stamps and I have heat embossed it using Ranger black embossing powder. Matted it and mounted it using some foam tape.
  This gift box has movable shutter and fixed wheels. You can add an handle to it if you want but I haven't added it purposefully to enable easy access to the gifts.
I am adding the youtube video link below to view the complete gift box. I hope you guys will like it.
Thank you for reading this post and I hope you all will like this.

Thursday, 2 February 2017

Handmade 50th Birthday Gift Box

Hey everyone
How are you all doing this week....I am back with a another new gift box...Ii have been making a lot of gift boxes lately and I really had some fun making them. Now this gift box is made to celebrate 50th birthday and is made keeping gold, black and white as color scheme. I really hope you guys will like this one...
I am putting this project up at Addicted to stamps challenge - Make your mark (I have used white gel pen to write on tags), Petal Lu  and Allsorts challenge - Lets celebrate.
This box is actually 9 1/4"x 5 1/4" on the outside and 8 1/4"x 4 1/4" on the inside and the thickness is 2". I have kept the embellishments to the minimum as the paper used is very decorative on its own. I have used handmade flowers, sparkle dots and few die cut flourishes to decorate this box.
The supplies used for this project are mentioned below.
 The little mustache is stamped with versamark using a foam stamp from itsybitsy and heat embossed with UTEE(Ultra thick embossing enamel) from ranger on a black cardstock. Then I just fussy cut is with little scissors and mounted it on the numbers using some strong adhesive.
The 3 little tags are handcut by me and the messages are handwritten with white gel pen. Holes were punched with a Kangaroo hole punch and then attached to the box using some white satin ribbon. I also used gold and white satin ribbonds as closure for the box.
 The Birthday Wishes sentiment is from Justrite Grande Handwritten Sentiments clear stamp set. I have heat embossed the sentiment using versamark and Gold embossing powder from Ranger on a black cardstock.
So here is the list of supplies used for the box:
1 Chipboard (Kraftily Konnect)
2 Black handmade paper (Itsybitsy)
3 Gold pearl paper ( A1 craft supply)
4 Gold satin ribbon (Itsybitsy)
5 White satin ribbon (Itsybitsy)
6 Silicon glue (Itsybitsy)
7 Pearls (Itsybitsy)
8 Pattern paper - Eno greetings Paper series Blossom.
9 Chipboard alphabets (Itsybitsy)
10 Sparkle dots (Itsybitsy) 
12 Flourish diecuts- MFT 
13 Versamark embossing pad and heat gun (Itsybitsy)
14 Gold embossing powder: Ranger (Crafters corner)
15 White adhesive - Fevicol
16 Handmade flowers- dies from sizzix.
17 White gel pen  local store
18 UTEE: Ranger (Crafters corner)
19 Mustache foam stamp (Itsybitsy) 
20 Birthday wishes - Justrite Grande Handwritten Sentiments clear stamp set
 At the very end I have added the link for the video walkthrough of this project. If you want a tutorial for this box, please let me know and I will come up with one. I hope you all will liked my project...until next time..keep smiling.

Sunday, 22 January 2017

Turquoise box 2

Hello guys...
I am so in love with these boxes that I just cant stop making them. Another one of these beauties is ready to leave my door...this one is a little different in the sentiment and the ephemera used. I just cant stop admiring them and so I am uploading the pictures of this one...I hope you all will like it as much....
You can refer my earlier post for supplies used to make these gift boxes.Thank you for stopping by and reading this post.


Monday, 19 September 2016

Birthday Journal / Album

Hello all you wonderful people out there
I am back today with yet another project. Its a Birthday journal/ album that I made for a dear friend whose birthday is today. Its ideally made from scrap cardboard pieces we get our couriers delivered in or inside our shirts....those thick corrugated cardboard pieces are used to make this album.

This album is 8" by 6.5" in size and has 3.5" broad spine. Unlike most albums, it doesn't have a hidden gusset binding system or a spiral binding system...This album is stitched page by page to a piece of canvas and then attached to the spine....like our notebooks or a journal. I have done this first time and it was fun experience.....
I started by folding the cardboard pieces I have to make flip pages. Then to every page, I added pattern paper and a magnetic closure. Made 6 such pages and decorated them. Then stitched them onto the canvas cloth. Once this part was ready, I added the front and back cover to the canvas and then attached them to the spine of the book.
The stitching part was fun. I never stitched books before and I had much fun doing that. Covered the entire album with handmade paper from Itsybitsy as its very sturdy. Decorated the front with floral cutouts from Eno Greetings paper pack...I used the same collection to do the pages.
For the album closure, I added a metal clasp with chain and some charms dangling to it.
Overall, I loved this album and had much fun making this. Will make one soon but this time might add actual pages instead of cardboard pages. I hope you all liked this album and thank you for visiting me.