Thursday, 7 July 2016

Newspaper Coiled Tray

Hey guys
I am back again with a new project. Its a newspaper tray which is made from newspaper tubes by using the coiling technique. Its a very close to heart project I made and I feel very happy for the way it turned out to be.
If you wish to make this tray you will need 11 rectangular coiled pieces. You can use a reference cardboard piece for coiling around it. I have coiled around a 1"x 1/2"rectangular piece to obtain even pieces. I have made each coil using 4 tubes, but then again this may vary according to the size of your tubes. Once all your pieces are ready, join then together in a pattern of 4 pieces for 2 sides and 3 pieces for 2 sides. Then join them together to get a rectangular frame.You will need thinner ans smaller newspaper tubes for this purpose and I make them from 1/4 sheet of 1 newspaper page.

For the base, you need to coil 12 cicular pieces like in picture and join then all together to obtauin the base. The cicular coiled pieces should have the diameter equal to the lenght of the rectangular pieces you coiled earlier.

Once ready, join the base to the sides and your basket should be ready. I went ahead and added a fews more paper coils on top of the baset edge so get a more even surface.

On this I coiled and attached the handles. They are of the same size as the rectangular coiled pieces.

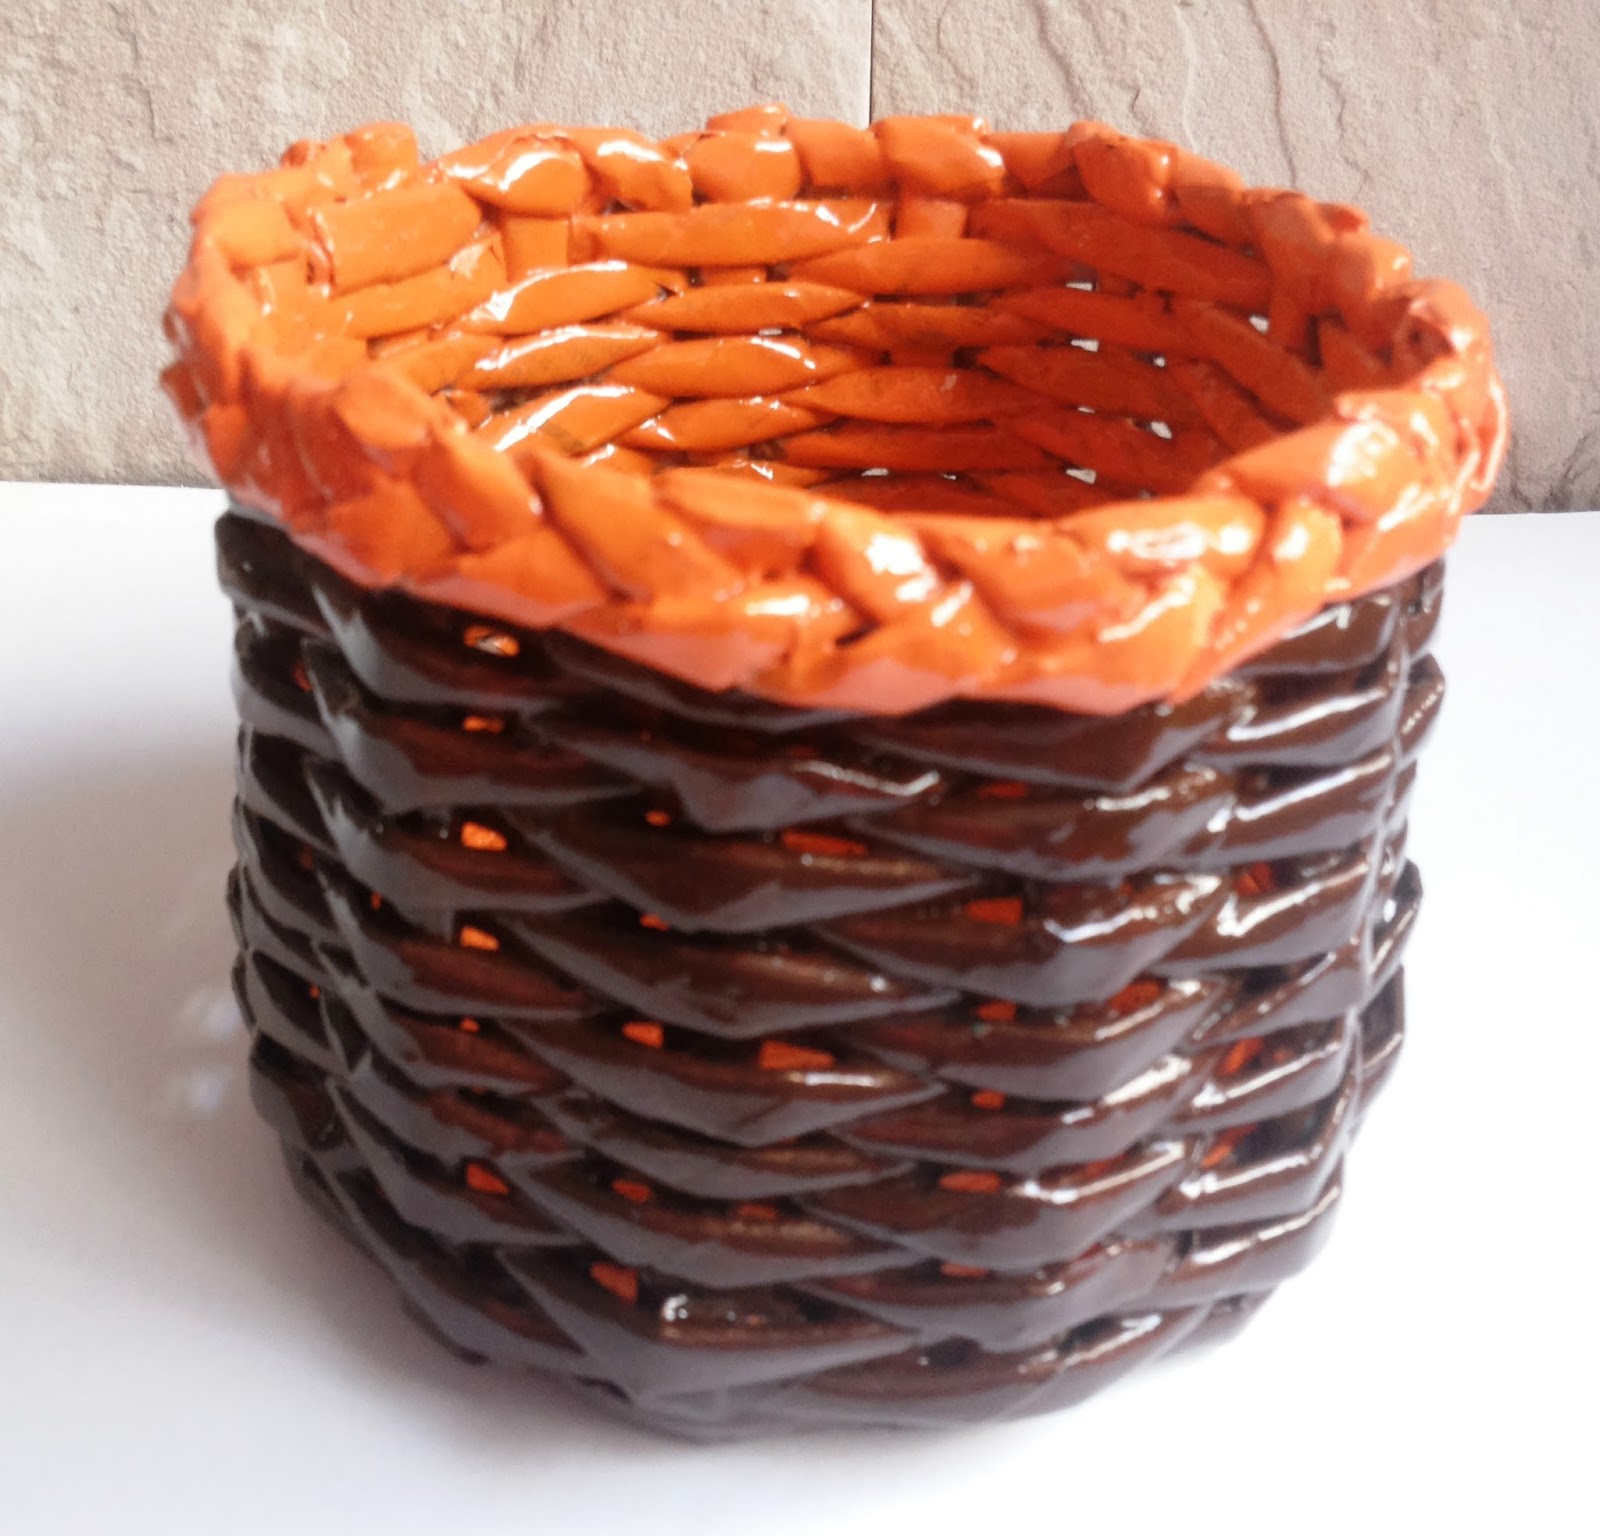
So that should give you your basket. I have painted my basket with acrylic colors in red and orange. Then I went ahead and added some detailing using fevicryl 3d outliner in black.. Once it was dry, I gave it 2 coats of varnish. I have used Asian Paints Aquadur exterior.

Thank you for reading my post and keep upcycling.

Sunday, 3 July 2016

Newspaper Bowls

Hello all your lovely people

I am back with something new this time. I going to share how to make newspaper bowls with you all. They are incredibly easy to make and very versatile in appearance......you can have square, triangular, circular, hexagonal.......if you can imagine it then you can do it. These little bowls are perfect to keep your little knick-knacks.
Supplies:
You will need very few supplies which are available in your home.
  • Newspapers.
  • Wooden Dovels or any thin stick or yarn needle
  • White Pva Glue or any other white liquid adhesive ( Fevicol Mr)
  • Acrylic or water colors ( Fevicryl\Hobby Ideas)
  • 3d liner tubes ( Fevicryl)
  • Clear varnish ( Asian Paints aquadur exterior)
Procedure:
  • We need to start by making newspaper tubes using a dovel or yarn needle. We will need at-least 30 or more tubes (now this will depend on the size of your bowl).
  • Once all your tubes are ready, just join them end to end by inserting the narrow end of one tube onto the broader end of other tube but add some adhesive inside the tubes to glue them.Make a train of tubes using 30 or more tubes. Now my tubes are 8" in length so I used 30 odd tubes.
  • Once all the tubes are strongly joined and the the glue dries, flatten all the tubes using your hand or pasta machine or anything else you want to use.
  • Start coiling the tubes leaving no gap in the center. Coil as tightly as you can and keep pulling the tube end at regular interval to coil them tightly ( something you would do when you coin ribbons).
  • Please make sure the coil is glue free and they are not stuck to each other. Once you archive something like a plate and like its diameter, stop coiling. I coiled till I got 6" diameter and then glued the end of the tubes to the coil. 
  • Now, we start shaping the coiled paper plate into a bowl. Slowing start pushing the coils away from each other. Be very gentle and be very careful while shaping the bowl because if you separate the coils too far apart, it will just come off and we cant fix it. We will have to start recoiling.
  • Go slow and push the coils away from each other and shape it into a bowl. We need to coat our bowl with glue mixture ( 2:1 Glue to water mixture) evenly on both sides. Let it dry and give another glue mixture coat.
  • Let it dry overnight and you can start painting it or decoupaging it. After drying i completely, give 2 coats of varnish and your bowls are ready.
Simple, easy an very useful. I am sure you all will love it and try this project yourself. Thank you for visiting my blog I hope you liked this post. Till next time, keep crafting......

Saturday, 2 July 2016

Coiled newspaper basket 1

Hey guys
I am posting a newspaper basket today for you to see. I do not have a video tutorial now but I am working on it and will update them asap.
For now I am adding pictures of basket I made. You will need newspaper tubes to make these baskets. You can refer my earlier videos for making newspaper tubes. Once you have around 100 tubes ready which should be 10-12"in length with thickness of around 0 . 25" we can start with our coiling.

This is a very simple process. We need to start coiling tubes in a circular manner around a pencil to obtain small circular coin like shapes. Depending on the size of the basket ans its shape you can decide how many coils you wish to make.
If you wish to make a basket similar to the one I have made, you will need 16 small coin like coils. I have made each coil using 2 tubes, but then again this may vary according to the size of your tubes. Once all your coins are ready, join then together in a pattern of 4 coils very similar to the one you can see using newspaper tubes. You will need thinner ans smaller newspaper tubes for this purpose and I make them from 1/4 sheet of 1 newspaper page.

So after you join 4 coins together, you will get a square like frame. you should have 4 such frames now. Start coiling your tubes around this frame in a square pattern. If you find it difficult, then you can measure your frame and cut a cardboard piece of the same size. You can coil newspaper tubes around it. I have used 8 tubes to coil around the frame structure. Once you finish this coiling, glue the end like always to hold your coils in place.
If you used a cardboard piece to coil the square, now take off the square coil from the frame and push the frame you made from 4 coins into the square coils. Please apply glue before you push it in. Its a very important step. So now, you will have the 4 sides of your basket ready. Apply white adhesive on both sides of the sides and let them dry.
For the base, I have taken a square cardboard piece 1/2" on all sides and coiled my tube around it. I have used 25 or so tubes to make the base. The length of the sides of the base is equal to the length of the sides of the side. Once your base is ready, start joining sides to the base. Use newspaper tubes to join the sides and the base. Dun't forget to join the adjacent sides.

So that should give you your basket. I have painted my basket with acrylic colors in turquoise and teal. Then I went ahead and splashed some purple acrylic color on it. Once it was dry, I gave it 2 coats of varnish. I have used Asian Paints Aquadur exterior. To finish the look of my basket, I added purple satin ribbon to it using strong adhesive. So that's all folks.
I hope you all liked my basket and I hope my tutorial was helpful for you all. Thank for visiting me and keep upcycling...


Tuesday, 21 June 2016

Birthday Wishes - Gift shaker card.

Hello everyone
How are you all? i hope you all are doing fabulous. Today I am posting a shaker card which is filled with sequins and handmade shaker elements. It carries a colorful birthday sentiment with it, which is stamped using 3 colors applied on the same stamp.I am sending this card to the this month challenge at A Blog Named Hero,Creativity with stampsPeek-a-boo designs and Craft Stamper.
  • Peek-a-boo Designs - Anything Goes ( I have used an old stamp sets and vellum and sequins are new stash.
  • A Blog Named Hero - Vellum is used as card base.
  • Creativity with stamps - Manly Card (This card is made using masculine colors like blues and purples)
  • Craft Stamper - Lets Get Inky ( I have used sketchpens and Dye inks
I have used a clear vellum for the base of this card which is in standard A2 size of  4 . 25"x 5 .5 card base. I then went ahead and cut another card base of same size from white heavyweight cardstock. I then cut the white cardbase into 2 parts. Resized one part of the cardstock by 1/8" on all sides and adhered it inside the vellum cardbase,
Now for the card front, I made shaker gift elements using some paper tapes, scraps of cardstock and stamps from GIFTS - HOTP Small Stamp Set. I glued purple, blue and lime green polka dotted paper tapes on scrap cardstock pieces. Then I stamped them using 2 gift stamps using Memento tuxedo Black ink and then fussy cut them. I made 6 gifts of 2 different sizes in 3 colors. Then, I also stamped and fussy cut some bow stamps from the same set.
I cut the white cardstock frame which is 1/4" thick on all sides to make the shaker window. I glued it to acetate sheet which is 41/8"x 5 3/8" in size. Then I added foam adhesive on the edges of the frame carefully not to show any from the sides. I brushed the window with nti static powder before adding shaker elements to avoid them sticking inside.


For the back, I used the other part of the white cardstock I cut earlier and stamped it with Birthday Wishes sentiment from Birthday wishes stamp set from Inkadinkado using Electric Lime dye ink from Ranger, Bahama Blue and Grape Jelly dye ink from Memento. I then filled up the window with green, blue and purple sequins, gifts and bows I made and then attached it to the vellum cardfront. I drew a few swirls using waterproof sketchpens to add some color to the frame of shaker window.

I added 3 gifts to the inside of the card to complete it. That's it and our cute shaker card is ready. I hope you all liked it. Thank you for visiting me.

Saturday, 11 June 2016

Galaxy card - Happy Father's Day

Hello everyone
I am back with another Father's Day card. Its June and Father's Day is just around the corner. Its time to celebrate our father and father figures in our lives....and so I made this one for my Father-in-law from my husband and myself.
I am sending this card to the this month challenge at A Blog Named Hero, Creativity with stamps, Peek-a-boo designs, Craft Stamper and Paru's Card Making challenges.
  • Craft Stamper - Lets Get Inky ( I have used watercolors, Dye inks and Fine-tip Pens) 
  • Peek-a-boo Designs - Anything Goes ( I have used an old woodblock stamp and pale grey cardstock used for card base while the watercolors and vellum is new stash) 
  • A Blog Named Hero - Vellum ( I have stamped the sentiment on star pattern clear vellum) 
  • Paru's Card Making Challenge - Father's Day ( The card is made to celebrate Father's Day) 
  • Creativity with stamps - Manly Card ( The card I made is to celebrates all Father figures)
I made made a watercolor card which is inspired from the sentiment " You mean the World to me".
I used rainbow watercolors and applied it randomly on my watercolor cardstock. Once dried, I applied black watercolor to the cardstock while keep it saturated at few places while a bit watery at other places. I removed excess color using a tissue paper. Once it dried, I used white watercolor to add splatters on the card which would resemble the stars. I have used camel watercolor tubes and watercolor cakes.
I mounted it on a pale grey cards which is 4 .25" by 5 .5". Now I added a star pattern vellum on this card  and stamped Happy Father's Day on it using Memento Tuxedo Black dye ink. The stamp Is woodblock mounted local stamp which I had bought years ago.

However, the stamp didn't quite stamp properly and so I had to redo it using waterproof blank pen. I have handwritten the sentiment "You mean the world to us"on the inside an added a few stars that fussy cut from the vellum.
I am uploading a video to show how I made this card.
I hope you like my card and thank you for visiting me.

Stone Pen-stands

Hello everyone
How are you all doing? Its weekend already and it has finally started to rain in Mumbai give all us Mumbaikars the much needed relief from the scorching sun. To celebrate this eventful day, I am blogging today about a pen stand I made for my bff for her office desk. It matches her office decor and color and also it has such fresh ad cool colors that you almost forget about the summer.....
Materials:
  1. Stones or pebbles (colored or uncolored)
  2. Acrylic paints
  3. Epoxy based glue ( Araldite or Epoxy 6000)
  4. Round/ square Chipboard piece (12 cm diameter/sides)
  5. Pattern paper or any paper
  6. Asian Paint Exterior varnish
Procedure:
  1. Clean and wash all your stones with soap water to remove all the dirt and grime. Dry them completely before you start using them.
  2. Get a circular piece of chipboard or any other shape you desire. I have taken approximately 5" in diameter for the base.
  3. Cover it with Pattern paper on both sides. You can use fabric too. Leave it as it is if you want and you can pain it later.
  4. Now start sticking stones in circular manner using epoxy glue ( I used  Araldite). Instructions to use epoxy glue is mentioned on the product itself. Make sure you place stones keeping distance from the center and towards the edge.
  5. Once you place a single layer of stones, wait for it to dry a little. Once it dries up, start building a second layer using epoxy glue. In such manner you can build ans many layers as you want. 
  6. Please be careful while placing the stones as they are irregular shaped, it takes patience and practice to place them properly. Sometimes you might have to hold it in place for few mins to secure them in place. I placed 8 to 10 layers of stones to obtain my pen stands.
  7. The perforated look comes naturally as the stones are all irregular in shape. Dunt worry about any spillage from the epoxy glue. once you varnish your project, it wont be visible.
  8. Now allow the pen-stand to dry for a day. Once dried, I applied acrylic paint to it because
    I wanted partiular color combination. you can leave it as it is also. 
  9. After your color dries up, apply atleast 2 coats of varnish. I have used Asian Paint exterior varnish. You can add embellishments it you want before or after varnishing depending upon what you are using. 
  10. You can start after the cuing time for the varnish is done.
I hope you liked my blog post and thanks for vising me. Keep crafting .....

Tuesday, 7 June 2016

Weaved basket with a Lid

Hello everyone

I am back today with another project that I did for a client. I am blogging about this because its different from what I usually make...as in It has a lid on it and I usually make open baskets. Anyways its one of my favorites and so I am sharing this with you.
This basket is a weaving style basket and its weaved in the Mat style. I have used 13 newspaper tubes on the base for this basket. To make a sturdy basket. we need sturdy tubes...so I made some tightly wound tubes using the entire half of the newspaper sheet. So, I got uniformly sized tubes which were sturdy and I used a yarn weaving needle.....worked for me. And for the weaving part. I used normal newspaper tubes ( Divide your single side of paper in 3 parts lengthwise). For tutorial about how to weave the basket, visit my earlier post about newspaper weaving basket (Mat Style).

For the lid, I did something different. I coiled the newspaper tubes to 10" diameter as tightly as I could without applying any adhesive in between the coils. I only glued when I reached at the end of my coil. Then again the size of the coil depends on the diameter of your basket. Then what you do is slowly push the layers away. So you will get something like concave bowl. Please be gentle or it might just pop off and you can fix it back. You will have to recoil it. So go slow and as gentle as you can push the coils and shape it into a lid.
Once you are done with this. give it a nice coat of glue mixture (2 parts glue and 1 part water). Now, I have used 3 tubes of newspaper and made a plait out of it. I made 2 such plaits and I glued this plait to the edge of the lid as well as the opening of the basket. Glue it with strong white glue and once it dries, give the entire basket a good glue mixture wash.
 Once the basket dries for 6 hours, we can start painting it. I have used acrylic colors to paint it. Did parts of brows and parts of oranges. Let it dry for 1 hours and you can varnish your project. I have used Asian Paints Aquadur varnish. I did 2 coats in intervals of 2 hours. Let it dry for 1 whole day.
Last step is adding a notch to open the lid. I added a orange crochet flower on top and used a satin ribbon to hold a bead and pearl on top of the flower and knotted the ribbon on the inside.I had a tiny hole purposefully left for this when I was coiling the lid. The bead, pearls and the satin ribbon used are from Itsybitsy while the crochet flower is knitted by my mother-in-law....xoxo..

I hope you all liked my blog post and try to make a basket one for yourself. Its fun and very useful. Till next time...Keep crafting.