Hello again
How are you all? I hope you guys are doing great. Picture frame, no matter how much we like them tend to become passe' after awhile. So why spend a lot of money on buying frames when you can make your own frames. Gather up some cardboard, get your tools and make your own frames.


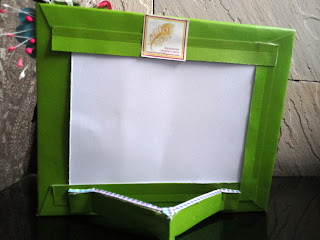
I have made cardboard photo frames which are incredibly easy and super fun. It uses very few supplies and to be honest I used a few scraps lying in my work space. The ones I made today have an added feature of changing photos, unlike other frames you need not stick the photo to your frame. We will make a slider and you can keep changing the pictures by simply sliding them inside the frames. Also this frame has a back rest, so you can recline it unlike the earlier tutorial which was for sticking your frame on walls or wardrobes.
 So let's get to work.....
Materials:


How are you all? I hope you guys are doing great. Picture frame, no matter how much we like them tend to become passe' after awhile. So why spend a lot of money on buying frames when you can make your own frames. Gather up some cardboard, get your tools and make your own frames.


I have made cardboard photo frames which are incredibly easy and super fun. It uses very few supplies and to be honest I used a few scraps lying in my work space. The ones I made today have an added feature of changing photos, unlike other frames you need not stick the photo to your frame. We will make a slider and you can keep changing the pictures by simply sliding them inside the frames. Also this frame has a back rest, so you can recline it unlike the earlier tutorial which was for sticking your frame on walls or wardrobes.

Materials:
- Mountboard/ Cardboard
- Pattern Paper
- Strong glue
- Scissors/ cutters
- Score board( optional)
- Embellishments :Mulberry flowers, leaves, Rhinestones. sequins, Satin ribbons, twines and satin threads etc
Procedure:
- Lets first measure the size of the picture you want to frame. Mine is 4. 5" x 3. 5". So, I took a mountboard which is 6" x 5".( the frame should be at least 1. 5" to 2" bigger than the picture from all sides)
- Now, draw a rectangle inside the mountboard 1 " from the edge from all sides. Once, you draw your rectangle, use cutters to cut it out. Your basic frame structure is ready.

- Take pattern paper which is slightly bigger than your frame so that you can fold it in the other side and glue it. This allows the edges to be covered as well. Make sure the glue you use is strong.

- Ok, so I took a 7 " x 6 " pattern paper and adhered on the front side of the frame. Then, I cut diagonally the pattern paper which is seen where the rectangular piece was cut. Now fold the inner part of the paper onto the frame and cut the excess. Once you do this, fold the excess paper from the edge onto the frame. Your entire frame should now be covered properly.

- Once done, make 2 cm strips from the same pattern papers which are 6 cm in length( strips should be smaller than the frame size). We need 2 strips and cut one of the strips lengthwise in half. Fold them in the middle and apply glue to one half of the strip widthwise. Glue this strip on the back of the frame in such a way that it is bordering the inside hollow space, but make sure that the glued half is placed on the outside. Repeat on 2 more sides. The strips will over lap each other at vertices. Glue the overlapping strip onto the other strip. This will give us the required section to slide our photos in the frame and change the photos when you want. Do not stick the overlapping pieces to the frame.

- For the back stand, I have used 5" by 8" cardboard piece and folded it in the middle. Then I folded 0.5" at both the ends. Covered the entire piece with paper. Then I adhered it to the frame base at the back at the lowerside at the the two folded parts such that the cardboards folds to form a V.
- That's all, embellish your frames and you are done.
- I have used various products to embellish my frames like stickers and flowers. I have even added few butterflies, mulberry flowers and leaves, pollens, sentiment stickers , rhinestones and flat back pearls .


I have made few more frames with different sizes but they all are rectangular in shape. You can also made frames in other shapes likes circular or oval or polygonal shapes.
I hope you all liked it and will make soon to display your memories. Thank you guys and see you all soon with a new project.
No comments:
Post a Comment